Replacing the flooring in a house is always a big decision — it can be expensive and there are almost endless flooring material choices. When it comes to hardwood flooring, you also have the question of what size and color of planks to buy and what wood pattern to use when installing the floor.

Things get really tricky if you only want to replace the flooring in some of the rooms at one time, or if you only want to replace a section of flooring.

Sometimes an accident, like a kitchen flood, can necessitate replacing at least part of a floor. If you can’t match the same wood flooring exactly, you might wonder if putting two different wood floors next to each other will look okay.

If you’re thinking about installing two different hardwoods next to each other, this article will help you find the techniques you need to make it look intentional.

two wood floors with concrete brick transition

Can You Put Two Different Wood Floors Next to Each Other?

The simple answer to this question is yes, but you need to do it right.

If you simply install two different sizes or stain colors of hardwood flooring next to each other, with the planks running the same direction and little or no transition, it will look terrible. The mismatch suggests that you could not afford to replace the whole floor at one time.

If you’re going to place one type of wood floor next to a different type, you need to include some special design choices to make the transition look like a real transition, not just an accident.

For example, transitions should happen in a doorway, not the middle of the room. If you can’t make this happen, it’s even more important to include elements like a border to help offset the difference in woods.

Do All the Wood Floors in a House Need to Match?

It’s definitely not a rule that all the hardwood floors in a house have to match.

While it’s beautiful when you can make it happen, sometimes it just isn’t practical. It can be a huge investment to install a whole house of hardwood at one time. And some rooms look better with different floor colors or patterns, even within the same house.

The key is that you manage the transition between wood floors nicely. The easiest solution is to keep different hardwood floors separated by a section of carpet or another flooring material. If this doesn’t work for your design, then the advice in this article can help make the transition look beautiful and intentional.

How to Transition From One Wood Floor to Another

There are a few great design techniques you can use to make the transition between two wood floors look a lot more natural. You might have to adjust them depending on whether you are installing both wood floors or if you are placing a new flooring next to an existing section. Check out the following ideas to see which might work best for you.

Keep in mind that the best solution for your space might be a combination of two or more approaches listed below.
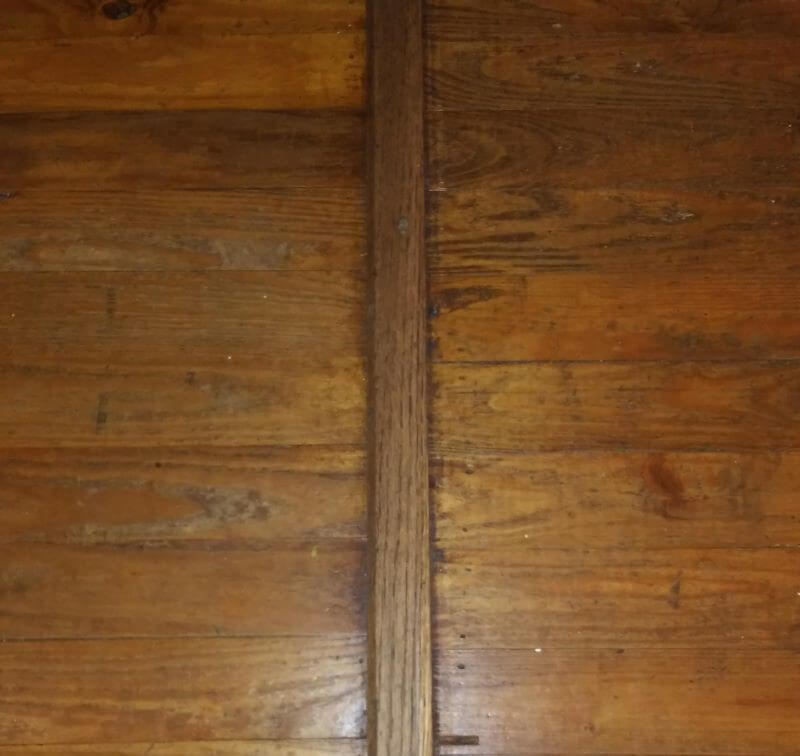
Use T-Molding

T-molding is a great tool for blending different wood floors, and it’s probably the easiest technique of all. It doesn’t always look great, but it can do the trick, especially in a natural transition like a doorway.

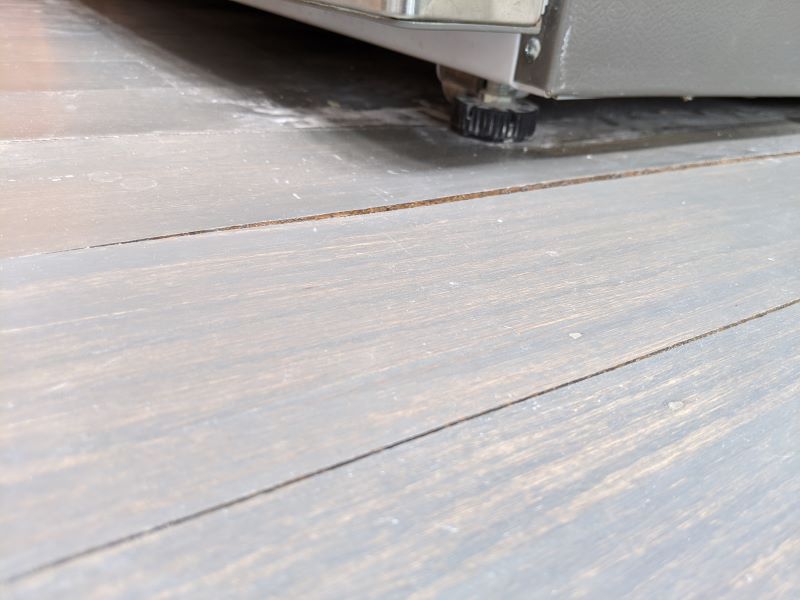
Wood floor T-moldings are shaped like a T, with the thicker stem piece attaching to the subfloor and a thin, rounded top piece designed to cover the transition between two different floors. They work best on floors of the same height but create a very gentle transition both visually and underfoot.

This is the most basic technique to separate two floors. It only requires laying the flooring with a gap of about 1 inch, cutting the T-molding to size, and attaching it to the floor.

When you buy new wood flooring, you can usually pick up matching T-molding at the same time.

Use a Seam Binder or Transition Strip

A transition strip is like using only the top of a piece of T-molding. It’s a thin, rounded piece of wood material that you can nail down across a wood flooring seam to “bind” the two areas together.

It’s one of the simplest options, but it has the potential to look tacked-on. It’s good in a pinch because it will still blend the two flooring materials more smoothly than a natural joint, but it’s not the best.

Use a Thin Metal Transition

The wooden transition pieces discussed above are classic solutions, but in recent years metal transitions have become very popular. Most metal transitions are very narrow (1/8th of an inch), but their straight lines and shiny appearance make for an attractive joint between floors.

Metal transitions give a contemporary look to a room and can also be very smooth to step on. If you want a modern look, and you are sure that your two wood floor stains will go well with the metal color, this might be a great option for you.

Like the techniques before, this one is not too hard to achieve. You only need to leave a thin gap between floors and mount the metal transition strip between them using the right adhesive.

Install a Threshold Piece

A threshold looks like a flat, rectangular block about the thickness of hardwood flooring. It doesn’t have tongues like a regular hardwood plank and it may come in other materials such as stone or marble. They are usually several inches wide.

A threshold is designed to be placed in a doorway between two different types of flooring. It can be quite an attractive option because of its larger surface. If you choose a threshold made of a nice wood or stone, it can really shine.

Plus, it’s easy to install. Simply order a precut length that is nearest to your transition area, cut it to size if necessary, and install the threshold in between your two flooring materials.

Transition Between Floors of Different Heights

Sometimes you will end up with floors of different thickness, or built on different levels. There are a few solutions you can choose, depending on how high the difference is.

A difference of less than an inch may be solved with transition pieces that are kind of similar to T-molding discussed above. You may need molding with a square nose or an angled nose, instead. These wood detail pieces can bridge the transition nicely.

If the difference in floor height is several inches or more, then you want to start looking into options that would be used on a staircase. There are stair nose pieces that create a rounded edge on the higher floor, which is laid over a piece of wood flooring standing vertically against the face of the step. You can apply staircase flooring principles to many steps of offset floor height to create a beautiful and smooth transition.

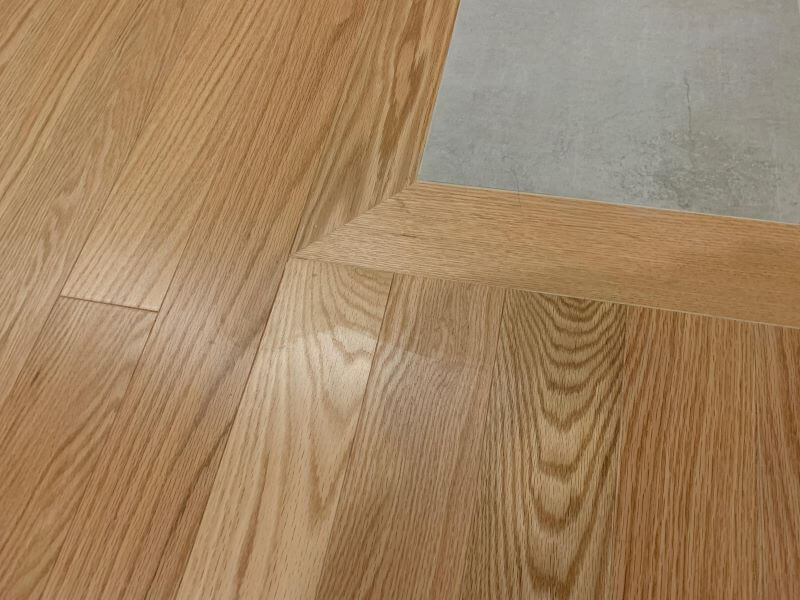
Lay One Floor With a Border

One way to create an intentional-looking transition between floors without buying any special pieces is to lay one floor with a border. This can actually come out looking great in a room.

Simply lay a square of hardwood one or two planks wide (no wider) around the outside of one wood floor area. Then you can lay the flooring inside that square and it will appear more offset from the other flooring.

This technique depends on a nice smooth edge on both floors since you will jamb the flooring materials right up against one another. If you are putting a new wood floor next to an old one that had its rough edges hidden under a transition piece, you may need to cut the old floor off by about 1 inch to create a new, clean edge to receive the border of the new floor.

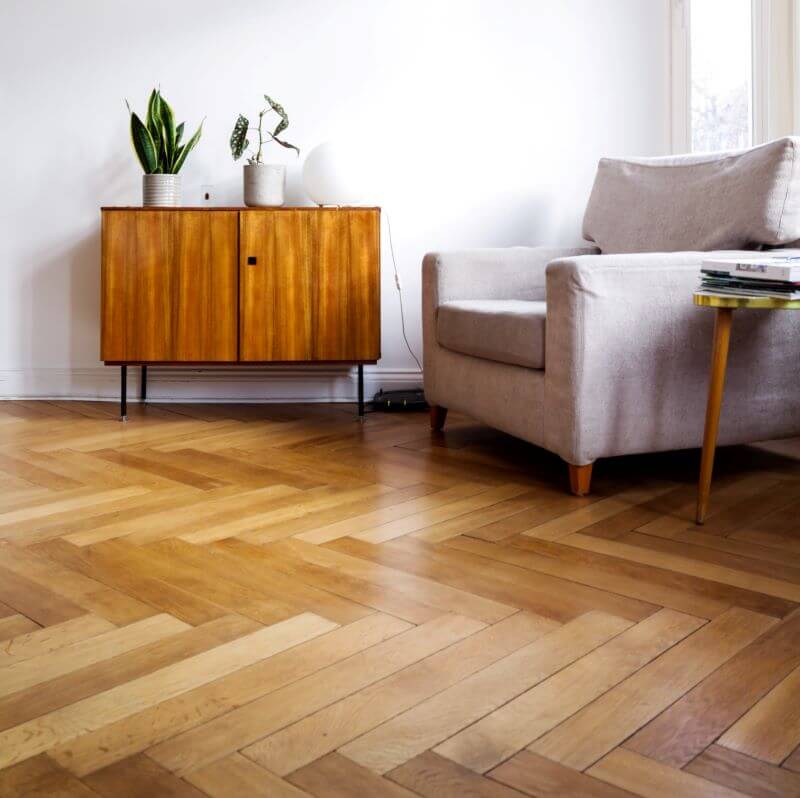
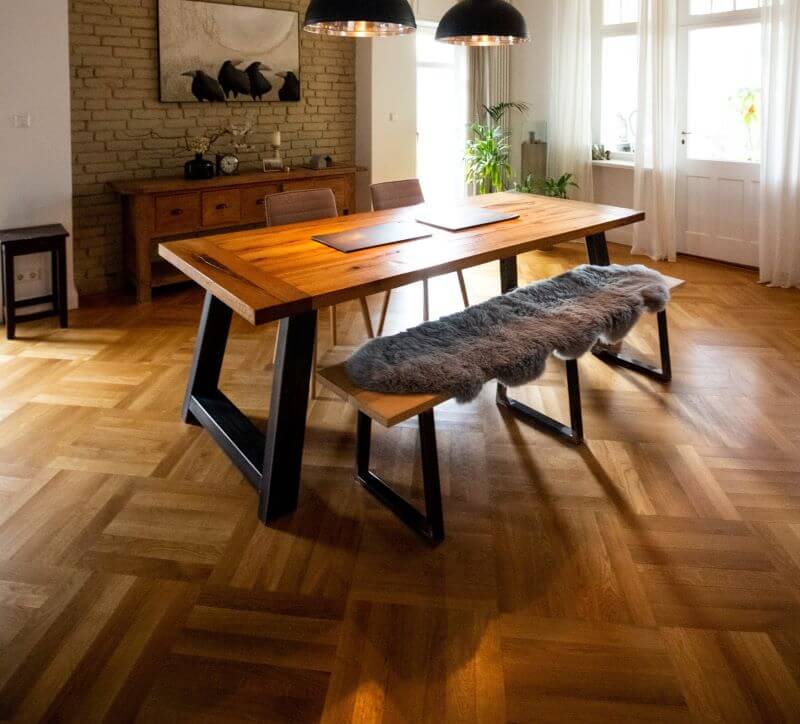
Lay the Two Floors in Different Patterns

If your first floor is installed with a typical vertical or horizontal layout (parallel to one of the walls in the room), you can set the second floor off by installing it with a very different pattern.

Some hardwood floor layout options include herringbone, diagonal, or parquet. Each of these will look like a completely different flooring material, even though they are really just layout techniques.

two wood floors transition

It’s usually best to combine this approach with the border technique mentioned above.

If you think this might work for your space, check out our article on choosing a hardwood floor pattern.

Tips for Transitioning Between Two Hardwood Floors

In addition to the more detailed techniques we’ve covered, you should keep the following tips in mind to make sure your wood floor transition comes out looking like you planned it.

Choose Contrasting Colors

There may be some exceptions to this rule, but you will usually have the best-finished product if you keep adjacent wood floors at a high level of color contrast. This means that you shouldn’t have two light-colored floors next to each other, but rather you should choose a dark, complementary color for the second flooring material.

Colors that are too close together can suggest that you couldn’t afford to match all the flooring or put it in at the same time, or can even just look like a mistake.

If you can, it’s better to pick two materials that aren’t so similar. If you really want the floors to match, you can get a flooring professional to try and match the original wood and stain for you.

Think About the Room Size

You should always think about the qualities of your rooms before you choose flooring. If you have a smaller room and you place very dark flooring in it (or if you paint the walls a very dark color), it can make it feel smaller and more closed-in. On the other hand, lighter wood floors can brighten up a small room and make it feel bigger. In big rooms, this effect isn’t so dramatic, so you can get away with more colors.

Is your room big or small? How much natural light is in it? Could you choose a certain color or type of wood to enhance the room? Think about these questions when you choose to transition between floors.

Consider Other Flooring Types

If you’ve thought about these methods and tips and none of them seem right for your room, maybe it’s time to think about other flooring types, such as tile or vinyl. You can apply some of the same principles to create a transition, but you might not have to worry about contrast or layout as much.

It can be a tricky balance to install two wood floors next to each other and make them work naturally. If another material is right for your space, go for it!

They are two varieties of flooring that can provide your home with the natural appeal, charm, and sophistication of solid hardwood at a fraction of the cost. However, they couldn’t be more different.

Engineered hardwood comes with an upper layer that is actually made of real hardwood and can thus provide an added touch of authenticity, as well as an enhanced degree of stability compared to solid hardwood.

Vinyl plank floors happen to be a subcategory of vinyl flooring which has been designed to resemble real wood as closely as possible and is even manufactured in the form of planks that can be clicked together. Also referred to as luxury vinyl flooring, it is considered to be more prestigious than laminate flooring and is several times thicker than standard vinyl flooring.

Which option should you choose? To find out the right answer, both floor types have been examined in detail with comparisons drawn up between them using key qualities that should be taken into consideration during the process of selecting a flooring surface. Examining them according to your preferences will enable you to make the best choice for your dream home.

Engineered HardwoodVinyl Plank
LifespanWill last between 30 – 50 yearsWill last between 5 – 25 years
Cleaning and maintenanceRequires special products and itemsEasier to clean and maintain
Water resistanceWater-resistant but not waterproofIs waterproof
Susceptibility to sunlightWill fade with continued exposure over timeWill fade with continued exposure over time
CostMore expensiveRelatively cheaper
Ease of installationSlightly complexEasy
Refinishing optionsCan be sanded and refinishedCannot be sanded or refinished
VarietyA wide range of colors, species, stains, and finishes are availableAn extensive range of colors and styles is available
Suitable for petsYes (high Janka rating, distressed finish recommended)Yes
Overall valueMay raise the value of your home significantlyMay not raise the value of your home significantly

Durability

This quality is one of the most important you will need to take into consideration when selecting a flooring option for your home. This is because selecting a durable surface can save you the extra cost and effort involved in shopping for new flooring and having to install it all over again.

Engineered hardwood

Engineered hardwood is pretty durable and also comes with added stability owing to its multilayered core. High-quality varieties can last for up to 50 years. However, because it is made from wood which is a porous material, it is by no means waterproof.

It is also susceptible to scratching and unlike solid hardwood cannot be refinished several times to get rid of extensive damage (high-quality products are the exception in this case).

Vinyl plank flooring

Vinyl plank flooring is also considered to be one of the more durable flooring options available however it does not last as long as engineered hardwood flooring since its lifespan does not exceed 25 years.

Yet, one of its key advantages over the former is its resistance to wear and tear and to scratching in particular; these qualities make it especially child or pet-friendly.

Another is its water resistance. Newer models which are made from polymers are fully waterproof making them ideal for mudrooms, kitchens, and bathrooms.

Verdict

In terms of longevity, engineered hardwood wins overall, yet in terms of water and scratch resistance and all the daily concerns they entail, vinyl plank flooring is the preferable option.

Cleaning And Maintenance

Different types of flooring surfaces have different types of cleaning and maintenance requirements. Some can be cleaned using general cleaning materials and do not require any special kind of maintenance. Others can only be cleaned using approved materials and their maintenance may involve considerable expense. 

Engineered Hardwood

The refined beauty engineered hardwood floors can provide requires special care to be maintained. Reaching for any available brush or broom and using a very wet mop or even a steam cleaner might simply ruin your floors with scratches from hard bristles or from buckling, crowning, or cupping due to water damage.

To clean your engineered hardwood floors effectively, you will need to ensure you use manufacturer-approved products and avoid harsh cleaning solutions which may also cause damage to the finish. You will also need to endeavor to use soft-bristled brushes and brooms when sweeping to avoid scratching the surface.

This surface is also susceptible to blemishes. Depending on their severity and number it may be possible to repair scratches on engineered hardwood floors with a clear coat or colored markers, wax pencils, or filler and a stain.

Alternatively, you may need to refinish the entire surface. However, unlike solid hardwood floors which can be refinished several times, it may only be possible to refinish your engineered hardwood surface once. The only exceptions are products that have a veneer layer of over 3mm.

Vinyl Plank Flooring

Despite vinyl plank flooring’s impressive resistance to moisture and scratching, you should still aim to use soft-bristled brushes when sweeping and should clean it with a microfiber mop which must be squeezed properly to eliminate as much moisture from it as possible during the process.

You will also need to ensure you avoid harsh cleaning products such as ammonia, bleach, or high pH detergents (mild dish soap is best) and avoid steam cleaning it as well.

The use of wax on surfaces in this category must also be avoided since doing so may cause buildup rather than providing them with an alluring sheen.

Vinyl plank flooring cannot be refinished and you will need to replace the damaged part of the floor using extra planks from the batch you have purchased.

Verdict

Both surfaces require the use of soft-bristled brushes and microfiber mops during cleaning. Neither take kindly to harsh cleaning products and require approved solutions or mild soap. However, vinyl plank floors are generally low maintenance compared to engineered hardwood floors.

Ease Of Installation

Flooring which is easy to install can enable you to save on cost and even time. Several homeowners now prefer to install their flooring themselves rather than relying on professional assistance. However, depending on the level of skill required, hiring the services of a contractor may be the more prudent and cost-effective option in the long run.

Engineered Hardwood

In terms of hardwood floors, engineered hardwood is considered to be an easier option compared to solid hardwood. Homeowners who are rather savvy with home renovation projects will be likely to find the floating installation or the nail-down installation methods easier than the glue-down method. The third option is to install engineered hardwood flooring over a concrete slab.

Vinyl Plank Flooring

Flooring surfaces in this category are even easier to install compared to engineered hardwood floors and are considered one of the most convenient in this regard.

The procedure may either involve locking them together if they have a tongue and groove design or gluing them down if they happen to be of the peel and glue variety, and do not require the services of a professional.

Verdict

If you prefer to save on time and avoid complexity, vinyl plank flooring will be preferable to engineered hardwood since you will be able to install it yourself. The simplicity of the process means that you will be able to complete it promptly compared to the latter option. It also means you will be able to spend less money since you would not need to hire a contractor.

Susceptibility To Sunlight

Sunlight can add a touch of natural magic to our surroundings bathing them in the warmth and glow of summer or spring. 

And yet it can also fade organic and non-organic materials. As a result, the susceptibility of your flooring of choice to damage from the sun’s rays is also another factor that you will need to take into consideration as well as protective measures you may need to take to preserve its charm for as long as possible.

Engineered Hardwood

Wood is sensitive to sunlight and will fade over time as a result of continued exposure to it. This is mostly due to its ultraviolet rays although infrared and visible light also plays a role. The change to your hardwood floors will depend on the nature of the wood used and certain species will lighten as a result of exposure while others will darken.

For example, cherry will darken rather quickly to a reddish color and jarrah will also develop a more intense color over time. On the other hand, walnut and hickory will lighten after a while. 

Vinyl Plank Flooring

Despite its impressive resistance to factors such as scratching and moisture, vinyl plank flooring is also susceptible to fading as a result of prolonged exposure to sunlight. As a result, you may need to rely on tinted windows or the use of window treatments to protect it.

Verdict

Both engineered hardwood and vinyl plank flooring are susceptible to damage from sunlight over time. It is worth noting that it is possible to find engineered hardwood that comes with UV protection in its finish or certain varieties of vinyl plank flooring which have been manufactured with wear layers that have UV protection.

Alternatively, you may also need to use window films to filter out UV light or rely on low-e coated glass.

Cost

Quite often when embarking on a reflooring project, a tradeoff will have to be made between your set budget and your preferences. Factors worth considering will not only include the cost of the flooring but also the cost of installation.

Engineered Hardwood

Surfaces in this category are generally considered to be cheaper compared to solid hardwood and often cost $4 – $10 per square foot. However, depending on the installation method you are choosing, you may also have to consider the cost of hiring a professional which may cost you between $3 – $8 per square foot.

Vinyl Plank Flooring

Luxury vinyl plank costs even less than engineered hardwood with prices ranging between $2.50 – $5 per square foot. Installation is pretty cheap compared to engineered hardwood and ranges between $1 – $3 per square foot. However as noted above, this is one of the easier flooring options to install and you may be able to cut costs even further if you install it yourself.

Verdict   

If you intend to enjoy the aesthetic appeal of one of the more expensive flooring surfaces for a fraction of the cost, vinyl plank flooring may be the preferable option given that it is considerably cheaper compared to engineered hardwood.

Variety

Availability of a wide selection of options increases the likelihood of you being able to obtain the style and color of flooring which perfectly suits your preferred esthetic for your home. Certain types of surfaces can be especially versatile in this regard.

Engineered Hardwood

If you select this option, you will find that you will have an extensive selection to choose from. Regardless of your preferred species, grain, finish, and grade, you will be able to find just what you need.

Vinyl Plank Flooring

Because luxury vinyl plank flooring is printed, the variety on offer is practically limitless. As a result, you will be able to have access to an even greater selection of colors and styles.

Verdict

While vinyl plank flooring offers a truly impressive range of options, engineered hardwood can provide you with all the choices you need to imbue your home with the natural appeal of real wood.

Which Is Better: Engineered Hardwood vs Vinyl Plank Flooring

If you are interested in obtaining the authenticity of hardwood which comes with enhanced moisture resistance and stability at a lower price than solid hardwood, then engineered hardwood will be an excellent choice. The fact that it is also sustainable and will add to the value of your home are added benefits for selecting this flooring option.

However, if you prefer a more child-friendly surface that is low maintenance, has an enhanced resistance to moisture and scratching, and can also be very budget-friendly, you may prefer vinyl plank flooring.

Fleas happen to be some of the most prolific pests which can detract from your quality of life. This article covers the most effective methods which can be used to eliminate them so you can enjoy a home that is free of these insects. 

We also discuss methods that must be avoided when you need to get rid of fleas on hardwood floors to enable you to come away with a knowledge of what works best so you can save time and possibly money during the extermination process and possibly afterward.

Can Fleas Live on Hardwood Floors?

Yes, they can. These parasites normally make it into your home by hitching a ride on one or more of your pets. Once in, they tend to hide in soft furnishings such as rugs and carpets and can also snuggle into cracks and splits in your hardwood floors. 

Old floors are particularly conducive for fleas. While concealed thus, they will rely on dust and debris for sustenance while they also multiply their numbers by laying eggs. Their droppings will also provide food for their larvae once they hatch.

How to Identify If Your Hardwood Floors Have Fleas?

Excessive scratching: Does your pet sit around and scratch actively behind its ears and other parts of its body where it never used to do so before? The culprit might be fleas whose bites cause itching due to their saliva.

To be certain you will need to inspect your pet’s fur for the presence of insects that have:

  • A small wingless torso under 3mm in length
  • Six long legs
  • Reddish-brown coloring

Redness on the skin: Does your pet have redness around its ears, belly, or hindquarters? These spots are a flea’s favorite area to latch onto your pet and take a bite.

Flea dirt: Do your pet’s fur and bedding have any telltale dark spots? Do they turn reddish-brown when dropped in water?  These dark specks are actually flea dirt, or more appropriately, flea droppings. 

Why are they red? Due to the blood from your pet some of which also makes it into their droppings.

How to Get Rid of Fleas on Hardwood Floor?

There are different remedies for dealing with flea infestation. However, for them to work effectively, you will need to prepare the room to be treated first of all.

1. Preparing Your Room

You will need to empty it of all furniture and soft furnishings.

You will then need to vacuum it thoroughly, paying special attention to the gaps between the planks and the walls.

Vacuuming itself can eliminate a great number of fleas at all stages of their life cycle: eggs, larvae, pupae, and adults.

Once you are through you will need to seal the debris and dispose of it outside your home.

You will then be able to apply any of the remedies listed below.

2. Applying Your Remedy of Choice

The following options for getting rid of fleas on hardwood floors are some of the most widely available and effective. They are also easy to apply and clear up afterward as can be seen from the procedures for applying them which have also been provided.

Borax

This versatile chemical which is used in the manufacture of detergents and insecticides has a desiccating effect on fleas.

However, it is worth noting that it is slightly toxic and as a result is unsuitable for the following:

  • Use around expectant mothers and small children.
  • Use around pets, especially cats (because it may cause pulmonary issues for them).
  • Ingestion under any circumstances (and as a result must not be applied around food).
  • Use around plants.
  • Use in damp carpets (due to the discoloration it may cause).

Its slight toxicity means you will need to ensure the room in which you apply it is adequately ventilated. 

You will also need to make use of protective clothing and gloves when applying it, taking special care to ensure it gets into crevices.

You will need to leave it for a minimum of six hours and a maximum of 48 hours to eliminate the pests. (You will also need to close all windows and openings in the room while you wait for the treatment to take effect. Doing so will prevent it from spreading about.)

Following this period, you will need to vacuum it thoroughly and take special care to remove the residue of the chemical in cracks and gaps in your floor and even beneath planks as well.

Diatomaceous Earth

Natural, easy to apply, and safe for use in your home, diatomaceous earth works by lacerating the cuticles of adult fleas and absorbing the moisture from their bodies.  

You will need to ensure you obtain the food-grade variety from the store and not the filter variety.

You will need to wear a face mask when applying it and ensure you sprinkle it generously.

Diatomaceous earth can also be sprinkled on rugs and carpets.

You will have to leave it for about 72 hours during which it will kill fleas and their larvae on your hardwood floors. Following this period, you will need to sweep or brush the diatomaceous earth or vacuum it using a shop vac or a filterless vacuum. Alternatively, you will be able to use a standard vacuum cleaner as long as you clear out the filter frequently — you will need to check it several times during an hour.

What about flea eggs and pupae? Does diatomaceous earth harm them? No, it does not. So, you may need to repeat the procedure of vacuuming and sprinkling the chalky white substance after a period of 72 hours, repeating it if necessary, to ensure you can eliminate any newly hatched larvae or newly emerged adults.

Baking Soda and Salt

Like diatomaceous earth, baking soda and salt are highly effective natural options when you have to kill fleas on hardwood floors.

It is also worth noting that salt is capable of eliminating adult insects and is also capable of killing their eggs as well.

All you will need to do is test the quality of the batch of baking soda you intend to use by sprinkling some of it in some vinegar. If it fizzes then you can be certain it is still active and will be efficient in eliminating the pests.

You will then be able to proceed to mix it with finely ground salt and sprinkle it all over the floor following which you will need to use a brush to ensure you spread it efficiently.

Next, it will have to be left for a period of about 48 hours following which you will need to vacuum it and dispose of the bags outside your home.

It is worth noting that this mixture can also be used on rugs and carpets, but not on your pets due to the irritation it may cause.

3. Mopping the Floor With Pine Sol

Why Pine Sol? Because it contains eucalyptus oil which kills fleas. Using disposable microfiber mops is highly recommended in this instance.

You will need to create a solution using one gallon of water and a quart of the cleaning fluid.

You will then need to proceed to clean the floor thoroughly, taking care to use a minimal amount of moisture to get rid of the flea-killing product you have used.

Doing so will enable you to kill any fleas which incidentally escaped your choice of borax, diatomaceous earth, or baking soda and salt, not to mention the second round of vacuuming.

4. Additional Steps

Cleaning an infested room is merely a single step out of several which need to be taken to get rid of fleas. You will also need to do the following:

  • Treat your pets using veterinary-approved products.
  • Wash household linen and clothing (including your pets’) with hot water.
  • Thoroughly clean furniture and window sills with Pine Sol or any other suitable product.
  • Wash your rugs and carpets with hot water where possible.

Alternatively, treat them with any suitable remedies which have either been specified above (such as diatomaceous earth or baking soda and salt) or happen to be others that have been proven to be effective against fleas.

Alternatives You’ve Always Wanted to Find Out About

While several remedies, homemade or store-bought will work on your hardwood floors, there are other flea exterminating solutions that are probably best kept away from them. 

To be able to assist you with those you need to avoid, we have taken a look at some more popular flea terminating options and the questions which revolve around them with regards to killing fleas in hardwood floors.

1. Will Flea Bombs Work?

Although this option is rather effective, it does also come with some drawbacks. The first of these is the fact that a flea bomb will only cover a limited area.

The second is the fact that fleas are pretty impressive jumpers and will be able to execute a prompt leap to a safer spot in the event of a flea bomb exploding in their vicinity.

2. Will Bleach Kill Fleas on Hardwood Floors?

Although this alkaline substance does kill fleas, bleach will damage your hardwood floors. Since several other suitable and equally effective alternatives exist, it is far better to select them rather than risk additional cost owing to damaged floors.

3. How Efficient Are Essential Oils?

While fleas are known to dislike certain essential oils, the fact is that several of them merely dissuade them from taking up residence in the area rather than killing them. As a result, fleas might stage a comeback depending on the kind you use.

4. Will Mopping With Vinegar Kill Fleas?

No mopping with vinegar will not kill fleas.

This is because its acid is generally too weak to cause any significant degree of damage to adult insects or their eggs.

However, it is widely considered to be an efficient flea repellent and is relied on by some pet owners to repel the parasites from their canine or feline charges.

There is also the fact that vinegar can be harmful to hardwood floors since it can erode their finish, stripping them of their luster and appeal as a result.

Hence using tried and tested options mentioned in the third section for killing fleas is highly preferable if you want to get rid of any of them in your home.

It’s the perfect shade of red to go with your very favorite outfit. But while you’re applying it, the phone rings. It’s only your friends confirming your presence at the party tonight. You return to finish your nails, only to find that Timothy, your Bengal, has tilted the container over on your brand new pale gray floor and is now staring at his handiwork in fascination.

How can you restore your floor to its original unblemished pearly allure in time to make it to your best friend’s birthday bash?

Find out how to remove nail polish from your hardwood flooring from our pointers provided below.

nail polish on hardwood floors

How to Remove Nail Polish From Your Hardwood Flooring

The last thing you want is your favorite brand and shade of nail polish on your floor. Especially since any mishaps on hardwood floors can’t simply be banished with harsh soaps or solvents and a stiff-bristled brush.

Reacting as fast as possible is key here, especially given the porous nature of wood.

But even though it seems like the next natural thing to do, don’t go reaching for your nail polish remover just yet.

There are a number of remedies that can ensure you will be able to get rid of the offending stain and restore the smooth appeal of your floor as shown right here.

1. White Sugar

To remove the stain while it is still wet and without risking the finish of your hardwood floor, sprinkle a generous amount of sugar on the still wet nail polish, ensuring you cover it completely. The crystals will absorb the polish and all you will have to do is wait for it to dry.

Once the polish has dried, you will simply be able to brush up the colored, clumped sugar with a brush or broom.

But what if you weren’t lucky enough to spot the mishap on time and the nail polish has dried up or there are still tell-tale stains even after you’ve taken this first step? The following solutions will come in handy.

2. Mineral Spirits

A more refined version of paint thinner, mineral spirits can be an excellent remedy for tackling dried nail polish or any lingering residue following an application of white sugar.

Before you use it, however, you will need to dab your floor in a corner to check for any unusual discoloration.

If you are able to proceed, you will need to apply a small amount to a cotton bud, a rolled wad of cotton, or a clean cloth and rub the stain gently following the grain of the wood.

It is important to apply only slight pressure when cleaning the stain. Any vigorous scrubbing could damage your floor’s finish resulting in yet another quandary.

3. Rubbing Alcohol

It’s best known as a household disinfectant and is pretty versatile for solving knotty little problems in the home. Hence it’s no surprise that rubbing alcohol is also ideal for cleaning dried-up nail polish as well.

There is also the fact that it is a more suitable option compared to nail polish remover.

The application process is pretty similar to that of mineral spirits.

You will need some cotton wool, a clean cloth, or even a cotton bud and will also have to apply the rubbing alcohol to your material of choice before rubbing at the stain taking special care to avoid unstained parts of your floor.

If the stain happens to be particularly persistent, a slightly different approach may be required: you may need to soak cotton wool in the solvent before placing it over the stains on the floor and then wiping it gently afterward.

You will also need to avoid any vigorous rubbing since doing so could also damage the finish.

4. Hairspray

This blend of polymers, propellants, and fragrance which is meant to provide your hair with both sheen and structure, can also function as a surprising remedy for getting rid of any tell-tale lingering nail polish stains.

All you will have to do is simply spray it once you have already cleaned the floor, let it sit for half a minute and then wipe it off with a clean cloth.

You may need to repeat the procedure if the stains happen to be particularly persistent.

Once you have gotten rid of the stains, you will also need to use a manufacturer-approved cleaning product to completely remove the hair spray from your floor.

Should You Use Nail Polish Remover?

Ideally, you should not. This is because most nail polish removers contain acetone, a solvent that may not only cause damage to the finish of your hardwood floors but also alter their color as well.

It is worth noting that while it also consists of additional chemicals other than acetone, nail polish remover is considered capable of damaging your floors to the same extent as pure acetone.

However, certain experts may recommend the use of the chemical itself.

That said, they advise applying the acetone in a corner or location where any such changes in coloration are likely to be unnoticed.

They also advise lightly touching the stained surface with the fabric to which the acetone has been applied and cleaning up the spot afterward to remove any lingering traces of the solvent.

Other experts recommend using varieties of nail polish remover which do not continue any acetone.

However, it is best to contact your manufacturer to ensure you make the right decision.

So, what should you do if the spill is extensive and has somehow gotten all over your floor, tempting you to unscrew a bottle of acetone-based nail polish remover?

Seeking out the services of a flooring professional might be the best solution.

They would not only be in the best position to get rid of the stains but also be able to restore your hardwood floor to a state of uniform perfection.

Two weeks after you have moved into your dream home, you pop out to do some shopping. On your return, you find Cookie and Fudge, your two Labradors, lapping at a pool of water on the pale golden wooden floor of your dining room.

What should you do to clear up the spilled water on the wood floor and minimize water damage to your hardwood floors? What issues are likely to arise as a result of the incident?

In this post, we examine the answers to these questions in detail to enable you to handle such an occurrence effectively and as a result, minimize the risk of further damage to your floor.

What To Do If You Spill Water on Hardwood Floor?

When any spill occurs, you will need to act as quickly as possible. Taking prompt action can enable you to forestall the possibility of your floors sustaining any serious damage, and possibly prevent any reduction to the value of your home, and even damage to your property as well. 

The following steps will enable you to get rid of as much moisture in the shortest possible time and greatly reduce the risk of any of the above issues occurring.

1. Identify the Source of the Spill

The first thing you need to do is determine the source of the water (once you’ve gotten your pets out of the room to prevent them from spreading even more water all over your home). You would need to find out whether it is due to a leak, a burst pipe, or simply the result of your pets turning over their water bowls.

This step is of paramount importance since attempting to mop up the water without being able to stop it from its source will defeat the purpose of getting rid of it.

2. Remove Any Furniture and Furnishings

Once you have cut off the flow of water, you will need to remove any mats, rugs, or carpets in the area. You will also need to remove any furniture as well. The furniture and the furnishings will have to be placed in an appropriately safe place.

Doing so will enable you to assess the full extent of the spill, and also ensure you can prevent any furniture or soft furnishings which have not been drenched from getting soaked.

Taking this precaution will also enable you to prevent any soaked items from constituting an additional risk to your wooden floor.

3. Mop Up the Water

This task is best handled using absorbent clothes such as old towels to be able to get rid of the excess water as promptly as you can. If you have to deal with a significant amount of water, you will need to make use of a wet vac. You will also need to use it even if you are dealing with a spill that has been mopped up with towels to ensure you can target any moisture which has seeped between each plank.

4. Get Rid of Any Residue

Depending on the source of the spilled water on your wood floor, you may have to deal with lingering silt or mud. This residue will need to be cleaned up thoroughly as well to not only restore the surface to its pristine state but to also reduce any possible risk of staining.

5. Disinfect the Surface

Getting rid of any water spilled on your hardwood floor is only one part of the task of minimizing damage to it. Another risk that occurs due to the spill is that of mold that prefers moist, warm, organic surfaces. This fungus can cause damage to your floors, furniture, and soft furnishings and most importantly can negatively affect your health.

You will need the following:

  • Gloves
  • Mask
  • Absorbent cloths
  • Cleaning cloths
  • Spray bottle
  • Disinfectant (store-bought or homemade — a solution made from 1 cup of water and ¼ cup vinegar.)

You will need to ensure the entire room is ventilated properly and spray the disinfectant on the part of the floor affected by the spill. You will also need to clean the surface thoroughly with it and clean it up with absorbent cloths at once.

Following this procedure, you should make use of the wet vac to eliminate any excess moisture your floor has been exposed to as a result of this step.

If you have any questions, we have a detailed guide for disinfecting your hardwood floors here.

6. Switch on Your Dehumidifier

Dehumidifiers are excellent at eliminating any excess moisture from the air and in this instance, they will dry it out and also dry out your floor as well.

Air conditioners are also capable of functioning as dehumidifiers to some extent and should be switched on as well as any fans in the room.

To eliminate as much moisture as possible, you will need to run these appliances for an extensive period (between 24 to 72 hours).

As is required during the disinfecting process, you will also need to leave the windows open during this step (unless there happens to be a downpour).

7. Assess the Extent of the Water Damage

Despite your efforts, and depending on the circumstances of the spill, there will be the possibility of lingering moisture in your wood floor. As a result, you will need to use a moisture meter to regularly check for the presence of any excess moisture during the weeks following the spill.

Issues Which May Arise Due to Neglecting Water Spilled on Wood Floor

Due to the organic nature of wood and its tendency to absorb water, spills should be taken seriously.

Merely mopping up the pooled water and moving furniture aside to dab up any in concealed areas will not be sufficient in the event of a spill. Failure to implement the above steps may result in the following issues:

1. Cupping

Exposure to water may result in an imbalance in moisture levels in the planks of your wood floor with higher levels being present at their bases. This could result in their sides expanding so that they are raised higher than their centers giving them a convex shape — an occurrence known as cupping. Learn how to fix cupping in hardwood floors in our detailed article.

Cupping in hardwood floors

2. Buckling

If the spill happens to be especially large and is not handled immediately in an effective manner, the exposure to the excess moisture may result in the planks actually lifting from the floor resulting in an uneven surface. This occurrence is referred to as buckling. It may be resolved by removing the affected planks, thoroughly drying the underlying surface, and adding new replacement planks. For more details, check out our article on how to fix buckling in hardwood floors.

buckled hardwood floors

3. Mold Damage

Mold tends to thrive in the presence of moisture and organic material, hence an unattended spill could provide it with the ideal opportunity to spread in your home. The fungus also tends to propagate promptly as well.

The presence of unattended moisture in your floors could attract spores which will begin to reproduce while feeding on the wood. They could also spread to other sources of organic material such as paintings, furniture, drapes, and upholstery and damage them as well.

The presence of mold in your home could irritate the eyes, noses, and throats of residents. It could also trigger allergic reactions and even result in more grievous issues such as serious damage to the lungs.

We recommend going through our article on removing mold on hardwood floors.

What to Do In Case of Major Water Damage to Your Hardwood Floor?

In addition to buckling or cupping, another sign which is likely to alert you to the presence of water damage is the appearance of stains on the affected parts of the hardwood floor.

This discoloration may be caused by nails becoming rusted, the presence of mold, or the reaction of the tannins contained in the wood to the presence of water.  

The following steps will need to be taken depending on the extent and the nature of the damage to restore your floors to normal:

1. Drying

Occasionally, cupped hardwood floors may flatten over time as they dry out. However, this may take up to half a month or even longer. The use of dehumidifiers and special fans can help to shorten this process. 

2. Removing Damaged Planks

In the event of permanent damage to part of your floor, you will need to remove the affected planks. 

It is worth noting that you will also need to remove adjacent planks to those damaged by mold or stains.

This is due to the fact they may very often be affected as well even though it may not be immediately visible.

3. Checking the Subfloor

You will also need to check the subfloor and the underlying concrete to ensure they are both free of mold and moisture. If this is not the case, you will need to remove the subfloor and dry out the concrete. You will also need to replace the subfloor and install a moisture barrier following which you will be able to add the new planks which should ideally be from the same batch as those already used for your floor.

4. Sanding and Refinishing

This procedure is often carried out to correct cupping in flooring. However, special care must be taken to ensure the planks are dried out properly, failing which crowning may occur.

This procedure may also be an option when replacing part of the wood floor with new planks to provide the entire surface with a uniform appearance.

Figuring out how to remove haze from a hardwood floor can be frustrating. You might have applied various methods to return your wood floors to their former beauty.

Yet, each attempt seems more disappointing than the last one. You might be wondering if your hardwood floors are actually getting hazier despite your efforts or if it’s your imagination. Relax. You’re not losing it. Honest.

In this article, we’ll discuss the causes as well as what to do about the cloudy film on your hardwood floors.

haze on newly installed wood floors

Why Do Your Hardwood Floors Look Cloudy(Hazy)?

Knowing the cause of haze on your hardwood floor is half the battle won. So, let’s take a look at what the trouble could be:

1) Trapped Moisture

If you’ve noticed cloudiness after refinishing your wood floor, the likely cause is insufficient drying time between coats of varnish. To remove the white haze from your hardwood floor, first, try doing nothing. It might be possible for the moisture to leave on its own in a couple of days.

2) Wax Build-up

Very few hardwood floors are finished with a penetrating seal anymore, but if your floors are sealed with wax, occasional waxing is called for. Frequent waxing is not.

Also, today, most hardwood floors are coated with a polyurethane finish. The coating doesn’t need to be waxed at all. Putting wax over a polyurethane finish will invariably leave a film on your hardwood floor.

Learn: How To Remove Wax Buildup From Wood Floors

white cloudy film on wood floors

3) Inappropriate Cleaning Solution

There are more floor cleaning solutions available on the market than ever. But not all floor cleaning solutions are good. Not all are intended for all hardwood floor finishes. It isn’t always easy to navigate a clear path to the solution that’s best for your hardwood floor. Cleaning a urethane-coated floor with a solution not intended for such can cause trouble. So be sure to read labels.

4) Inappropriate Application Of Cleaning Solution

Applying too much cleaning solution can result in hardwood floors that have an uneven, white, cloudy film over them. Here again, strong emphasis is placed on the importance of labels. Follow application and/or dilution instructions to the letter. More isn’t necessarily better. A stronger solution isn’t necessarily better either. “More” and “stronger” aren’t always as easy to remove.

5) Infrequent Change Of Cleaning Pad

To do its job effectively, a cleaning pad must be clean. Frequent rinsing and wringing will keep the pad clean, but the less you need to touch a dirty mop pad, the better. With plenty of clean mop pads on hand, there’s less chance of dragging dirt and germs across all the hardwood floors in your house. There’s also less handling of dirty pads.

Because most mop pads are machine washable, you can simply toss the used and dirty pads into the washing machine when you’re done cleaning your hardwood floors. Frequent changing of mop pads is better than frequent rinsing of the same mop pad. Better for your floors and better for you and your family.

6) Tap Water, Rain, And Snow

If it comes from nature, it’s good. Right? Mmmm… not necessarily. Your hardwood floors also come from nature. Trees need water to grow, of course. But your floors’ polyurethane coating doesn’t and hopefully, your floors have stopped growing. Your hardwood floors and the polyurethane that coats them should have limited contact with water.

This should especially be the case with hard water. Hard water, rain, and snow can do to the surface of a floor what they can do to a shower door. They leave an ugly white film that’s made from hard water deposits. Use water to damp mop only. Then use a flip-style mop and the chenille side of the mop pad to wipe the surface completely dry. Keep plenty of extra mop pads on hand.

If hard water constantly reminds you of its presence, use a neutral pH solution to clean your floors.

Snow is particularly loaded with salt. This makes long winters even longer for hardwood floors where entry mats have inadequate bristles and poor absorption.

Popular Remedies For Getting Rid of Haze on Hardwood Floors

Here are a few of them:

1) Olive Oil Mayonnaise For Floor Blushing

Blushing is the term used when moisture is trapped between or under the layers of a hardwood floor’s finish. The popular remedy for this involves spreading olive oil mayonnaise over the cloudy areas of the floor.

This might seem a little whacky until you think about the science involved:

Because oil is heavier than water and the two don’t mix, the oil displaces the water. The water has nowhere to go but the surface where it’s met by the mayonnaise. High fives and bonding follow. Wherever one goes, the other goes.

Naturally, when the mayonnaise is removed, the water goes with it. Thus, no more blushing.

Here’s what you’ll need:

Directions:

  • Remove area rugs, furniture, and all other items from the entire room.
  • Dust and damp mop.
  • With the rubber spatula, scoop out enough mayonnaise to spread a layer over the affected area of your wood floor. About ⅛” to ¼” thick.
  • Let the mayonnaise sit without drying, for one hour.
  • Use the paper towels to wipe the mayonnaise from the floor. Depending on the size of the affected area, you might need a generous amount of these.
  • Working in small sections, damp mop with the short-napped side of the mop pad to remove any oily residue.
  • Use the long-napped side of the mop pad to wipe the floor dry.
  • If some haze remains, repeat the process. You’ll need to use your judgment or best guess to increase or decrease the time between application and removal of the mayonnaise.

2) Vinegar To Remove Haze Caused By Hard Water, Cleaning Solutions, Or Floor Wax

Vinegar is another popular remedy for hazy hardwood floors. Most wood flooring manufacturers and professionals advise against it. We’re no exception.

Yet, there’s an increasingly popular belief about certain household products. Accordingly, if a solution is acidic, but diluted with water, it will clean your floor and do it safely. So, it’s the solution to use.

Following that logic, diluted battery acid will also clean a wood floor without damaging it. But no one seems to consider using it to clean a floor. Maybe this is because battery acid isn’t a household product.

Whatever the logic used, people seem to be unshakeably convinced that white vinegar can do no harm. Irreversible staining of raw wood and clouding on coated wood floors aside, this may be true.

Still, this is as good a place as any to offer advice to first try new solutions in an inconspicuous area of your floor.

Here’s what you’ll need:

  • ½ cup Vinegar
  • ¼ tsp. Dish Soap
  • 1 Gallon Warm Water
  • Microfiber Spin Mop and Bucket

Directions: 

  • Remove rugs, furniture, and other objects from the workspace.
  • Thoroughly dust the floor.
  • Mix all ingredients into the bucket.
  • Dip the mop in the bucket and wring it out until it’s almost dry.
  • Move the mop in an ‘S’ pattern across the hazy area of your hardwood floor.
  • To be sure the floor doesn’t dry on its own and leave streaks, dry the floor with a microfiber cloth as you go.

This method is also used to deep clean hardwood floors.

Now that we have the condiments out of the way…

Remedies For Removing Haze From Hardwood Floors That Work

Apart from removing the finish altogether, there are two solutions for removing the ugly white film. In the right measure and correctly applied, the haze will be removed while the wood and finish remain uncompromised using either of these two solutions. Both solutions also function as disinfectants.

1) 3% Hydrogen Peroxide

Hydrogen peroxide is the quintessential cleaning solution. It cleans, disinfects, is odor-free, and very inexpensive to buy. The solution is almost invariably sold in dark brown containers. This is because hydrogen peroxide is sensitive to light. It also has a shelf life of about six months to a year.

Whether or not there’s haze on your hardwood floors, hydrogen peroxide will leave them clean, disinfected, and looking refreshed and restored. To use hydrogen peroxide to remove haze from your hardwood floor, 

Here’s what you’ll need:

  • 1 Bottle of 3% Hydrogen Peroxide 
  • 1 Clean Empty Spray Bottle
  • 1 Flip Style Mop
  • Several Two-Sided Microfiber Mop Pads

Directions:

  • Remove all rugs and furniture from the work area.
  • Dust and damp mop the floor.
  • Transfer the contents of the hydrogen peroxide bottle into the empty spray bottle.
  • Working in 2’ x 2’ sections, spray the floor with the peroxide.
  • Let the peroxide stand for several seconds without allowing it to dry.
  • Use the wet side of the mop pad to work out the haze.
  • Spray again.
  • Use the chenille side of the mop pad to wipe the floor dry. You might need to put a very small bit of back into it.
  • Change the microfiber mop pad frequently throughout the process until the floor is clean.

2) Ammonia Based Or Ammonia Free Window Cleaner

Follow the instructions for cleaning with hydrogen peroxide. Substitute peroxide with an ammonia-free window cleaner. If this doesn’t remove the haze, try substituting with a conventional ammonia-based window cleaner instead.

Once all the haze has been removed from your wood floors, be sure to clean the rugs and dust furniture before bringing them back into the room.

Installing a hardwood floor is all about protecting your investment with good techniques.

No matter how nice of hardwood material you buy, even a simple mistake installing the floor can throw off the beautiful, seamless look of a new hardwood floor.

The easiest way to make your new floor look more professional is to do a great job staggering the wooden planks. If you do this right, the flooring will appear as one beautiful surface from wall to wall. If you mess it up, you will create patterns that are impossible to overlook and leave an amateurish feeling in the room.

You want your expensive hardwood floor to look as warm and natural when it’s in your room as it did when you picked it out from a website or catalog. The best way to do this is by following the steps in this guide to nail a carefully randomized installation that will let the beauty of your new floor shine.

Stagger Flooring for Strength and Stability

Laying your hardwood floor with good staggering technique makes a more beautiful floor, but did you know that it’s also essential for the strength of the floor?

Hardwood floors are like a puzzle of interlocked wooden pieces. They need to be strong enough to walk on and to hold heavy furniture. Proper staggering helps to dissipate this weight across all of the nearby boards.

Wood flooring is also known to expand and contract slightly as temperature and humidity change. It’s like a living material. If you have weak staggering patterns in your floor, it’s more likely that your floor will buckle when this expansion occurs, creating unattractive gaps in your floor, or worse.

Staggering your wood planks properly is what makes the floor strong. It’s similar to how a brick wall is built: the bricklayer doesn’t stack bricks in tall columns that can fall over. Instead, the bricks overlap to create one strong wall.

You may also want to check our guide on acclimating hardwood flooring correctly.

Overlap Wood Floor Planks by at Least 6 Inches

The basic rule to remember for creating a strong stagger is that all planks should overlap by 6 inches or more.

This means that the short joint between planks should be at least 6 inches away from the nearest joint in any adjacent row.

This type of stagger will lock the flooring tightly together. This is especially important on the first 2-3 rows of wood flooring that you lay because these will create a strong base as you lay the following rows.

This is also the first step to creating a stagger that looks good. Parallel seams within a few inches of each other will be very obvious when you look at the finished floor.

Avoid Creating a Patterned Appearance

We always recommend a randomized installation of hardwood floors because it creates a floor that looks seamless and draws attention to the natural color and grain of the wood, rather than the joints.

patterned wood floor installation

Some installers and DIYers choose a rigid, patterned look, but they can appear amateurish and distract from your wood floor’s natural beauty. Here are the common patterns that you should avoid:

Stair-Step Pattern

We recommend avoiding this pattern when you are laying the stagger for a hardwood floor.

You can create a stair-step pattern on the floor if you are using boards of the same length and you offset each row by the same length. For example, staggering the joints in each new row to be 6 inches to the left of the joint in the previous row.

This will create a diagonal pattern of joints across the room. If you crave an orderly, patterned look, you may choose the stair-step technique. Just know that you are choosing to emphasize the joints in the floor over the more subtle beauty of the flooring itself.

“H” Pattern

The “H” pattern is another one to avoid.

This pattern forms if you use planks that are all the same length and you offset each row by half of one plank. This makes the seams line up on every 2nd row of flooring, so you can easily see two columns of alternating joints that line up across the room.

This is another pattern that is obvious to the eye and will take the focus right off of your gorgeous flooring with its natural patterns and color. All you will see is the pattern of short joint lines. Again, it’s a fine option if you prefer the orderly appearance, but the best recommendation is to randomize your layout so that the joints disappear and the wood itself is the focal point.

avoid h joints

How to Randomize a Wood Floor Layout

While the ideal appearance for a hardwood floor is a completely randomized installation, that doesn’t mean that you can achieve this look by chance. It takes a lot of patience and planning to make sure that every row is unlike those around it.

If you just install the boards one by one as they come out of the box, you will likely create patterns by accident.

This section will show how to lay out hardwood planks ahead of time in a process called “racking.” You will choose planks and lay them out next to each other on the floor to see how they look, before locking the tongues or gluing them down. Racking a floor is great because it lets you experiment and make changes.

Once you’re satisfied with the layout, you can just move your racked rows slightly out of the way and install them using whatever method your flooring requires.

Not all hardwood products are the same. Some materials come with boards of all the same length. Others include 3 or more lengths of board inside the cartons. Each has its own challenges to randomizing your layout and avoiding a patterned stagger.

Randomizing Hardwood Flooring of Varied Length

To prepare yourself for racking a beautiful, random installation, first lay out the wood planks in stacks of matching size. Create stacks of 5-10 of each size a few feet in front of your first row.

Always mix wood pieces from different cartons as you make your stacks. This is because one package can have significant color differences from another carton. If you just lay wood from one carton at a time, you can end up with all dark pieces on one end of the room and all light pieces on the other end.

Once you have the stacks sorted, start racking your first row by choosing a variety of lengths and laying them out end-to-end.

When you create the following rows, pay attention to the joints in the row behind it. Make sure there is always an overlap of at least 6 inches in between joints on adjacent rows. Remember that this is especially important on the first 3-4 rows you lay out because they will create a strong foundation for the rest of the floor.

Once you rack 3-4 rows, stand up and look at them from a distance. Are there any obvious stair step or “H” patterns, or any joints too close together? Now is the time to rack a different combination of planks to remedy the problem.

When you are satisfied that the several rows you have racked to install create a random stagger pattern with at least 6 inches of overlap on all joints, you are ready to install them!

Randomizing Hardwood Flooring of the Same Length

Begin laying out your flooring for the racking process by opening several cartons of wood and creating stacks across the room just in front of where you will lay your first few rows. This will make them easy to reach as you lay them out. Stack 5-10 planks in each pile.

Always mix planks from several different cartons because the color of the material can vary from box to box. Pulling planks from multiple boxes will spread out the wood from each carton and hide any color differences.

If your hardwood is all the same length, you need to cut your starting end piece on each row to be different from the piece that started the previous row.

As long as your starting board overlaps the adjacent joint by at least 6 inches, the stagger will continue across the whole row.

The fastest way to create a good stagger when working with boards of the same length is to take 4-5 planks out to the chop saw and cut each board to a different length. You can use these cut ends to start several rows at once. You can trim the unused cutoff ends to complete the rows on the wall opposite your starting boards.

When you make your starter cuts and rack 3-4 rows by laying them out on the floor, stand up and look at the flooring from a distance. Are there any joints that are too close together? Are there any stair-step patterns or H-patterns in the rows you racked for installation? If so, choose a longer or shorter starting piece to offset the joints in the row.

Always remember to keep at least a 6-inch overlap between seams for stability and appearance.

When you have created a good, randomized stagger across several rows, you can install the boards you racked and repeat this whole process for the following rows.

As soon as a floor is installed, day one begins. The fact that day one might have been a long time ago doesn’t necessarily mean there’s anything wrong with your floor. A well-maintained floor can last for generations.

A timeworn floor is another matter. Floors not properly maintained can get old in a hurry. Where floors are finished in some areas, but not others, cleaning them as they are and leaving them that way doesn’t make much sense.

In this article, we’ll discuss how to clean your worn-out hardwood floors without refinishing them so that they preserve their natural, unfinished look. If you don’t care for the idea of a polyurethane finish, you’re not alone. But we’ll be discussing something else as well.

Perhaps your aim is to avoid any more chemicals or chemically-based products in your home than necessary. This makes you part of a growing movement toward a safe and sensible way of life. This movement isn’t merely a popular trend. It’s more of an outlook. This outlook is becoming the norm and it’s here to stay.

If you’re looking for a way to restore your hardwood floors and keep them looking good without spending a lot of money, this has never gone out of style.

Follow along as we look at age-old, natural, low VOC, and inexpensive ways to get and keep your aging, timeworn floors clean and looking good.

old hardwood floors

Sanding Old Hardwood Floors

Over time, a hardwood floor’s finish will become thinner over the high traffic areas first. But getting your floors completely clean and even looking will involve removing the rest of the finish. A floor sander is usually required for this type of work. You can rent one of these at your local home improvement center.

However, if you’re not used to working with a floor sander, this fact could evidence itself later on. Not only will a professional sanding save a lot of frustration, but it could also save your floor.

There Are Limitations When It Comes To Sanding Old Hardwood Floors

A hardwood floor can only be sanded so many times before replacement should be considered. If your hardwood floors have already been sanded too many times to survive another sanding, a professional will be able to determine this.

If replacement isn’t an option, but your floors are still good for another sanding, there’s only one chance to get it right. Let a professional do this.

Removing Finish From Old Hardwood Floors Without Sanding

If you decide to save your hardwood floor’s last sanding for another time, this is understandable, but you can still remove the finish and get the entire floor clean.

In this case, consider a wood stripping product. Granted, it’s a chemical, but considering the likelihood that your hardwood floor is finished with polyurethane and sanding isn’t an option… For a stripping product that’s methylene chloride and NMP-free, we like Citristrip Gel.

As with any product you intend to apply to your hardwood floor, it’s always best to first test it in an inconspicuous place before proceeding. Be sure to follow the instructions printed on the product label.

How To Remove Stains From Hardwood Floors Without Damaging Them

If your hardwood floors are old, sanded thin, and stained, then damage is the last thing you can afford. You’ll need to use extreme caution to get them clean. You’ve already used a chemical to strip them. This alone might have done a good deal to remove dirt.

To assure your floors are as smooth and even in porosity as possible, try not to use an abrasive pad or fabric to remove any residual stain. This is especially important because by the time you’re done reading this, you might change your mind about finishing your hardwood floors. Anything’s possible.

For stains that remain on your hardwood floors, identification of the causes might not be possible. But in most cases, the more troublesome of these are likely to be dark in color. It’s a reasonably safe bet that these stains are the result of spilled food or pet urine. Possibly, a human accident.

black stains on hardwood floors

What if the stains are foul-smelling?

How To Remove Foul-Smelling Stains From Old Hardwood Floors

For foul-smelling stains, this means that whatever caused the stain is still present. Depending on how long this has been the case, the subfloor might be affected as well. Removal of the affected floorboards to address the floor beneath should be considered. Start with the floorboard located at the center of the stain.

With the affected floorboard removed, look at the underside of it. If the stain has saturated it, you’re better off replacing it than trying to get the stain removed.

If it looks like the adjacent floorboards will be in the same shape, remove and check these as well. Continue to work your way outward until you come across floorboards that aren’t stained through and through. That is to say that looking at it from the exposed edge, a significant portion of the floorboard remains unstained. These lesser stained floorboards don’t need to be replaced and therefore, don’t need to be removed.

You can read all about it in our article on how to remove dark stains from hardwood floors.

What To Do If Your Old Subfloors Are Foul-Smelling

If the subfloor has traces of stain on it, try using an enzymatic cleaner to consume what’s left of the problem. Apply it liberally to the affected area of the subfloor only.

Also, be sure not to drench the subfloor or allow any of the solution to puddle. Soak up any excess with a clean, dry rag, The solution will continue to do its job even after you’ve done this.

Return to the area in a few hours. If the floor is dry and the smell is gone, spray the solution onto the subfloor again. The moisture will reactivate any lingering odor. Soak up any puddling and allow the enzymes to resume doing their job. Repeat this process until you’re satisfied that the subfloor is completely odor-free.

You can also try soaking stains with hydrogen peroxide. Saturate a clean terry cloth rag with it and lay it over the stain. Cover the rag with plastic food wrap. Keep the wrap in place by setting something heavy on top of it. A water jug will work.

Leave the saturated rags in place for a couple of hours before checking the stain. You can leave the rags in place for up to eight hours.

If a large area of the subfloor is significantly blackened and foul-smelling, it will probably need to be removed and replaced. A professional flooring installation expert or general contractor would be the one to determine this. Because a subfloor must be completely supportive and stable, it’s best to let a professional do this type of work. A professional will also be able to tell you if and to what extent the floor joists may be affected.

Once you’re sure your subfloors are no longer a concern, replacement floorboards can be installed. If you don’t have any of these left from the time your hardwood floor was first installed, there’s another option; Remove an unaffected floorboard and take it to your local home improvement center or flooring specialty store to match it.

If You Don’t Want To Apply A Polyurethane Finish To Your Hardwood Floors

If your floors have no more sandings left in them, the importance of protecting them can’t be stressed enough. You won’t have another chance. If the look of unstained hardwood floors is what you’re after, you can have this while still ensuring their protection.

After all, there’s no point in going to the trouble of cleaning your old hardwood floors if you don’t want to protect them.  Polyurethane offers superior protection and it’s also the longest-lasting.  But if the idea of polyurethane doesn’t appeal to you, there are alternatives.

Clean Old Hardwood Floors and Make Them Shine Without Polyurethane

Sure, polyurethane is available in different sheens. Just buy some in high gloss and you’ve got a shiny floor.

However, when it’s time to restore floors sealed with polyurethane, the services of a professional are usually required.

Paste wax devotees will tell you they love the fact that they can simply remove wax buildup and re-wax their hardwood floors whenever they want to. It doesn’t require calling on a professional to manage this.

When floors are sealed with wax, they can be easily buffed to a gleaming shine. Again, no pros necessary. A wax seal gives owners more control of their hardwood floors because the cost to keep them in good condition is so low.

Try Using A Penetrating Oil To Seal Your Old, Classic Hardwood Floors

For an old-world look, there are also penetrating oils. These aren’t the kind of oil normally found in the kitchen or garage. Penetrating oils dry to a hard finish. They form a seal by binding to the wood on a molecular level whereas polyurethane seals a wood floor by coating it.

If you’re restoring an old, classic home’s hardwood floors, the application of a penetrating oil should be considered. This is chiefly what was applied to floors before polyurethane was invented. Penetrating oils aren’t glossy or shiny, but they bring out the beauty of wood’s grain and color.

Better still, if you discover a scratch on your hardwood floor, simply work some oil into it and buff

The Choice of Hardwood Floor Sealers Is Up To You

Polyurethane, wax, or oil; the choice is yours. Once your old hardwood floors are clean, whatever you decide to apply to them is fine. Keeping your hardwood floors clean, protected, and looking their best is what it’s all about.

Exuberant kids running all over the house, your pet Labrador pawing at the floor in a fit of pique, mischievous teens dragging furniture across the floor to hide broken china. These are just a few factors that can cause scratches on your engineered hardwood floors.

Is it possible to get rid of those blemishes and restore that surface to its former smoothness? And how would you need to go about it?

Find out in this post where we discuss how to fix scratches in engineered hardwood floors and key factors which you will need to take into account to be able to do so.

scratches on engineered hardwood

Things You’ll Need

To make the necessary repairs, you will need the following items which have been categorized according to the kind of scratch you will need to fix.

General Items

  1. Rubbing alcohol
  2. Cotton swabs

For Faint Scratches

  1. Clean white cloth
  2. Extra plank of wood for testing
  3. Markers (clear coat or colored)
  4. Paper towels

For Moderately Sized Scratches

  1. Clean white cloth
  2. Blow dryer/heat gun
  3. Wax pencil

For Major Scratches

  1. Painter’s tape
  2. Putty knife
  3. Sanding sponge
  4. Stain pen
  5. Stainable wood filler
  6. Wipe-On Poly

Preparing the Area  

The first thing you will need to do is remove any furniture or rugs from the area you need to work on.

If you happen to be handling scratches that are spread out, you may need to empty the entire room.

Next, you will need to clean the room thoroughly with a brush or vacuum, and then a mop.

You will also need to apply rubbing alcohol to the area around it and to the scratch to completely remove any lingering debris.

You will also need to ensure you have purchased all the items you need to effect the repairs and have them with you ready for use.

How to Fix a Minor Scratch on Engineered Wood Floors

Faint Scratches

If you have to fix surface scratches on engineered hardwood floors, or a series of them, you will need to try out the marker you intend to use on a spare plank of your flooring, or in a small spot in a corner where it is unlikely to be noticed.

Doing so will enable you to select the right color and prevent you from unintentionally discoloring your hardwood floor surface.

Once you have determined the right color to use, you will need to apply it following the direction of the scratch.

You will then need to wipe the treated surface with a paper towel and leave it to dry.

light scratches on engineered wood flooring

Moderately Sized Scratches

For scratches that are somewhat wider and more prominent, you will need a wax pencil of the right color — you may be able to test it on a white cloth to ensure it is the color you need or on a spare plank that belongs to the hardwood batch in question.

Once you are satisfied that the wax pencil is a matching color, you will need to light the blow drier or heat gun to melt the wax. 

Next, you will need to apply the wax pencil to the scratch and when you are done, you will need to buff it and the surrounding areas using a clean cloth.

Varathane Scratch Repair Pen

This product is ideal for minor scratches and has been specifically designed to conceal them.

It is not only easy to apply but will fill blemishes with a varnish which will dry promptly. The Varathane Scratch Repair Pen also provides a filling that is especially durable and will not crack.

Minwax Blend-Fil Repair Pencil

Produced by a leading brand, the Minwax Blend-Fil Repair Pencil is ideal for those scratches on your floor which are slightly larger than usual. 

It comes in different colors which can be blended to obtain the hue which is just right for your floor.

In addition to being easy to apply, it is also easy to clean with mineral spirits. The result is a durable filling that can be buffed to blend in with the surrounding wooden surface.

How to Repair Major Scratches or Gouges on Engineered Hardwood

Surround the area to be treated with painter’s tape. Next, apply the wood filler as smoothly as possible to the damaged part of the floor and leave it to dry. 

Sandpaper it so that the surface becomes uniform and dabbing the stain on a piece of cloth, apply it to the wood filler.

Wipe off the excess stain and leave to dry. If the treated area seems to have a slight sheen to it, simply touch it up with a small quantity of Wipe-On Poly and rub it in vigorously to create a more uniform appearance.

Minwax Stainable Wood Filler

This product has been designed for both convenience and efficiency. The Minwax Stainable Wood Filler is not only fast-drying but is also easy to sand. 

It is also suitable for both water and oil-based stains and is suitable for indoor and outdoor use.

Sanding Engineered Wood Floors

This process is considered a suitable option for repairing scratches that tend to be rather numerous and widespread.

Unlike solid hardwood floors, engineered hardwood floors are often considered unsuitable for sanding.

And while this may be true in certain respects, it does not necessarily apply in every circumstance. The main qualities which will make surfaces in this category suitable or unsuitable for sanding include:

The Thickness of the Veneer

Unlike solid hardwood floor planks which consist of hardwood in their entirety, only the topmost layer — the veneer or wear layer — of engineered hardwood floor planks are made from the material. It is this difference that makes it possible to sand down surfaces consisting of the former several times.

However certain engineered hardwood floors have particularly thick veneers, i.e., above 3mm in thickness. Those in this category may be sanded.

Hand Scraping

Certain engineered hardwood floors have been treated to make them appear distressed and older, to enhance the character they provide to a home. 

This process is referred to as hand scrapping and it renders engineered hardwood floors less suitable for sanding. Certain experts believe that it may only be possible to sand floors that have been hand scraped once.

Preventing Scratches on Engineered Wood Floors

Protecting your hardwood surfaces from scratches is of paramount importance since they can detract from the beauty of your home if left unattended and if allowed to grow in number.

The following steps will enable you to protect your hardwood floors from scratches and preserve their charm for longer.

Establish a No Footwear Policy

Shoes can often bring in grit and small pebbles trapped beneath their soles which in turn can cause scratches on your floor.

High heels can also cause dents on the surface due to the pressure they apply. The risks posed by footwear means that disallowing them in rooms with hardwood floors will play a role in significantly reducing the risks of scratches and dents to them.

Make Use of Indoor and Outdoor Mats

It may not always be possible to enforce a footwear ban and that is where mats come in.

They serve to catch any lingering grit or pebbles which happen to be sticking to soles, or which might even have snuck into shoes or sandals and stuck to socks.

A rough-textured outdoor mat is ideal for visitors to wipe their footwear on and would see most of the grit removed, and a smoother textured indoor mat can also serve to remove grains of sand that make it past the outdoor mat.

Make Use of Furniture Protectors

The legs of sofas, tables, stools, and chairs can cause damage to hardwood floors, especially when they happen to be particularly heavy.

Felt furniture protectors can help prevent your dining or sofa set from causing scratches and dents on your floors, and are highly recommended as a result.

We recommend checking out our article on keeping furniture from sliding on hardwood floors.

Sweep and Vacuum Often

Sweeping or vacuuming frequently will prevent the accumulation of dirt, sand, and dust which can cause scratches on engineered hardwood floors.

Brooms, brushes, and vacuum cleaners should have soft bristles to prevent them from causing scratches themselves on your floors.

It is also important to lift furniture when sweeping or vacuuming to prevent the accumulation of debris beneath their legs as this can also constitute a scratching hazard.

Take Care of Pets’ Paws

Your pets can also play a role in damaging your floors especially if they happen to be particularly active and like to play outdoors and paw at surfaces.

Ensuring you keep their claws carefully trimmed and clean their paws once they come in from a run in the garden or a walk will reduce the risk of them scratching your engineered hardwood floors.

Clean Up Any Accidents Instantly

If any china or crystal is broken, you must ensure you clean it up instantly and take special care to sweep up any broken shards. Failing to do so will place your floor at risk of getting scratched especially in the event of anyone stepping on one of the broken pieces (and will also place residents at risk of injury).

Make Use of Rugs and Runners

Placing rugs at strategic spots such as dining and coffee tables can prevent or at least slow down the wear and tear of your floors and even reduce the risk of their sustaining scratches. 

Rugs can also be used for covering scratches on engineered hardwood floors. 

Runners are also an excellent choice for protecting high traffic areas and can reduce the likelihood of your needing to repair any scratches on your hardwood floors.

As you plan for a new hardwood floor, you have a lot of choices to make. From the species of wood to the color of stain, there are endless possibilities. Some homeowners overlook one of the most important aspects, which is choosing the proper direction to lay hardwood flooring.

This guide will help you understand the various options for hardwood flooring layout design and choose which one is best for your room. With the right layout, you can accentuate nice features in your room or hide the parts you aren’t so fond of. The right flooring pattern has the potential to seriously upgrade your home’s visual appeal.

Types of Hardwood Flooring Patterns

There are several common options that you may choose from when planning your hardwood flooring. They vary in difficulty and some methods work better in certain rooms than other methods do.

Keep in mind that a skilled installer can combine two or more patterns, such as by placing a straight border around a herringbone floor. Here are six of the most timeless patterns:

1. Vertical Pattern

The first two methods, vertical and horizontal, are somewhat relative to the room. But you can think of vertical as laying the boards parallel to your line of sight as you look into the room from the main entrance.

A vertical pattern should be one of the most natural ways to install your floor. The long lines created by the floorboards should align with your sight as you look toward the back of the room. It works great in most rooms, especially those that are deeper than they are wide. A vertical pattern is also easy to install, even as a DIY project. 

vertical pattern wood flooring

2. Horizontal Pattern

Again, horizontal vs. vertical installations are somewhat relative to the room, but horizontal floors usually appear to run perpendicular to your line of sight as you look into the room from the entrance.

The horizontal pattern is natural and easy to install, just like the vertical pattern. You should choose horizontal for rooms that are not deep from the entrance to the back wall. This pattern will draw your eye from sidewall to sidewall instead of front to back, balancing the shape of the room.

horiontal pattern wood flooring

3. Diagonal Pattern

Like the first two patterns, this one lays all the boards parallel to one another. The difference is that instead of running the boards parallel to either wall, they are cut and installed at a 45-degree angle relative to the walls.

This flooring style is a little more visually interesting than vertical or horizontal patterns. It can be a good option in odd-shaped rooms. It will also work magic in a large installation that goes through doorways into multiple rooms. It’s hard to choose between vertical and horizontal installations if you are working in a hallway that opens into multiple rooms, because the pattern that works in the hallway may look bad in the rooms.

A 45-degree diagonal installation, on the other hand, will look great in both narrow hallways and rooms of any shape. The drawback is that they become much more difficult to install than the first two patterns. You will have to be especially careful on measuring and cutting your 3-4 starter from the corner to make sure you get the angles just right.

4. Herringbone Pattern

This flooring pattern brings a look of extra luxury to your hardwood floor. Two boards are laid next to each other at a 45-degree angle to form a V shape. Pairs of boards then lay parallel to continue the V shape throughout the room.

This flooring pattern is like the diagonal method because it will not draw attention to the shape of the room. Instead, for this pattern, the flooring itself will be the center of attention. A herringbone floor, while difficult to install, is one of the surest ways to add class to a room. This hardwood flooring direction does tend to create more waste because the cuts need to be more precise, so you will pay a little more for materials.

herringbone hardwood flooring

5. Parquet Pattern

The parquet method creates a checkerboard appearance on the floor. It is done by forming a square of planks of the same length and butting it against an identical square that is rotated 90 degrees. The alternating squares cover the whole surface of the floor, mixing both vertical and horizontal patterns.

Parquet ranges from small, 2-inch boards forming squares as small as 8 inches up to large squares (3 feet) made of wide planks.

Parquet is moderately difficult to install, though it is easier than the herringbone pattern. It can work well in almost any room, as long as you choose a corresponding size of parquet. For example, large squares for a large living room or small squares for a tight hallway.

parquet wood floors

6. Random Pattern

This pattern begins with the materials you buy. A random hardwood pattern uses boards of varying width to mix large and small rows. You can choose different ratios of large to small, or even use three different widths.

You can combine random installations with the other pattern listed above. It just takes extra planning to make sure that the rows of various sizes fit correctly with the rows around them. For that reason, random floors can be difficult to install well, especially if you are randomizing a pattern other than vertical or horizontal.

random pattern wood floors

How to Choose Which Direction to Lay Your Flooring

Here’s what to consider when picking a layout for your hardwood floors. Some of these ideas are about creating a strong structural floor while some are purely cosmetic. Your choice will depend on the shape and condition of your room, the look you are trying to achieve, and how much you are willing to spend.

Floor Joists

If you are installing hardwood over a wooden subfloor, one of the most important factors is the floor joists. Your hardwood planks should always run perpendicular (or at least diagonal) to the floor joists.

Over the years, floor joists can settle and move slightly. Hardwood floors need a stable, flat surface underneath them. If you lay hardwood in a vertical pattern parallel to the floor joists, the floor will buckle when the joists settle.

Room Shapes and Hallways

Very narrow rooms or hallways will usually look choppy if you lay the planks parallel to the shorter side of the room. Instead, you should run the hardwood pattern lengthwise down the hall or choose a diagonal pattern.

Connected rooms look best if you can run the wood the same way throughout the entire space, but this is not required. You can buy thin wooden transitions to separate the rooms where the flooring changes direction.

Straightness of Walls

If you are installing your hardwood in a vertical or horizontal pattern, it is important that the seams that run the length of the room appear visually straight. You may want to run the wood so that the planks are parallel to the straightest wall in the room. No house is perfectly square, but if yours is really funny, this might be a good factor to consider.

Usually, exterior walls are straighter than interior walls. You may base the installation off of an exterior wall to help achieve a nice straight-looking floor.

Features in the Room

Some rooms have that one piece that makes you say “wow.” Whether it’s a fireplace, a window, or another feature that captures your attention, you should lay your flooring to draw the eye toward it. Usually, the lengthy side of the planks creates leading lines to which you can align with the central feature.

Lighting

You can always consider the sources of light when deciding which way hardwood flooring should run. Natural light will highlight the seams in your flooring pattern, so a room with a lot of natural lighting may benefit from a more intricate pattern. Or you may consider one large window to be a focal point in the room, and you may want to lay the flooring toward that window.