The laminate flooring in warm golden brown tones not only looked just like real wood but also came at a price that was a fraction of the real deal. What’s more, your favorite cousins promised you it would be easy to install. 

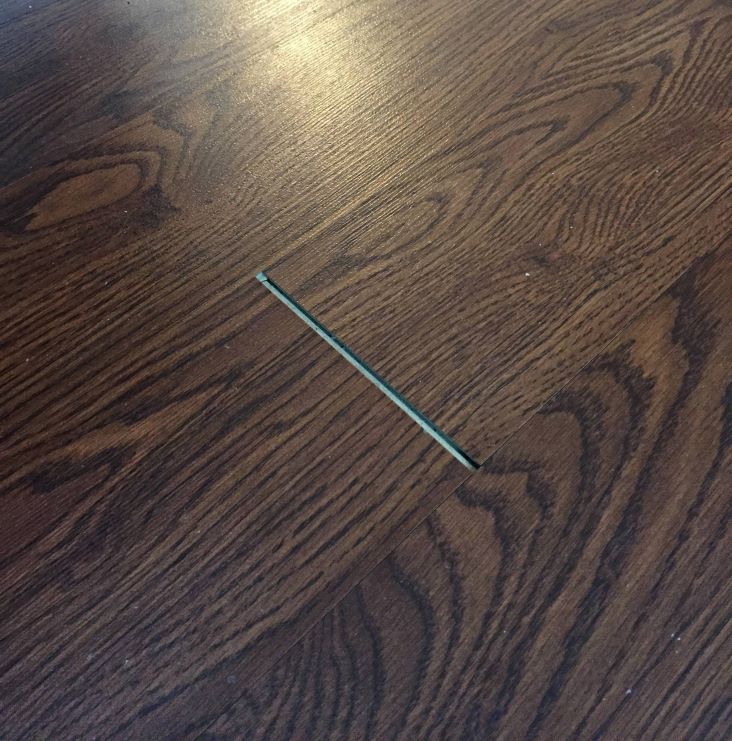
And when they were all done it made your dining room look as though it was worthy of a feature in Architectural Digest. Until you started noticing the presence of tell-tale spaces close to the walls, when winter set in.

Were the expansion gaps left when installing your floor actually too big? Or could the issue have been caused by other factors? What could the reason be for their becoming especially noticeable?

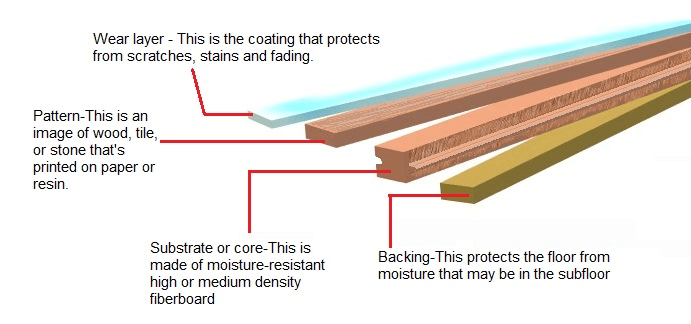
Laminate floor planks are mostly made up of wood (about 90%). Owing to the porosity of this material they tend to shrink and expand due to changes in humidity and temperature, just like solid or engineered hardwood planks.

As a result, they can expand when the weather gets warmer and contract when it gets colder, making any gaps or spacing especially visible.

Noticeable expansion gaps can be fixed by the following methods:

  • Removing and replacing your planks
  • Adding molding 
  • Adding beading
  • Caulking

Below you will be able to find detailed information on each of these options. You will also be able to find additional helpful pointers such as the perfect size for expansion gaps and how to ensure you get it right the first time. 

How Big Should Expansion Gaps For Laminate Floors Be?

Expansion gaps are essential when installing your laminate floors to ensure your planks have enough space for movement when they start to expand during those sunny summer months.

Failure to account for this may result in their pushing against each other as temperature and humidity levels rise, an incidence which may result in buckling laminate floors. (Conversely, falling  temperatures, and humidity levels may result in your laminate floor planks separating.)

In addition to detracting from the aesthetics of your surroundings, buckling can also damage the interlocking mechanism of your laminate planks, resulting in extra expenditure to have them replaced.

The minimum recommended size for an expansion gap is a quarter( ¼ ) of an inch. This precaution must be taken around any structures such as cabinets, stairs, and pillars.

How to Fix an Expansion Gap That Has Gotten Too Big

If your laminate flooring expansion gap has gotten too large, you will be able to rectify the issue using a number of straightforward methods explained in detail below.

1. Replace the Entire Floor

Depending on the size of the floor and the state of the room and whether you have furnished it, this may prove to be rather labor intensive.

What you will need to do is remove the molding and then starting with the first row closest to the wall remove each plank. You will need a chisel to lift up each board.

Special care should be taken when removing the planks to avoid damaging the click mechanism.

You will then need to reinstall your floorboards taking special care to leave the required expansion gap recommended by the manufacturer of the laminate floor.

2. Make Use of Molding

Molding can prove especially helpful in concealing wide expansion gaps in your laminate floor.

Ensure you select the correct size which will cover the spaces between the walls and your floor; the material should be solid wood.  

It is also a good idea to select molding in a color that is as close as possible to your laminate flooring. However, it may also be possible to stain it.

Once you have obtained a suitable product, you will need to nail the molding into the baseboard.

The molding must never be nailed into the laminate itself since the floor needs to be left free to contract and expand.

3. Make Use of Beading

When using this option you will need to measure the length required as well as the width of the visible part of the expansion gap to ensure you make the right selection. 

(As is the case with molding, you will also need to ensure that the color of the beading is pretty close to your laminate flooring. You should also make sure it is waterproof if you intend to use it in a kitchen, bathroom, or mudroom.)

You may also need to cut a 45° angle at the end if the length you will be fitting will also be meeting another at a corner in the room. You will need to use a miter saw to achieve a perfect cut. 

An adhesive such as super glue will be suitable for sticking the angled ends together before fitting them into a corner. (Holding them together for a quarter of a minute will ensure the glue will bond both pieces together effectively.)

As is the case with molding, the beading should be attached to the skirtboard and not the laminate flooring to allow for contraction and expansion or even movement as a result of traffic.

If using glue, opt for a strong variety and wipe the excess off with a cloth once you are through. (You may also need to push heavy objects up against the beading until the glue dries.)

Alternatively, you may also use nails to fasten the beading to the skirtboard.

4. Make Use of Caulking

This method can be especially beneficial owing to the ability of caulk to accommodate the movement of your floor. It is also possible to obtain a product which matches your preferred color.

The first thing you will need to do before getting started is to use a vacuum cleaner to thoroughly clean the expansion gaps you intend to cover. 

When applying the caulk, you will need to apply consistent pressure on the trigger of the caulk gun while drawing it backwards.

Next, you will need to pull your finger along the line of applied caulk to press it down lightly. It will take about an entire day to dry.

Caulking can also be used to seal the space between tubs and shower stalls and reduce the susceptibility of your flooring to damage by water that may seep beneath the planks.

Building experts specifically recommend the use of silicone caulk for this purpose.

How to Prevent Big Expansion Gaps

Remembering to provide expansion gaps when installing your laminate flooring is important. However, it is just as essential to ensure they are the right size while also taking into account the sensitivity of laminate flooring to changes in temperature and humidity.

Taking the following precautions will enable you to do so:

1. Make Use of Floor Spacers

Floor spacers come in different measurements and varieties. There are those which come in the form of rectangular tabs which you simply slip in between the laminate boards and the wall when installing your flooring. There are also those which are shaped like triangular tabs and tend to have greater stability.

You are also likely to come across floor spacers that lie flat on the floor and can be adjusted and tightened. They are reputed to be especially useful in terms of being able to assist you to lay your laminate flooring in a straight row. Their stability is also another plus.

Alternatively, it is also possible to make floor spacers yourself from yardsticks, for example.

Regardless of which option you choose, you should ensure the expansion gap is the right size recommended by the manufacturer to prevent problems with your flooring. If you are not certain, you may verify it with them since this value is often determined by the size of your floor.

2. Acclimatise Your Flooring

Like solid and engineered hardwood floors, laminate floors need to be acclimatised. This process will ensure your laminate floor planks become accustomed to humidity and temperature levels in the room in which it is meant to be installed.

Failure to take this step will lead to the boards expanding or contracting once they have been installed and may even result in your warranty being voided by your manufacturer.

3. Make Use of Humidifiers in Cold Weather

Laminate planks are especially prone to shrinking in winter and autumn due to falling temperatures and humidity levels. Making use of a humidifier during those colder months could add some much-needed moisture to your surroundings, and possibly prevent shrinking in your laminate floorboards.

Conclusion

Laminate floor planks mostly consist of high-density fiberboard, and as a result, are rather porous. This quality means that they will either shrink or expand depending on the weather or season.

This may affect your expansion gap and make it appear visible. However, by shifting the boards together, using molding or beading, or simply relying on caulk, you will be able to conceal them.

This condition can also be prevented by ensuring you obtain the recommended expansion gap size for your floor from the manufacturer, acclimatize your laminate boards, and use a humidifier during colder weather.

You’ve selected your high-quality laminate flooring in roasted mocha — just the right hue to perfectly complement the ivory and caramel color scheme of your home. Now it’s sitting in your house waiting to be installed and the one question you never previously considered suddenly rears its head: which way should you lay your laminate flooring? 

Find out right here, in addition to the essential pointers you need to be aware of when installing your brand new floors to ensure you get to feel thoroughly satisfied with your gleaming surfaces at the end of it all.

A Question of Preference

While many tips and pointers exist which can help you make your floors appear especially alluring, the truth is that you should be guided by personal preference in terms of the direction in which your laminate surfaces should be installed. This is because this effect is purely esthetical and is subjective as a result, as opposed to a procedure that must often be followed as required.

Choosing the Right Direction to Lay Your Laminate Flooring

When laying your flooring, factoring in the direction of the lighting and the dimensions of your rooms can actually make the areas in question appear brighter and larger or longer.

These tips show you how:

1. Take Note of the Shape of the Space

Rectangular spaces: If an area happens to be rectangular, installing your floors parallel to the longest wall can make the space appear wider.

This principle is also followed when installing laminate planks in hallways and the effect serves to attract the gaze straight ahead so the focus is on the length of the space.

Paler or lighter flooring planks and even walls can enhance the effect further.

Conversely, installing your floor parallel to the shortest wall may make it appear smaller.

Extremely small spaces: If an area happens to be especially small, placing your floor planks diagonally will attract attention to the corners. It will also create longer lines and enhance the spaciousness of the area.

Placing planks diagonally also ensures a seamless transition between two areas, such as the lounge and your study, for example.

2. Follow the Direction of Natural Light

Our gaze tends to be attracted to light and to follow its path as well. As a result, laying your laminate flooring at right angles to the main source of a room’s natural light can make it seem larger, brighter, and airier.

What if you happen to have multiple points of entry for natural light? Simply install it according to your own design preferences.

3. Pay Attention to Entrances and Focal Points

Placing laminate floor planks at right angles to the point of entry of a room will ensure the gaze of anyone who comes in will naturally follow them. This has the effect of making an area appear more spacious.

Focal points such as artwork, bold wallpaper, TV consoles, and fireplaces, should also be taken into account and it is best to install your planks at right angles to them as well. This is because doing so will naturally direct the gaze to your room’s defining feature.

4. Ensure Uniform Installation

When installing your laminate flooring, ensuring the planks follow the same direction throughout your home can serve to provide a sense of uniformity.

This especially holds true if you have an open-plan home.

Laying the flooring parallel to the longest wall of the house is the best option to draw the gaze of the occupants longitudinally, making any space they are in seem larger as a result.

FAQS

Why should I stagger laminate planks?

Staggering your laminate flooring will make it more structurally sound since the end joints will be more stable and less likely to separate. It will also enhance the aesthetic appeal of the entire surface.

Manufacturers recommend staggering your planks by a measurement of between 6 – 12 inches.

Are there any differences between installing laminate flooring diagonally and doing so horizontally or vertically?

Yes, there is. Installing planks diagonally is rather difficult compared to the other two standard directions. 

The procedure requires taking careful measurements before the actual installation process can begin. What’s more, the first planks must be placed at the center of the room as opposed to being placed against a wall.

The diagonal installation will also require a degree of skill and professional assistance may be required.

It is also worth noting that doing so will result in a higher proportion of unusable cut-offs and is likely to involve more waste as a result. 

How can I work out how much laminate to purchase?

Simply measure the length and breadth of the room you wish to install the flooring in and multiply the figures you obtain to work out the area of the total flooring surface. Next, add 10% of that figure to allow for wastage.  (This percentage should be increased to 15% if you intend to install your floors diagonally.)

Can I install laminate planks over an existing flooring surface?

Yes, you can as long as the existing surface is hard, flat, smooth, and in excellent condition. 

Suitable examples include: concrete, cork, ceramic tile, marble, linoleum, porcelain tile, sheet vinyl, and solid hardwood.

Unsuitable examples include: brick, carpeting, and engineered hardwood.

What is underlayment and why is it necessary for laminate flooring?

Underlayment is a thin layer that serves to smooth out any irregularities in the subfloor, provide enhanced stability to the laminate planks, and also provide additional sound, heat, and moisture insulation.

It varies depending on the type of flooring: underlayment for laminate surfaces often consists of closed-cell foam or layers of cork with a thickness that typically ranges between 6 – 8 mm. 

Certain varieties of laminate flooring come with underlayment and if the planks you have purchased belong in this category, you will have to avoid laying underlayment before installing them since doing so may actually void your warranty.

Is it a good idea to install laminate flooring on top of carpet? The answer is no, except maybe in a few special cases.

It can be really tempting to just place a new floor on top of the old flooring material. Think of the time and mess you could save by not tearing out the old flooring.

Some types of flooring lend themselves to this method, like ceramic tile. Unfortunately, leaving old carpet down when you install a laminate floor on top is just not a good idea.

This article will explain why you should avoid this, and also point out the few situations in which it might be okay. 

Why Shouldn’t You Install Laminate Over Carpet?

The main reason is stability. Laminate is meant to be used with a thin underlayment that provides very little cushion. Most types of carpets are too thick and soft. This can cause the laminate to separate at its delicate tongue-and-groove joints, especially if you put heavy furniture on top. Laminate flooring is a big expense, and it’s not worth damaging the floor (or voiding your warranty) just to avoid removing the carpet first. 

When is it Okay to Install Laminate Flooring Over Carpet?

There is really only one type of carpet that might not cause problems underneath your laminate flooring. That is a low-pile, glue-down carpet.

This type of carpet is what you see in hotels, theaters, and other commercial buildings. It’s quite flat and not very soft. The fibers must be shorter than a ¼ inch. Any longer than that would be too unstable for laminate flooring.

If you are trying to put new flooring in a commercial building without tearing out the carpet, and it is of this short, very firm variety, it’s possible that it will be an okay underlayment for laminate.

This is never really recommended, and will always be a second-best option to removing the carpeting first.

Interestingly, this type of carpet can be one of the most difficult to tear out due to the glue which usually needs to be scraped off by hand using a wide razor blade. So you might be making a valuable trade, especially if you are short on time to get the floor replaced.

Can You Put Laminate On Top of Carpet Tiles?

Carpet tiles are usually a rolled-pile carpet with fibers that are about ¼ inch long. This type of flooring is glued to the subfloor and used in many offices and shops. It’s similar to wall-to-wall berber carpets (if they are glued down) because it is moderately firm and has a relatively short pile.

Carpet tiles and berber carpets are still too soft to leave under laminate flooring. They will just create too much flexing and bending of the floor.

The worst that can happen here is that when you move furniture into the room after the new flooring is installed, the weight of the furniture can damage the tongue-and-groove locking system on the laminate. This could create chipped edges on the finish or cause boards to pull apart from one another. It could even separate rows completely.

If you still decide to install laminate flooring over a carpet like this because you really think it’s firm enough, you need to do a perfect job of staggering the laminate flooring. A good staggering technique will create a lot of strength for your floor and hopefully protect you from damage.

These types of carpet are moderately difficult to remove and will require some scraping of glue with a razor scraper. It will be a trade-off but the peace of mind is worth it, knowing that your new floor will last longer.

Can You Install Laminate Over Plush Carpet?

We seriously recommend that you never, ever try to install laminate flooring over top of high-pile plush carpet.

This is the most common type of carpeting in homes because it’s soft and comfortable. That’s exactly what makes it so bad if it’s under laminate flooring. 

You will almost certainly experience failure of the laminate floor if it is installed over plush carpet. There will be way too much room for the boards to flex and break. You might not even be able to install the whole floor properly in the first place.

The right thing to do is tear out the carpet and any padding (underlayment) that you find underneath it. This is one of the easier flooring materials to tear out. It will require some muscles and usually a few minutes of light scraping to get rid of staples or old padding.

A laminate floor installed on top of a clean wood or concrete subfloor should last for many years.

Can You Install Laminate Over Carpet Padding?

For the same reasons listed above, you should not install laminate on top of the padded underlayment that you find beneath plush carpet.

Not only is this stuff too soft, it’s usually made of recycled foam and fabric and contains some very firm pieces of material. These will make the laminate floor uneven as well as unstable.

Just go all the way down to the concrete or wood subfloor and start fresh with a firm, level surface for your laminate flooring.

How to Remove Carpet to Install Laminate Flooring

  1. If the carpet is wall-to-wall, use a pair of pliers to pull up and untuck the edges (near the walls). It is usually attached to tackstrip and tucked under the trim on the wall.
  2. Use a sharp razor knife to cut through large sections of carpet into manageable pieces that you can roll and carry.
  3. Remove carpet by rolling it neatly with the fiber side in (to contain dirt) and securing the rolls with tape.
  4. To remove carpet that is glued directly to the subfloor, pull at a low angle to peel the carpet up, and use a long-handled scraper if it’s really hard to remove.
  5. Repeat steps 2-4 as needed for any padding under the carpet.
  6. Remove any tack strip by using a large pry bar and hammer (wear gloves to protect your hands from the tacks).
  7. Take old carpet out to throw away.
  8. Scrape up any remaining staples or scraps.
  9. Sweep and vacuum the subfloor to prepare for laminate underlayment and flooring.

 Yes, engineered wood floors can be installed in a bathroom. 

Engineered wood can also be installed in a basement and other places that solid wood can’t. Specifically, the kind of places that are prone to humidity and temperature changes. 

Unlike solid wood, engineered wood floors stand up well to environmental changes. Bathroom and basement environments can change quickly, and this can happen routinely. But engineered wood is quite well suited to this. 

Why Is Engineered Hardwood A Good Choice For These Kinds of Environments?

The layer of engineered wood that you can see is made of real wood. The core is made of layers of plywood. These are bonded together in such a way that they form a thick sort of mesh. 

This core is what gives engineered wood floors the ability to withstand environmental changes. It’s what gives this type of floor more dimensional stability.

In other words, the core of an engineered wood floor won’t warp. 

Can Engineered Wood Stand Up To Spills?

If your engineered wood floors were installed a few years ago, the answer is, “yes, but not for long”. Spills should be cleaned right away. Your floors should never be wet-mopped or allowed to air dry. This type of flooring is no less sensitive to standing water than solid wood is. 

This has invariably been the case …until recently.  

Recent Improvements in Engineered Wood Flooring Products

In the past few years, a lot has changed in the flooring industry. 

Where having engineered wood flooring in bathrooms and kitchens was once thought to represent a lot of upkeep, manufacturers now claim that their newest improvements have made them trouble-proof and worry-free The biggest improvement — waterproofing. 

Can You Let Engineered Wood Floors Get Wet?

Allowing your floors to get wet and allowing them to stay that way are two very different things. Water spills happen. Accidents are inevitable. But with traditional engineered wood, clean-up should take place as soon as possible. 

This fact represents a bit of mindful care where bathrooms are concerned. In a bathroom where traditional engineered wood flooring is installed, everyone who uses it must be sure to leave no watery footprints behind. Everyone must be sure to clean up after themselves if they allow water to splash when washing their hands. 

This makes traditional engineered wood a less-than-ideal choice for bathrooms that see a lot of use by youngsters. 

The introduction of waterproofing is said to change all this. But does it?

In fact, the words, “waterproof” and “worry-free” should be synonymous. But are they?

Is Waterproof Engineered Wood Better For Bathroom Installations? 

The very short answer is yes, although the rules change between brands and levels of water resistance. 

Before deciding on a particular waterproof engineered wood floor product, it’s important to understand its capacity or level of water resistance. 

Manufacturers of some engineered wood floors claim that a spill can safely go unseen or ignored for up to 12 hours on their improved variety. Others claim 24 hours, and some claim that their waterproof engineered wood can withstand a spill for up to 36 hours. 

Right about now, you’re probably thinking that waterproof engineered wood floors can be installed in a kitchen. Well done! (pun intended)

Of course, once a cooking spill has been allowed to go unchecked for 24 to 36 hours, a new concern about how to clean up dried crud might be created. 

…and naturally, taking care of this would involve the use of some type of liquid solution …and well, how the rest of this story goes seems to be anyone’s guess. But however it goes, waterproof is still better than not. 

How Are Waterproof Engineered Wood Floors Different?

As discussed earlier, the difference is in the core. The core of traditional engineered wood is made of densely packed layers of plywood that give this type of floor more dimensional stability than solid hardwood. 

Thus, engineered wood is better suited to below-grade installations and similar environments. 

With waterproof engineered wood, the core is different from each manufacturer. 

Some cores are made of stone plastic composite or SPC. 

One manufacturer uses an “ultra-high-density fiberboard”. 

Another manufacturer claims that their hardwood floor is waterproof as well as the most durable on the market. The floor is actually a laminate floor. How they get away with calling it “wood” isn’t clear.  

Are The New Waterproof Engineered Wood Floors Better For Installation in Bathrooms?

Well, we do know that they’re at least somewhat more waterproof than the traditional kind of engineered wood floor. But this doesn’t necessarily mean they’re better. 

Besides the fact that some manufacturers don’t seem to know or care that there’s a difference between waterproof and water-resistant, there are two cons. 

  1. Waterproof floors can’t be refinished. 
  2. Unlike traditional engineered wood, installing radiant heating underneath them is out of the question.   

Waterproof or not, the fact that they can’t be warmed up might mean that no one will spend much time splashing about or letting their wet hair drip onto the floor. 

So if you want to install engineered wood floors in your bathroom, you might as well stick with the traditional kind.  

As long as you don’t install radiant heating, the floor isn’t as likely to be in prolonged contact with water anyway. 

Engineered Wood Floors In Bathrooms: The Bottom Line

If you know you can successfully manage spills, install traditional engineered hardwood in your bathroom. 

That way, you can install radiant heat while you’re at it. 

As for the kids’/guest bathroom, it’s probably the smallest room in the house. If you’re going to experiment, this would be the place to do it. 

Granted, engineered wood floors and children aren’t necessarily a match made in heaven. But you’ll probably be supervising their bath time anyway. 

If not, then another adult. So, staying ahead of spills shouldn’t be a problem. 

Teenagers might be a different story, but beyond this, there really isn’t much else to consider. 

So go ahead — install engineered wood floors in the bathroom. Take care of them a little. Enjoy them a lot.   

Yes. You can use a steam mop on laminate floors. 

If you are among so many people looking for a definitive answer to this question, there you have it.

However, this answer doesn’t apply to all laminate floors. 

In fact, it doesn’t even apply to laminate floors in general. Not yet anyway. 

Currently, the answer only applies to waterproof laminate floors. As this type is expected to sell as well as the water-sensitive type that’s more familiar to most consumers, the water-sensitive kind will in all likelihood be phased out. So, ultimately the answer might apply to all laminate flooring. 

In this article, we’ll discuss what you need to know for a better understanding of how the answer applies to your circumstances. 

steam mops on laminate floors

The Purpose of A Steam Mop

It’s reasonable to assume that because steam is a safe, chemical-free way to sanitize surfaces, it’s safe for all surfaces. 

“Dust mops are used to dust floors. So steam mops must be intended for floors or they wouldn’t be called steam mops”. 

This is true. Steam mops are indeed intended for use on floors. 

“If it wasn’t for steam mops, people would still be on their hands and knees to scrape up crud and goop.” 

“If a steam mop can do this, how bad can it be?”

Good arguments, but unless they’re used judiciously, steam mops can do more harm than good.   

Can A Steam Mop Be Bad For Laminate Floors? 

The short answer is, yes. 

If your laminate floors aren’t waterproof, water can seep through the seams and be absorbed by the floorboards’ substrate. The substrate is made of medium or high-density fiberboard. 

While it may be moisture resistant, fiberboard isn’t necessarily waterproof. It can swell when it’s exposed to water. 

Even after the fiberboard has dried, the swelling remains.  

Can Water-Damaged Laminate Floors Be Repaired?

A solid wood floor that’s swollen can be sanded back down to level. 

Although the number of times is limited, engineered wood floors can also be sanded.

Laminate floors are another story.

laminate floor structure

Just below the wear layer of a laminate floor, is the pattern layer. The pattern is an image of tile, stone, or wood. This image is printed on paper or resin. 

Attempting to sand the pattern layer to get to the swollen substrate would result in the removal of the pattern itself. This would also leave the substrate exposed.  

The only way to repair a water-damaged laminate floor is by replacing the damaged floorboards. 

Laminate Floors That Can Be Steam Mopped

Because laminate flooring is considered to be a relatively new concept, the year 2018 marks a line between new and “newer”. 

In 2018, the first line of water-resistant laminate floors was launched. This was a game-changer. 

More improvements have since followed. 

Today, laminate floors are available with water-tight seams between the floorboards. This makes them virtually waterproof. 

Where consumers were once advised against installing laminate floors in kitchens and bathrooms, they’re encouraged to install the waterproof type throughout the entire home. 

As with most things, you get what you pay for. Waterproof laminate floors are priced at the high end (about $8/sq ft). But even the most expensive laminate is less costly than wood, engineered wood, or even carpeted floors.

Here’s why:

  • By the time carpets are a couple of years old, they begin to look that way. Sometimes, it isn’t until after paying for a few rounds of professional cleaning, that consumers realize that laminate floors would have cost less than carpet.  
  • Unlike wood and engineered wood floors, laminate floors don’t need to be refinished every few years
  • Wood and engineered floors can be sanded in the event of water damage, but with waterproof laminate floors, there’s no water damage to speak of.
  • The more robust wear layer makes laminate floors more resistant to scratches, dents, and stains than wood, engineered wood, and carpet. 

How To Know For Sure If Your Laminate Floors Can Be Steam Mopped

It’s important to understand that if your floors were manufactured after 2018, this doesn’t necessarily mean that they’re the waterproof kind. 

The best way to know how to care for your particular floor is by referring to the manufacturer’s care and maintenance guidelines. These come with the purchase of every box of flooring. 

Of all the manufacturers’ guidelines for care and maintenance that we were able to find, none specified the use of a steam mop as the primary cleaning method. 

However, they did specifically call for dusting followed by damp mopping if necessary to clean laminate floors. 

if your floors’ manufacturer’s guidelines call for a specific method, then this is the method to use. Deviating from it could void the warranty.

Unless they’re somehow defective, how well your laminate floors hold up and how long they last are up to you. Following the manufacturer’s guidelines offers the best chance of having floors that last as long and look as good as they should. 

Here’s How To Use a Steam Mop on Waterproof Laminate Floors

  • Be sure to set your steam mop to the lowest setting. 
  • To avoid spots and streaks, dry your floors with a microfiber cloth or dry microfiber mop pad. 
  • The rest of the rules for floor cleaning still apply:
  • Be stingy with water
  • Don’t allow puddling or ponding
  • Clean spills right away
  • Also, damp mopping should still be considered first

What Type Of Steam Mop Can Be Used On Waterproof Laminate Floors? 

Because manufacturers recommend setting your steam mop to the lowest setting, it’s important to use one with a steam control feature. Many steam mops don’t have this. 

Of those that do, here are a few that we like: 

Steam Mops and Laminate Floors: The Bottom Line

As for waterproof laminate, if you long for the good ol’ days, you might also be pleased to know that you can occasionally break out your old mop and bucket. 

For most people, however, this option is not a selling point. If you ask around, you’re sure to find that of all household chores, floor cleaning is the least popular.  

If your laminate floors aren’t waterproof, steam mopping is risky and unnecessary. 

Yet, if they are waterproof, steam mopping is acceptable, but it’s still unnecessary. 

Either way, dusting, and occasional damp mopping are all that’s required to keep any type of laminate floors looking their best. 

After all, easy care is one of the biggest reasons for their popularity. 

If you think about it, house cleaning is tough enough and there will always be plenty of it to last a lifetime. So when a break like this comes along, instead of adding to the load unnecessarily, why not simply enjoy it? 

Laminate flooring is a popular flooring option because it offers the warmth and beauty of wood flooring, but it’s cheaper and easier to work with. It’s a floating floor, which means you can lay it down on top of a variety of subfloor materials. But can you install laminate flooring over tile? Yes!

You have a lot of options when you update the flooring in a house, and one of them is whether you can skip grueling tearout work and just put new flooring over the old. Tile floors are one of the hardest to remove yourself. Picture chipping away with a heavy chisel and hammer to clear your floor one small chunk at a time. If you can skip that, why wouldn’t you?

If you want to know how to install a laminate floor over old ceramic tiles, you just might be in luck. This article will tell you the factors to think about before you get started to ensure you have a successful install. 

Can you install laminate over an old tile floor? The answer is yes, but you need to make sure the tiles are still in good shape and the floor is level. Also, check that you won’t be adding too much thickness to the floor and ruining doorways or transitions. Finally, use a good underlayment to protect the floor from moisture and squeaks.

What to Consider Before Installing Laminate Floors Over Tile

Installing laminate over tile isn’t the right move 100% of the time. Pay attention to the following to make sure it’s going to work out:

Condition of the Tile Floor

Laminate floors need to go on top of a sturdy and clean subfloor surface. Tile floors are usually good for this because they’re strong and durable. Sometimes if tile floors were installed badly or they are really old, they can crumble and break.

Don’t try to install a floating laminate floor on top of broken tiles. A chip here and there can be ok, but if there are whole pieces of tile missing or the grout is turning to dust, you risk the laminate floor coming apart later because it won’t be supported from below.

Leveling the Floor

It’s also important that laminate flooring goes down on top of a very level subfloor. There should be minimal difference in floor height. A good rule is less than ¼ inch variation across a six-foot span. You can test this with a long metal level or straightedge. If the level rocks back and forth, or if there is a gap between the middle of the level and the floor, that section of floor is not level.

If the floor has a big slope or especially if the tiles are badly uneven, you need to level it up first. You can use a concrete patch mix and a six- or twelve-inch metal putty knife to level up the low spots. You can also consider a thin self-leveling mix, but you need to make sure the floor is watertight for this. It’s also more expensive than concrete patch mix.

Floor leveling mixes contain water, which can create a humidity issue if you install the flooring over top too soon. Use a big fan and give the leveling material several days to dry completely.

Added Height of the Floor

This really comes into play in two situations: doorways and transitions.

Doors usually have just a small gap between the floor and the bottom of the door. This gap isn’t always big enough to add a new layer of flooring without interfering with the swing of the door. 

The easiest way to test this out is to take a plank of the new flooring along with a scrap of whatever type of underlayment you will install, stack them on top of each other, and slide them under the door. Remember to test the door not just when it’s closed, but also when the door is at its fully open position — and everywhere in between.

If the door opens and closes with some space left over when you perform this test, you’re good. If not, you need to either saw some length off of the bottom of the door or remove the whole tile floor first.

If your ceilings or doors are already short or if you have really tall people living in the house, you should probably remove the tile rather than adding to the height with new laminate on top.

As for transitions, the important thing is to make sure you have a plan for how to transition the new, higher floor to existing thresholds or places where the tile currently meets another type of flooring.

For example, you may need to install a trim or transition piece. These usually need to be glued or nailed to the subfloor (below the tile), so you might need to cut the neighboring flooring back slightly. Transitions are different in every house. It’s just important to figure out how you will complete them ahead of time so you can order the right materials and you end up with a nice finished product. 

Underlayment

Underlayment is a foam or paper material that you roll out and seal across the whole surface of the room between the subfloor and the laminate. It helps dissipate the noise of footsteps on the laminate (really important if you’re installing over tile), creates a moisture barrier, and helps the flooring to float freely.

The flooring manufacturer will usually tell you what kind of underlayment to use. You may find one that’s specifically for use on concrete or tile subfloors. A little bit thicker one will help with minor variation in flatness. There are lots of choices, so pick one that seems to fit your purposes and make sure to install it according to the instructions.

Potential Problems of Installing Laminate Over Tile

Watch out for these issues that people run into when they install laminate over tile floors. There is usually something you can do to prevent them if you see the warning signs, so study up:

Excess Moisture

Laminate floors are sensitive to moist environments. They can cause the flooring to expand or contract too much and pull apart the locking tongue-and-groove system. With a lot of water, it can get really ugly with warping, cupping, or buckling.

Tile floors, on the other hand, do great in humid or even wet environments like kitchens, basements, and laundry rooms. If your laminate is going into a room like this, you might want to get a moisture meter and test to make sure the room is pretty dry. If there is a drain in the floor or if water regularly drips onto the tile, you need to correct these issues before you install the laminate floor. Laminate won’t hold up under wet conditions.

Underlayment can go a long way to protect the laminate from excess moisture. You may even think about painting the floor with a moisture-barrier paint before you roll out the underlayment.

Uneven Tile

Uneven subfloors can cause all kinds of problems for your laminate floor. Minor problems include a clicking, creaking, or hollow sound when the floorboards flex underfoot. More serious problems can be buckling laminate floorboards that separate from one another and leave you with ugly gaps in your laminate flooring.

Your subfloor (in this case tile) must be as flat and level as possible. The instructions above on leveling the floor can help, but they can only do so much. Be wise and don’t risk your new laminate flooring by installing it on a shoddy and uneven tile surface.

Debris Under the Flooring

This goes for all flooring installations, but especially for laminate over a hard subfloor like tile: clean everything!

Even if your tile floor is flat and level, a small rock or chunk of grout that sticks up can cause all the problems of a majorly uneven floor. Take the time to sweep two or more times and preferably run a vacuum with a hose over the entire floor.

If the tile is messy with grout or other construction materials stuck on, take a metal putty knife and scrape them off. Get the flooring clean before you do anything else.

Staggering is one of the most important parts of installing a new laminate floor. If you do it right, it will make your whole space look just as beautiful as the showroom or catalog that made you choose laminate flooring in the first place.

Good staggering technique will make the wood-patterned laminate finish shine and look absolutely beautiful. But staggering your flooring isn’t just a cosmetic choice, it’s also where all the floor’s stability comes from.

You’ve probably walked on a laminate floor that had unattractive gaps between the laminate floorboards or other signs of the floor just not “fitting” together. The majority of the time, these problems come from not staggering the flooring right when you install it.

If you want a smooth, elegant laminate floor that’s going to last for many years, you need to know what you’re doing when it comes to staggering. The good news is it’s not too complicated – this guide will tell you everything you need to know from how much to stagger your laminate flooring boards to what patterns you must avoid, and more.

How Much Should You Stagger Laminate Flooring?

Whenever you are installing laminate flooring, the most important rule is to read the manufacturer’s instructions and follow what they say. Almost all brands and types of laminate need to overlap by at least 6 inches. Some will give a range, like 6 to 12 inches. Even if there is a range, you can overlap the boards by more than that, but never less.

What does an overlap or stagger mean? It means that when you lay a row of laminate lengthwise in the room, you offset the joints between planks from the joints in the previous row. You control the offset by cutting the first board in the row (your starter board) to be at least 6 inches longer or shorter than the starter board on the adjacent row.

You should follow this process on every new row of laminate flooring. While the adjacent rows are the most important, you should also look at the joints 2 and 3 rows away. If you look at any section of flooring (4 or 5 rows), no 2 seams in that section should line up exactly.

The Best Pattern to Stagger Laminate Flooring

What’s the best pattern you can use when staggering laminate? The answer is that you should avoid creating a pattern at all. This is called a randomized stagger.

randomized staggering pattern

A random stagger doesn’t just happen by chance, though. You really need to pay attention to each & every new row to make sure it’s different from the 2 or 3 rows before it. If any seams line up too closely, they will catch your eye from across the room.

Installing the flooring with a randomized pattern will keep your eye from focusing on the seams in between individual boards. Instead, you and your guests will notice the wood pattern on the laminate. The goal is to make the material pop by removing distracting patterns.

Avoid These Common Staggering Pattern Mistakes

You need to achieve a certain level of balance for a strong and beautiful laminate floor. If you don’t stagger the flooring by more than 6 inches on every row, it will be unstable and may lead to damage later on. But on the other hand, a lot of flooring installers get a little too strict when they stagger their flooring.

If you cut all your starter boards to the same length (full board, half board, and repeat) or if you cut them all to regular lengths (6-inches, 12-inches, 18-inches, 24-inches, and repeat), you will create a pattern that sticks out to anyone who looks at the floor.

If you’re the kind of person who really craves an orderly look and a rigid pattern, you can go for one of the staggering patterns I’m about to describe.

But I warn you, in my experience, it always looks better to choose a randomized stagger pattern because the flooring itself is more beautiful than the seams. The brain loves patterns, and if you install your laminate with one of these patterns, it will be the only thing you can see when you look at your new floor. 

H-Pattern

This is the pattern you will create if you alternate starting boards of full length and half-length. Some installers will use this technique to save time. It’s very easy to tell which length you should use to start each row because you only have two options. It’s also strong because rows will overlap consistently. 

The problem is that when you stand up and look at the floor, you will see the seams skipping every other row, looking like two dotted lines across the whole room. The eye and the brain are so good at seeing patterns like this, it will be the first thing you notice every time you see the floor.

Again, it’s not technically wrong to install the floor this way. Professionals do it all the time. If you really like the look, go for it. But remember, patterns like this one take the focus off of the beautiful wood finish you chose and paid for. Randomized staggering will put the focus back on the laminate itself.

h-joints

Stair Step Pattern

This is the other common mistake you see in laminate flooring all the time. Installers create a stair-step pattern when they use starter boards of several regular lengths and lay them in a repeating order. The first starter may be 6 inches, the next one 12 inches, the next one 18 inches, and so on.

It’s a little more complex and varied than the H-Pattern, but it also creates a strong pattern that will catch the eye every time. It sounds like a strong pattern at first because every row is staggered by a regular amount. However, the regular offset actually creates diagonal seams across the room in a stair step pattern. These can be a weak point across multiple rows. This doesn’t stop professionals from using this method all the time. It’s fast and easy, but you pay for it in quality later on.

Again, it’s not technically wrong to install the flooring this way. If you really like the look, you can choose to stagger your laminate in a stair step pattern. But remember, patterns like this one take the focus off of the beautiful wood finish you chose and paid for. Randomized staggering will put the focus back on the laminate itself.

stair step staggered patten

How to Stagger Laminate Flooring

If you like putting together jigsaw puzzles, you just might like installing laminate flooring. The boards usually click together and it’s fun to watch your progress. To set yourself up for a beautiful staggered laminate floor, keep in mind that prep work and planning ahead are essential.

Prepare the Room for Flooring

To get a room ready for laminate flooring, you usually need to tear out any old flooring material that was down before (unless you plan to install over laminate on top of another hard floor, like vinyl or tile). 

Make sure not to miss any staples or nails because even small bumps on the subfloor can affect your finished product.

You should also check the subfloor to make sure it is relatively flat and level. If your subfloor is made of wood and in bad shape, you may need to install a layer of ¼-inch plywood on the whole floor to make it smooth and strong. If it’s a concrete floor, make sure that it’s completely dry and has the right moisture content.

Acclimate Your Laminate Flooring

You must put your flooring material in the room 24-72 hours before you start installing it so that it can adjust to the humidity and temperature of the house. Acclimating prevents problems later on like buckling or bubbling in your laminate floors. Follow the manufacturer’s recommendations for acclimating your laminate so that you can qualify for any warranties.

Our guide to acclimating laminate flooring can tell you everything you need to know.

Use Underlayment

Follow your flooring manufacturer’s recommendations for what type of underlayment to buy. This is a layer of thin foam, paper, or plastic that creates a moisture barrier to protect your flooring from excess humidity. It also helps cushion the flooring to avoid squeaks or hollow sounds when you step.

Cover the whole subfloor with underlayment according to the instructions.

Cut Several Starter Boards

To begin your laminate flooring stagger, use a laminate cutter or chop saw to cut 5 or 6 laminate boards to various lengths. You can use the one end as starters for 5 or 6 rows, and the other end of the boards will be used on the opposite wall to finish your rows (you will probably need to trim these finish boards later).

Laying the Laminate Flooring

Remember that laminate needs an “expansion gap” between the edge of the flooring and any walls, cabinets, or other obstructions. It’s usually ½ an inch. Be careful to leave this gap all around the flooring. If you need to, use plastic spacers.

Lay one of your precut starter boards near the wall in one corner, and continue laying whole boards end to end down the room until you can’t lay any more whole boards in the row. You can then measure and cut the last board to fit.

Now move to your next row. Look at the starter board of your last row and at the other starter boards you cut earlier. Choose one that is at least six inches longer or shorter than the previous row’s starter board.

You may want to lay out several starter boards down one wall and compare their lengths. Are they all at least 6 inches longer or shorter than the row adjacent? Are you avoiding H-patterns and stair-step patterns? You need to constantly look for these patterns in order to avoid them — it’s easy to create them by accident.

I like to lay out 3 rows in front of me without locking them together. Then, I stand up and look at the flooring from far away to make sure that the seams look random and don’t create any type of obvious pattern. When everything looks good, you can go in and quickly snap the rows together.

If you have difficulty locking the planks together, you might need a plastic or wooden block to tap the tongues into place.

Staggering the Laminate Flooring

As you install your flooring, just remember to stand up often and look at the floor from a distance.

Look at the seams. If any of them are creating visual patterns by being too close together or because you created a stair step or H-pattern, adjust these rows before you go on.

Remember that a randomized look is created by carefully selecting our starter board on each row. You might need to measure a specific length for your starter board, especially as you begin the last few rows.

Why Stagger Laminate Flooring?

There are two reasons to stagger your laminate flooring: it makes the floor stronger and it makes it look better.

If you’ve ever built with bricks (or even toy bricks, or any type of block), or if you’ve ever looked at a brick wall, you understand the importance of staggering. If you stack all the bricks up in straight columns, they fall right over. But when you overlap each brick, spacing out the joints, you can build a stable wall.

It’s the same principle in flooring; overlapped or staggered laminate flooring will create a strong floor that can expand, contract, and absorb impact as one big surface. Staggering interlocks the boards like a big puzzle that will never come apart.

Staggering also prevents unsightly problems like warping, buckling in laminate floors, and forming gaps. Avoiding these issues will make your floor look good forever.

And if you do a really good job laying down the flooring in a randomized, irregular pattern, you will hardly notice the joints between boards. Each plank will blend into the next and you’ll see nothing but a big, beautiful room of fine laminate flooring.

The last thing you expect to happen when looking at your newly laid surface is to spot a few planks of your laminate floor coming apart. Especially if you were hoping to enjoy a gleaming expanse of wood-like flooring for the near foreseeable future without any hiccups..

So what steps would you need to take to resolve the issue? Find out all you need to know about how to fix laminate flooring that is separating, right here.

laminate floors separated after 18 months

Why Are My Laminate Flooring Separating?

There are a number of reasons why gaps are appearing on your laminate floor. Some of the most common of them are:

Changes in temperature and humidity

Laminate flooring is affected by changes in temperature and humidity just like wood floors are. Laminate floors contract & expand as their values decrease and increase.

Ambient humidity levels should be maintained between 30 – 60 percent. If they fall outside these limits,  your laminate flooring planks may start to separate.

Problems with interlocking

Laminate floor planks have a click and lock system. If they do not interlock properly, they may separate later on once the floor has been installed.

This issue is generally caused by the presence of debris in the groove system, or a faulty tongue or groove.

Failure to acclimatize flooring

Like wood flooring, laminate boards need to be acclimatized before being installed.

This can be done by leaving the flooring in its container in the room in which it is meant to be installed for a minimum of 48 hours.

Unprofessional installations

There are several issues a non-professional or first-timer may overlook when installing a laminate floor.

For example, they may not leave an expansion gap; they may also fail to notice that the subfloor is uneven, and is therefore unsuitable for having laminate flooring installed over it.

An uneven subfloor

Installing your laminate flooring over an uneven subfloor can actually affect the interlocking mechanism of the boards and cause them to separate, later on.  

As a result, it is important for you to check the level of the subfloor before you begin the installation process.

How to Repair Separating Laminate Floors 

Fixing laminate planks that are separating is a straightforward affair. Below we have provided the items you will need and the steps you will have to follow to reconnect laminate floors in order to close up any gaps. 

Items you will need:

  • Floor gap fixer
  • Mallet
  • Clear wood glue (optional)
  • Putty (optional)
  • 180 grit sanding paper (optional)

1. Clean the Gaps

Using a vacuum cleaner clean up any debris between the gaps you are about to fix and then wipe the planks clean with a damp cloth.

Doing so will eliminate any lingering dirt or particles which might prevent the boards from fitting together perfectly.

2. Apply the Floor Gap Fixer

Select the first plank you need to work on. You will need to ensure you work outwards away from the closest wall. (This is important since any outstanding gaps which remain once you have moved separated planks close to each other,  will be closest to the wall where they will be less noticeable.)

Next, place the floor gap fixer one inch from the gap (ensure you have removed its adhesive strip first of all).

Using your mallet, give the end of the floor gap fixer a sharp tap until the gap between the two boards is closed completely.

You will need to ensure you maintain a firm grasp on the gap fixer during the process.

You may need to give a  few taps before the board fits snugly against the one in front of it.

However, you should take special care not to strike the gap fixer too hard with the mallet.

3. Apply an Adhesive

You may also be able to add glue to the tongue and groove of the planks you intend to join using a cotton swab or a toothpick. You will need to promptly push the boards together, and wipe away any excess glue.

Alternatively, you will also be able to use putty in place of glue. However, you will need to sand it down with sandpaper (at least 180 grit) once it is dry. 

Using an adhesive is optional but can serve to decrease the likelihood of any gaps reoccurring in the future.

separating laminate floors

How to Keep Laminate Floors From Separating

There are a number of precautions you can take to ensure your surfaces will remain in excellent condition once they have been installed. Below, we examine what they are and how to keep your laminate floors from separating.

Regulate humidity levels 

Humidity levels should be monitored carefully ensuring they do not fall outside the range of 35 – 55%.

Hygrometers are particularly useful instruments for measuring these values.

It is also important for you to ensure that you use dehumidifiers during warmer summer months when humidity levels are likely to rise (air conditioning can also help as well since it has a similar effect).

During colder months when humidity levels tend to fall, you may need to use a humidifier instead to prevent them from falling and your floors from shrinking as a result.

Ensure proper installation

Although laminate flooring is comparatively easy to install, special care must be taken to ensure the appropriate steps are followed in each instance. 

This is because different manufacturers provide varying tongue and groove systems (for example, certain varieties of laminate flooring can be installed without the use of a mallet). Failing to follow the correct procedure might not only damage the planks and possibly result in gaps, but also void your warranty.

It is possible to order sample boards and practice with them.  Doing so can enable you to get the hang of working with your flooring efficiently and decrease the likelihood of any possible hiccups occurring during the installation process.

Acclimatize your flooring

During the manufacturing and storage process, your laminate flooring would have gotten exposed to varying levels of temperature and humidity.

Acclimatizing it will enable it to become accustomed to the ambient humidity and temperature in your home.

Generally, laminate flooring should be left in its original packaging on the floor of the room in which it is meant to be installed.

The process usually lasts for a maximum of three days (and a minimum of two), unlike solid hardwood flooring which can take as long as one week.

Failing to acclimatize your laminate flooring may result in your warranty being voided.

Enlist the services of a professional 

Although laminate flooring is pretty easy to install, getting a professional can turn out to be beneficial in the long run. Especially if you are unacquainted with the procedure yourself.

A professional will be more skilled at cutting boards to fit irregular shapes and laying diagonal flooring, for example.

Examine your subfloor before installation 

Before installing your laminate flooring, you will need to ensure that the available subfloor is appropriate for it and is in excellent condition.

Subfloors of carpet or glued vinyl, for example, are unsuitable for laminate flooring, while concrete, plywood, or tile, on the other hand, are ideal options for surfaces in this category.

It is also important for the subfloor to be level. Irregular subfloors can be made so by the use of self-leveling compounds or a floor grinder or sander. The services of a professional may be required if the structure happens to have more than a few irregularities.

Conclusion

Gaps in laminate flooring can easily be rectified by means of a straightforward, inexpensive procedure.

However, care should be taken to work towards the center of the room to ensure any outstanding gaps end up closest to the wall where they will be least noticeable.

Taking the appropriate preventative measures before installing your flooring, such as ensuring the subfloor is of a suitable material and is level can significantly lower the likelihood of gaps occurring.

For many people who have hardwood floors in their homes, the appearance of white spots and white marks can be both perplexing and frustrating. What caused them? Where did they come from? How do I get remove white spots on wood floors?

In this article, we’ll answer all these questions and offer some tips for prevention as well.

white spots on hardwood floors

What Causes White Spots on Wood Floors?

Although there are a lot of ways to prompt them, there aren’t too many causes of white spots and white marks on hardwood floors.  Let’s discuss these:

Heat

If you enjoy watching TV while sitting cross-legged on the floor eating a pizza, you should probably consider how hot the underside of a pizza carton can be.

The same goes for most cardboard or foil boxes that are used to contain hot food for delivery. These containers are all designed to keep food hot.  

Heat can also be transferred through the bottom of a full coffee or soup mug, or a bowl of hot pasta.

Moisture

Trapped Moisture

If your floors have been recently refinished, white, cloudy spots may form in areas where there wasn’t enough drying time between the coats of lacquer.

Where a wood floor’s finish is worn, water can seep under the edges of the finish and also become trapped between the layers

Spills and Condensation 

If you’re washing that pizza down with an ice-cold beverage, resting the can or bottle on the wood floor can cause white marks. This is the result of condensation traveling down the outside of the can or bottle. Left unchecked, water spills on hardwood floors and condensation can form white water marks on a wood floor.  

Tap Water

In terms of water, “hard” is the term used to describe water with high mineral content.

On some level, most tap water contains minerals. When water evaporates, the minerals remain. Damp mopping with tap water can cause white spots to appear if droplets are allowed to evaporate before they’re dried. The harder the water; the bigger the problem.

Rainwater

Rainwater that’s tracked in from outside is a more common concern in climates with heavy or long rainy seasons.

In these cases, white spots are usually more present nearest a home’s entry doors. This is because rainwater usually contains sodium. On hardwood floors, when rainwater evaporates, the sodium remains.  

Snow 

As if water tracked in from outside isn’t bad enough news, snow along with its naturally high sodium content can be especially rough on hardwood floors. Rainwater is naturally salty, but snow is even saltier.

In the northern hemisphere, wood floors surrounding entry doors can quickly become almost entirely white during the winter. The melted snow’s deposits of salt and other minerals often combine to form what appears to be a large cloud.

Removing scale from a hardwood floor can be a tedious and time-consuming challenge.  

Mold

If the white spots were discovered under a potted plant or under something that remained in direct contact with the floor (boxes, cushions, or even shoes), this could be white mold.

Mold needs two things to survive; moisture and a food source. In this case, the food source is wood.

This type of trouble is more prevalent in moist climates. White mold usually grows in dark, dank areas of a home. You might notice a white powdery substance on the edges of the wooden basement stairs or the basement ceiling joists that support the floor above.

If a roof has leaks or isn’t properly ventilated, white mold might be present on the attic rafters or crawlspaces.

In some cases, the overall appearance of mold can become darker as it generates more spores.

For some people, this situation can send health spiraling downward. For others, the same situation might not even prompt a sneeze. 

Read our article on how to remove mold on wooden floors to deal with this.

Spider Poop

Yes. You read that right.

No. We’re not kidding.

Granted, spiders don’t usually gather out in the open for a poop pow-wow or defecation shindig on hardwood floors.

In fact, most spiders don’t even do this on special occasions. (!) But if it’s been a while since the last time the corners of the room were dusted, well …anything’s possible.

Cleaning Solutions For Removing White Spots That Can Ruin Hardwood Floors

When some people think about removing hard water deposits, the first solution that comes to mind is a container of all-in-one calcium, lime, and rust remover. This type of product can be very destructive to wood and wood finishes.

For other people, the solution is vinegar. But vinegar’s low Ph content makes it as unsuitable for cleaning wood floors as other acidic solutions. Vinegar is corrosive. Corrosives should not be used as wood floor cleaning solutions.

Of course, vinegar can be diluted, but if you’re going to do that, you might as well dilute lemon juice. The Ph content is about the same and lemons smell good.

How To Remove White Spots From Hardwood Floors?

The solution to white spots and marks depends on the cause:

White Spots Caused By Heat

The remedy for this is quick and simple; Place a dampened terry cloth towel on the spot and hold a blow dryer over it.

Start with the blow dryer on the lowest heat setting and check your progress every few seconds.

White Spots Caused By Trapped Moisture

More often than not, these will go away on their own.

If not, treat these as you would a white spot caused by heat, but leave the dampened terry cloth towel out of the process.

Removing Spots Of White Mold

If the white spots are limited to an isolated area such as under a potted plant, a pair of shoes, etc., hydrogen peroxide will remove this. Hydrogen peroxide also functions as a mildewcide.

(See, How To Remove White Spots Caused By Moisture…)

However, if you discover white mold in other places as well, the best thing to do is to call a mold remediation specialist. A remediation service ensures the removal of all mold throughout the entire home.

To Remove Spider Dung

Dust the corners and spray some pet stain cleaner on the um… er… spots. They will disappear in a few minutes. Wipe the area dry with a microfiber cloth (If you’d rather use several squares of t.p., that’s your prerogative).

To Remove White Spots Caused By Moisture

Alkali and acid neutralize one another.

Because most forms of water are somewhat alkaline, a somewhat acidic solution should be used to remove the minerals that remain after evaporation. Hydrogen peroxide in an appropriate concentration will serve this purpose.

Things You’ll Need:

  1. Floor Vacuum (or a vacuum with a setting for wood floors or with a hard floor accessory attachment. Nothing with a brush roller)
  2. Face Mask
  3. Rubber, Latex, or Vinyl Gloves
  4. 8 oz. Hydrogen Peroxide 6%  (or 1 oz. pure lemon juice and 10 oz. distilled water)
  5. Spray Bottle (Empty and clean)
  6. Neutral Ph Floor Cleaner for Hardwood
  7. Flip-Head Mop
  8. Several Two-Sided Mop Pads (one side for damp mopping, the other side for drying)
  9. Several Terry Cloth Towels
  10. Plastic Putty Knife
  11. Whisk broom and dustpan

Instructions:

  1. Put on the face mask and gloves
  2. Transfer the hydrogen peroxide or lemon water solution into the spray bottle
  3. Spray a small area (1’ x 1’) of the floor
  4. While this area of the floor is still wet, use the plastic putty knife to gently remove as much of the offending white crud as possible. Don’t worry if you can’t get all of it. We’ll discuss what to do about the rest later. Pro Tip: When scraping any surface with a putty knife, it’s important to always keep the surface wet.
  5. Scrape residue from the putty knife into the dustpan.
  6. Wipe the area with a water-dampened terry cloth towel as you move from one area to the next. After you’ve scraped up as much of the white stains as can be easily scraped from your wood floor, you’ll move on to confront the more stubborn deposits that remain.
  7. Saturate several terry cloth towels with distilled water and wring them out until they’re damp only
  8. Focusing on a 3’ x 3’ section of the floor, spray the remaining patches of white with the solution in the spray bottle (It’s easier to work in sections not larger than about 3’ x 3’)
  9. Place the damp terry cloth towels over the white stains.
  10. Check the stains every five minutes to see if they come up more easily.  If they don’t, leave the dampened towels in place until the next check. Be sure to keep the towels damp. Exchange them with freshly dampened towels if necessary.
  11. When the stains have become less resistant, remove them with your   putty knife as you did earlier with the less stubborn ones
  12. Move to the next section of the floor and repeat steps 8-11
  13. When all the white spots and marks have been removed, damp mop the entire floor with the neutral Ph floor cleaner. Use the chenille side of the mop pad to dry and buff the floor as you go
  14. Follow up with the Neutral pH Cleaning Solution according to the manufacturer’s directions for use

Preventing White Spots on Hardwood Floors

As always, the key to the life and beauty of hardwood floors is proper care.

Of course, it might be possible to go on forever about various difficulties that can come with hardwood floors. But in reality, these challenges are usually the result of improper or lacking maintenance.  Where a simple but solid care and maintenance routine is in place, these challenges rarely present themselves.

Listed in random order, here are some measures to take to prevent white spots:

  1. Clean up spills as soon as they happen
  2. If you’re inclined to using your hardwood floor as a coffee or dining table, be sure to use coasters.
  3. While you’re at it, set that pizza carton on a pair of oven mitts
  4. To clean your hardwood floor, try using a neutral Ph floor cleaner intended for use on hardwood
  5. When damp mopping, be sure to dry the floor as you go
  6. If your tap water is hard, use distilled water to damp mop
  7. Remove potted plants from the floor
  8. Place protective floor mats on either side of exterior doors. To ensure that shoes are dry, place two or three mats next to one another inside the entry
  9. Keep a towel handy so that Fido’s paws can be dried when he comes in after getting them wet
  10. Better yet, buy Fido some protective footwear
  11. Even better still, be sure that everyone removes wet footwear upon entering the home (You too, Fido)
  12. Have and use an appropriately located umbrella stand
  13. If your home doesn’t have a mudroom or some form of an anteroom, try setting up an entry bench with shoe storage. That way, items 9 and 11 can be more easily managed
  14. Mount coat hooks and a hat rack over the bench so that outerwear can be removed when entering the house
  15. Get in the habit of entering through the door located nearest to wherever the floor cleaning equipment and supplies are stored
  16. Be sure to include corners in your usual dusting routine to ensure the removal of spider webs
  17. Place rugs in areas of your wood floor where foot traffic is heavy. This will prevent the finish from becoming worn.

Whatever type of hard floors are installed in your home, in addition to preventing white spots, keeping floors dry will go a long way to reducing the risk of slips and falls.