How To Fix Hardwood Floor Buckling
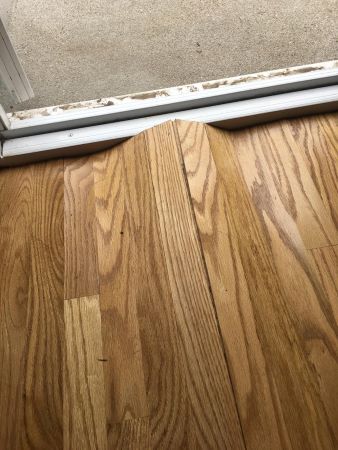
Buckling is the term that’s used when one or more areas of a floor swell or lift upwards.
In some cases, the floor might have only one swollen area whereas, in others, the floor might appear to be wavy or undulating as the floorboards can arch upward several inches.
As you can imagine, the sight of a buckled wood floor can be pretty jarring. Let’s face it; this isn’t something that can be obscured by tossing a throw rug over it. A throw rug also won’t do much to resolve the problem or keep anyone from stumbling over it. Something needs to be done.
If buckling wood floors is a concern, read on to learn about causes, how to fix buckling in hardwood floors, and ways to prevent this situation.
What Causes Wood Floors to Buckle?
Water
Hardwood floors can react to moisture in various ways. Buckling is a very significant reaction. So it’s natural to assume that a significant event preceded it such as a flood or an event that caused prolonged contact with water.
Humidity
There’s a reason gymnasiums have wood floors, but locker rooms do not. Locker rooms can be extremely damp and humid. If you live in a tropical climate, or in a region that tends to be very muggy during the summer months especially, your hardwood floors are at greater risk for buckling.
Lack of or Incomplete Acclimation
Before a wood floor is installed it must be acclimated to its immediate environs. To do this, the floorboards are placed in the room where they’re to be installed, and allowed to remain for at least two weeks before installation takes place. This allows the wood to “breathe” or draw in the moisture in the air so that it can expand as necessary.
This doesn’t mean the floorboards should be acclimated to greenhouse types of conditions or that the floors’ intended substrate shouldn’t have a limited moisture content. The moisture content of the substrate should be monitored using a moisture reader. Ambient air temperature should always be in the 60℉ to 80° range.
Installation Failure
It is only in very rare instances that a professional flooring installer will overlook or forget to do something crucial to a successful installation.
On the other hand, laypersons are more likely to fail to appreciate critical steps when installing hardwood floors on their own. Overenthusiasm and assumption can play major roles as these can lead to failure to allow for long enough periods of acclimation and failure to leave enough room for their new hardwood floor to expand.
Another reason for buckling hardwood floors is the failure to install a moisture barrier between the substrate and the new floor itself. If a moisture meter wasn’t used prior to installation or the readings were ignored, the resulting lack of protection that a moisture membrane would have provided can cause trouble in the long run.
If you suspect installation failure has caused your hardwood floor to buckle, you’ll need to call your flooring installer right away.
Can You Repair Buckled Wood Floors?
On the other hand, if you and your flooring installer happen to be one and the same, you’ll need to look for ways to remedy the situation. If your wood floor hasn’t buckled too severely, there might be something you can try, but there’s no point in it until you do the following:
Identify The Source

Firstly, it’s important to keep in mind that your hardwood wood floor has warped.
In most cases, the cause of a warped hardwood floor is moisture. So naturally, you’ll need to take measures to locate the culprit.
However, for every action, there is an equal and opposite reaction. Buckling is an extreme reaction. Such a reaction usually indicates that your hardwood floor has been directly exposed to more than mere moisture. Think!
The floor might have been underwater? BINGO!
A flood would certainly account for an extreme reaction.
But if your hardwood floor is no longer submerged for whatever reason (e.g., after being somehow roped into it yet again, while shopping for groceries with your mother, you were so thoroughly captivated by the dulcet tones of her delightful litany concerning the high price of produce, her bursitis, and her last husband, that you remembered you’d left the water running in the tub), then we can assume that the source is no longer an issue,
However (there’s always a “however”!), because your floor can be directly exposed to water without you being aware of it, it’s time to bring your awareness up to date.
Assuming you don’t hear squishing sounds when you walk on your hardwood floor, you’ll need to look for other telltale signs of moisture.
Telltale Signs of Moisture That Can Cause Your Wood Floor to Buckle
Start by inspecting your walls. You’ll need to inspect your home’s interior and exterior walls. Look for walls that are:
- Swollen
- Mossy, moldy or mildewed
- Bubbled or peeling
- Water stained
- Water Streaked
- Seeping
- Water, water, water…
These characteristics can be caused by
- An improperly sealed window or door
- A leaking pipe or condensation
- A leaking faucet
- An exposed sill plate.
A sill plate, also known as a sill, framing sill, or sill piece, is a piece of lumber usually a 2”x4”, that sits atop the length of a structure’s founding walls or footings of a structure. If your home’s foundation is made from poured concrete, a sill plate rests horizontally on top of the foundation and flush along the length of the foundation’s outer edges.
If you have no trouble locating part of your home’s sill plate, then it’s exposed to the elements. An exposed sill plate that’s soggy, swollen, water-stained, or rotting indicates that it is saturated or has been saturated at some point. A saturated sill plate is a potential troublemaker.
- A cable (Yes, a cable!)
If you have cable television service, satellite internet service, a low voltage security system, wired security cameras mounted on your home’s exterior walls, or anything that calls for a cable to pass through an exterior wall to some type of terminal inside, then the cable should first be looped before it’s fed into the exterior wall.
To prevent water from traveling along the part of the cable that runs past the exterior wall, this “drip loop” should be lower than the cable’s entry point. A cable that isn’t drip looped or isn’t properly looped can cause water damage.
This might not seem like a big deal, but in climates where there is heavy annual rainfall, the damage that can be caused by water that’s allowed to travel along a cable can become increasingly significant with each drenching.
Put The Cause of Your Buckled Wood Floors in Check
Once you’ve located the source of what’s causing your hardwood floor to buckle, it’s time to eliminate it. This will also help to stabilize your home’s humidity and moisture levels.
Until then, any effort to fix your buckled hardwood floor is likely to be wasted.
How To Fix a Buckled Wood Floor
If your hardwood floors haven’t buckled too severely, your hardwood floor might right itself as it dries. You can also use a floor dryer to speed up the process. These are usually available for rent at your local home improvement center or you can buy one for under $60.
You can also help to straighten your hardwood floors by placing some weight on them as they dry. Just be sure to start with something light and continue to add weight a little at a time as the pressure helps the boards settle back into place.
If neither of these solutions does the trick, you’ll need to remove and replace the warped floorboards. You can use boards that were saved when your floors were initially installed. Because ten percent is added to the measurement of the planned installation area, there might be enough extra boards to complete the repair.
If not, you’ll need to buy additional boards at your local home improvement center or flooring specialty store. Be careful to match the wood species and color. If the color of the existing and spare floorboards can’t be matched exactly, it’s best to choose a lighter color so that you can stain them darker to match and blend with the rest.
Instructions for Replacing Buckled Hardwood Floorboards
Although the following instructions represent the simplest way to replace warped floorboards, an intermediate skill level is called for. While working outside your comfort zone is always a good way to expand your skillset, be sure to ask for help from a professional if you’re not confident in your skill level. These instructions apply to nailed or glued floors. Repairs to tongue and groove planks call for a more advanced skill level.
In addition to the floorboards, you’ll need to have these items on hand:
- Floor nailer and nails (for floors that are nailed)
- Circular saw
- Straight edge
- Chalk
- Chisel
- Mallet
- Pry bar
- Floor adhesive (Check with the floor’s manufacturer for recommended adhesive)
- Clean Towels
- Whisk broom with soft bristles
- Floor Vacuum or vacuum floor accessory
To replace buckled hardwood floorboards, follow the steps listed below:
- Use the straightedge and chalk to draw two parallel lines along the length of the plank, about ½” inside the edge.
- Set the circular saw to the depth of the floorboard only.
- With the circular saw, cut along the chalk lines.
- Cut diagonally to form an ‘x’ between the parallel lines.
- Beginning at the center of the ‘x’, tap the chisel with your mallet to remove the floorboard piece by piece.
- Continue in this way to remove any old glue. Note: Do not attempt to sand the glue. Some older adhesives were manufactured with asbestos which becomes powerfully carcinogenic when sanded or ground.
- Uset your pry bar to remove rusted, loose, or protruding nails.
- Collect loosened debris with the whisk broom.
- Vacuum the area. It’s essential to keep your work area completely free of dust and debris.
- If you notice any sign of moisture, aim an electric fan or floor dryer at the affected area until it’s completely dry.
- Fit the new floorboard to the exact dimensions of the empty space.
- Nail or glue the replacement board (as appropriate) into place.
Note for nailed or glued wood floors: If the empty space is surrounded by other boards, this final piece will need to be glued in place.
- Use weights to hold the glued board flush and firmly in place.
- With a water dampened towel, wipe up any excess glue as quickly as possible. Dried floor glue is difficult to remove and will require a different process.
- Allow the glued board(a) to set according to the adhesive/floor glue manufacturer’s recommendations. Two hours are usually necessary before removing the weights.
If you’ve concluded that a moisture barrier might have prevented the source of the damage from having such a pronounced effect, you probably shouldn’t attempt to fix your buckled wood floor on your own. This is a time-consuming and often tricky process that’s best undertaken by an expert.
Speaking of prevention…
How to Prevent Your Wood Floor from Buckling
It truly is as your mother (the person you can hardly wait to go grocery shopping with) always says. An ounce of prevention really is worth a pound of cure. So, it’s important to be sure not to allow your hardwood floor to be in prolonged or repeated contact with moisture.
- Be sure to clean water spills as soon as possible
- Elevate potted plants
- Don’t allow wet towels, boots, or shoes on your hardwood floor
- Keep a rug or doormat outside of exterior doors
- Keep your home well ventilated to prevent high levels of humidity
- Refresh the seal. If your floors have a wax seal, this should be done annually. For floors with a polyurethane seal, this should be done every few years
- Conduct routine inspections as above for leaks and/or excess moisture
Also, be on the lookout for changes as they might not be terribly obvious at first.
Warning Signs of Buckling Hardwood Floor
A buckled hardwood floor doesn’t necessarily happen overnight.
In fact, in cases where the buckling isn’t the result of an extreme event, there were probably warning signs that presented themselves on some level or in some way. These signs might be small, but they are clarion calls nevertheless.
- Clouding, White Stains: A floor or an area of a floor that appears cloudy or hazy. The appearance is distinctly different from the hazy effect of abrasion.
- Dark or Black Stains: Water or moisture that’s underneath the floor or has penetrated the surface can cause this type of stain. You can learn more about this specific issue in our article on removing black stains on hardwood floors.
- Rust Stains: These usually form at the edges of individual floorboards that have been fastened with nails.
- Cupping: This is the term for individual floorboards that lift at the sides. The effect is a U-shaped board. Cupping can happen to a single board or entire sections of boards. Learn more about this topic in our guide on hardwood floor cupping.
- Crowning: A floor that’s crowned will have one or more “humps” in it.
- Lifting: As the term suggests, the floorboards lift at the ends.
All these things are evidence of damage from moisture. If the source is eliminated before the damage becomes profound, cupping, crowning, and lifting can resolve themselves.
However, instead of waiting for these warnings to become more prominent, proactive measures should be taken to ensure the earliest possible intervention. The following items are vital components of such an effort.
- Moisture Tester: Klein Tools makes a very decent one that sells for under $40. In addition to moisture reading of concrete to let you know if installation of a water barrier membrane is called for, you can also use this device to read the moisture content of wood, drywall, and masonry. So, it’s perfect for detecting leaks as well. For the price, you really can’t do much better.
- Humidity Monitor: For under $20, you can buy a pair of these to alert your phone when the readings are outside of the range you preset by using the app that comes with it. These hygrometers display the temperature as well. Very cool.
- Dehumidifier: You can purchase a dehumidifier that will dehumidify up to 3,000 sq. ft. for about $140. For a few dollars more, you can even buy one with wi-fi remote capability.
The total cost of the three items, above, comes to around $200. Hence, the cost to prevent buckled hardwood flooring amounts to a tiny fraction of the cost to replace it. Prevention also saves a lot of hassle and headache.
While it might seem like investing in hardwood floors represents a lot of work, in reality, they’re no more difficult to maintain than any other type of flooring. The difference is that hardwood floors never go out of style and with proper care, yours can last a lifetime.
Table of Contents


