Tag Archive for: buckling

Like the most bothersome issues, buckling in laminate floors seems to almost happen overnight. One moment, all seems right with your laminate floor and the next, it seems to be doing its very best to defy gravity. 

What could be the cause of that unwelcome rise right in the middle of your living room floor? Can it be rectified? If so, how to fix buckling in laminate floors?

We’ll discuss in detail each of these questions along with preventing buckling in laminate floors.

What Is Laminate Floor Buckling?

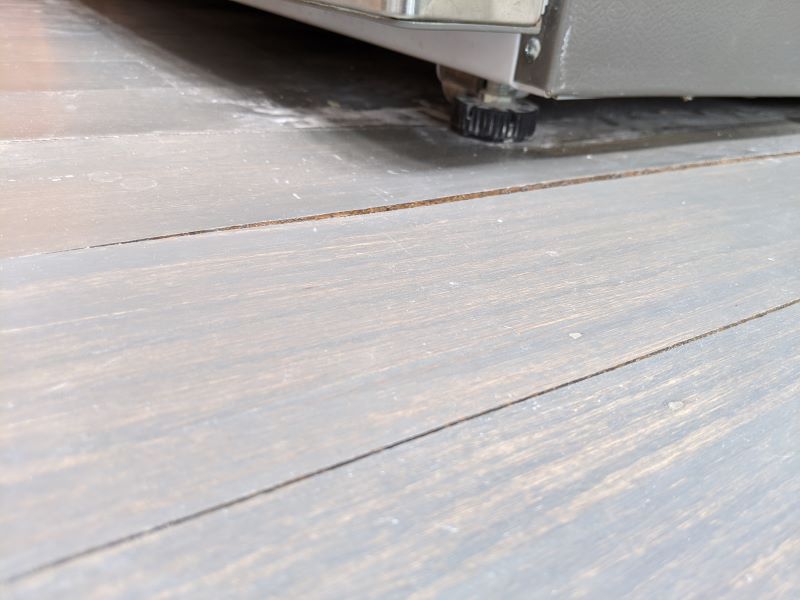
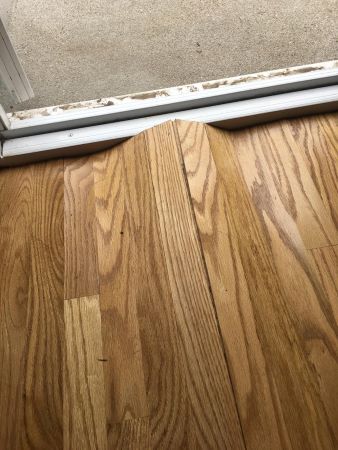
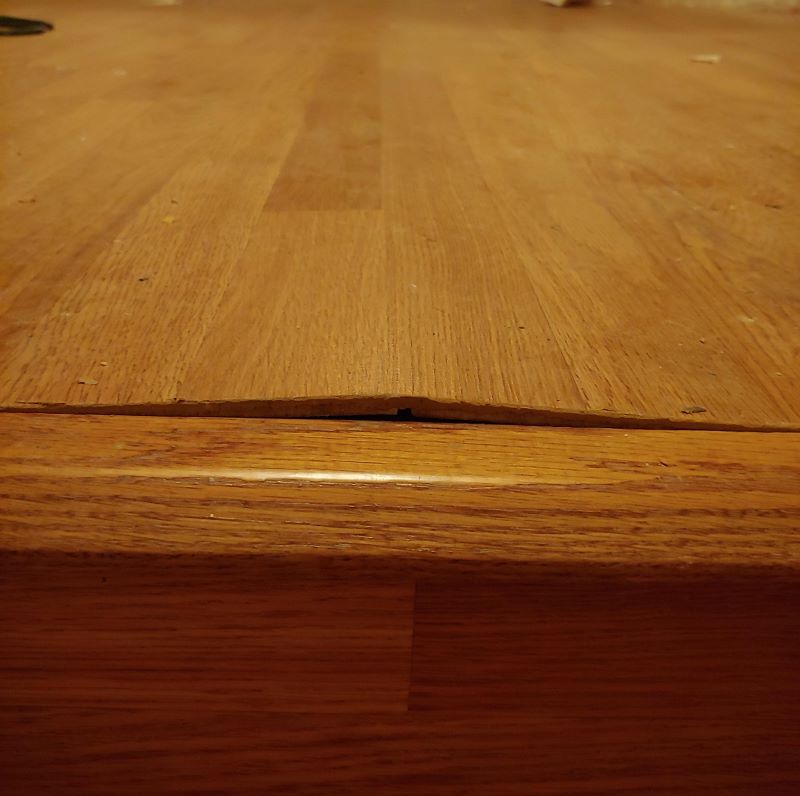
Laminate floor buckling is a condition that causes laminate floors to take on an uneven appearance due to their planks seeming to lift and split. This results in raised ridges at specific points on affected laminate floors.

laminate floor buckling

Why Do Laminate Floors Buckle?

Moisture and changes in temperature are two of the main causes of buckling in laminate floors. Quite often, the problems they cause in this regard could be as a result of the following issues:

1. Failure to clean spills on time

Although laminate flooring may possess some moisture resistance, it is not completely moisture-proof. Hence any spills should be cleaned promptly. Leaving any spills for long periods could result in moisture seeping between the floor planks, damaging them as a result.

2. Inappropriate cleaning methods

Laminate flooring is not meant to be cleaned with copious amounts of water or with a steam mop. Doing so will ensure moisture can reach the core of the planks and cause damage to them.

3. Lack of a moisture barrier

This is especially the case when installing flooring over a concrete surface. This subflooring secretes moisture over time which can affect the laminate flooring installed over it, resulting in swelling in the planks.

4. Lack of expansion gaps

Laminate floors tend to contract during colder weather and expand during warmer weather. As a result, it is important to leave expansion gaps during the installment process to accommodate such changes. Failure to do so will result in buckling when floor planks expand against each other in the absence of sufficient room for their new sizes.

5. Installing the wrong type of flooring

Not all laminate floors are suitable for rooms exposed to a great deal of moisture (such as kitchens, mudrooms, and bathrooms). Using the wrong variety which is especially susceptible to water can result in buckling.

6. Failure to acclimatize flooring

Like hardwood and vinyl flooring, you need to acclimatize laminate flooring so that it can adjust to the temperature and moisture levels of its surroundings.

To do so, you will need to leave the flooring in its packaging, lying flat on the floor for a minimum of 48 hours, in the room it is to be installed in.

How To Fix Buckling In Laminate Floors?

Buckling in laminate floors can be fixed. However, different measures may be required depending on the nature and the extent of the damage.

As a result, you will need to take the following steps:

1. Ascertain the source of the moisture

You will need to first ensure that the buckling is not being caused by leakage of some sort. For example, if the flooring surface in your kitchen happens to be affected, you will need to ensure that it is not a result of any leaking pipes or appliances.

If you happen to have a concrete subfloor, you will need to ensure that a vapor barrier has been installed to protect your laminate planks from any moisture which may seep through the concrete.

You will also need to wipe any spills which may have been left unattended.

Once you have done so you will need to switch on your dehumidifiers. However, it is worth noting that while dehumidifying the affected area may resolve the issue if it happens to be minor, you may need to implement one or more of the following steps presented below in the event of the damage being somewhat more extensive.

2. Replace part of your floor

If a relatively small part of your floor happens to be affected, you will need to remove the damaged portion by implementing the following steps:

  • Remove the molding closest to the part of the floor which needs to be replaced.
  • Remove the tongue of each plank from the groove of the one closest to it, and then remove the segment of laminate flooring. (This should be repeated  until you get to the damaged part of the floor, and you should discard any planks which happen to be damaged.)
  • Replace the damaged planks with boards from the new batch, locking them as you proceed to the molding (simply locking in any planks you have retained to their former position as well). Special care should be taken to ensure that an expansion gap is left to prevent buckling in the future.
  • Tap the planks with a hammer and a wood block to ensure they are firmly set.
  • Replace the molding.

It is also possible to saw off the affected part using a circular saw and tape, however, this method is somewhat more complex and may require the services of a professional.

The possibility of having to replace part of your floor means that ordering surplus quantities is always recommended. If not, you may have to order another batch if possible.

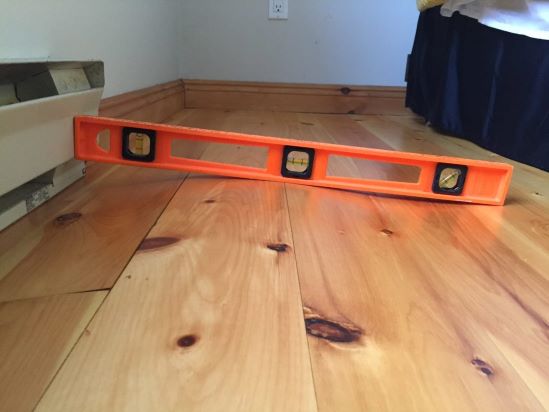
3. Provide an expansion gap

If the issue is caused by the lack of an expansion gap, you will need to remove the molding. You will also have to create the gap using spacers and cutting out part of the floor close to the walls. The minimum recommended size for an expansion gap is a quarter of an inch. Also, make sure that the expansion gaps left when installing your floor aren’t too big.

The molding will need to be replaced following the procedure.

How To Prevent Buckling In Laminate Floors?

Unlike hardwood flooring, laminate flooring cannot be sanded. It will also not return to its original state when dried in the event of sustaining significant water damage. As a result, taking special precautions to protect your floor is rather important. Here are how you will be able to do so:

1. React promptly to spills

Any spills should be promptly cleaned up. If necessary, you may need to use a wet-dry vacuum to ensure as much water as possible is removed from the seams.

2. Check plumbing and appliances regularly

If you have installed laminate flooring in kitchens or bathrooms, you will need to regularly check the plumbing in those rooms to ensure it is in peak condition. Potential problem spots such as toilets, sinks, and heaters should be inspected closely.

You will also need to inspect your appliances as well, to ensure none of them happens to be leaking, constituting a buckling hazard as a result.

3. Opt for other flooring surfaces where possible

Although laminate flooring is more water-resistant than hardwood, it is by no means waterproof.

Hence, installing it in rooms where spills and leakages are more likely to occur, will significantly increase the risk of buckling.

As a result, opting for waterproof options where possible is highly recommended. It is actually possible to obtain high-quality vinyl flooring which will enhance the esthetic quality of your kitchen, shower room, and mudroom.

4. Choose the right kind of flooring

If you are intent on installing laminate flooring in rooms where a great deal of water is used, you will need to ensure you select a water-resistant variety.

You will also need to take special care during installation to ensure that the seams are as tight as possible.

It may also be possible for you to use a polyurethane laminate floor sealant for the entire floor. 

However, it is also worth noting that doing so may actually void your warranty and so you will need to pay close attention to the manufacturer’s stipulations in this regard before proceeding with this step.

Two weeks after you have moved into your dream home, you pop out to do some shopping. On your return, you find Cookie and Fudge, your two Labradors, lapping at a pool of water on the pale golden wooden floor of your dining room.

What should you do to clear up the spilled water on the wood floor and minimize water damage to your hardwood floors? What issues are likely to arise as a result of the incident?

In this post, we examine the answers to these questions in detail to enable you to handle such an occurrence effectively and as a result, minimize the risk of further damage to your floor.

What To Do If You Spill Water on Hardwood Floor?

When any spill occurs, you will need to act as quickly as possible. Taking prompt action can enable you to forestall the possibility of your floors sustaining any serious damage, and possibly prevent any reduction to the value of your home, and even damage to your property as well. 

The following steps will enable you to get rid of as much moisture in the shortest possible time and greatly reduce the risk of any of the above issues occurring.

1. Identify the Source of the Spill

The first thing you need to do is determine the source of the water (once you’ve gotten your pets out of the room to prevent them from spreading even more water all over your home). You would need to find out whether it is due to a leak, a burst pipe, or simply the result of your pets turning over their water bowls.

This step is of paramount importance since attempting to mop up the water without being able to stop it from its source will defeat the purpose of getting rid of it.

2. Remove Any Furniture and Furnishings

Once you have cut off the flow of water, you will need to remove any mats, rugs, or carpets in the area. You will also need to remove any furniture as well. The furniture and the furnishings will have to be placed in an appropriately safe place.

Doing so will enable you to assess the full extent of the spill, and also ensure you can prevent any furniture or soft furnishings which have not been drenched from getting soaked.

Taking this precaution will also enable you to prevent any soaked items from constituting an additional risk to your wooden floor.

3. Mop Up the Water

This task is best handled using absorbent clothes such as old towels to be able to get rid of the excess water as promptly as you can. If you have to deal with a significant amount of water, you will need to make use of a wet vac. You will also need to use it even if you are dealing with a spill that has been mopped up with towels to ensure you can target any moisture which has seeped between each plank.

4. Get Rid of Any Residue

Depending on the source of the spilled water on your wood floor, you may have to deal with lingering silt or mud. This residue will need to be cleaned up thoroughly as well to not only restore the surface to its pristine state but to also reduce any possible risk of staining.

5. Disinfect the Surface

Getting rid of any water spilled on your hardwood floor is only one part of the task of minimizing damage to it. Another risk that occurs due to the spill is that of mold that prefers moist, warm, organic surfaces. This fungus can cause damage to your floors, furniture, and soft furnishings and most importantly can negatively affect your health.

You will need the following:

  • Gloves
  • Mask
  • Absorbent cloths
  • Cleaning cloths
  • Spray bottle
  • Disinfectant (store-bought or homemade — a solution made from 1 cup of water and ¼ cup vinegar.)

You will need to ensure the entire room is ventilated properly and spray the disinfectant on the part of the floor affected by the spill. You will also need to clean the surface thoroughly with it and clean it up with absorbent cloths at once.

Following this procedure, you should make use of the wet vac to eliminate any excess moisture your floor has been exposed to as a result of this step.

If you have any questions, we have a detailed guide for disinfecting your hardwood floors here.

6. Switch on Your Dehumidifier

Dehumidifiers are excellent at eliminating any excess moisture from the air and in this instance, they will dry it out and also dry out your floor as well.

Air conditioners are also capable of functioning as dehumidifiers to some extent and should be switched on as well as any fans in the room.

To eliminate as much moisture as possible, you will need to run these appliances for an extensive period (between 24 to 72 hours).

As is required during the disinfecting process, you will also need to leave the windows open during this step (unless there happens to be a downpour).

7. Assess the Extent of the Water Damage

Despite your efforts, and depending on the circumstances of the spill, there will be the possibility of lingering moisture in your wood floor. As a result, you will need to use a moisture meter to regularly check for the presence of any excess moisture during the weeks following the spill.

Issues Which May Arise Due to Neglecting Water Spilled on Wood Floor

Due to the organic nature of wood and its tendency to absorb water, spills should be taken seriously.

Merely mopping up the pooled water and moving furniture aside to dab up any in concealed areas will not be sufficient in the event of a spill. Failure to implement the above steps may result in the following issues:

1. Cupping

Exposure to water may result in an imbalance in moisture levels in the planks of your wood floor with higher levels being present at their bases. This could result in their sides expanding so that they are raised higher than their centers giving them a convex shape — an occurrence known as cupping. Learn how to fix cupping in hardwood floors in our detailed article.

Cupping in hardwood floors

2. Buckling

If the spill happens to be especially large and is not handled immediately in an effective manner, the exposure to the excess moisture may result in the planks actually lifting from the floor resulting in an uneven surface. This occurrence is referred to as buckling. It may be resolved by removing the affected planks, thoroughly drying the underlying surface, and adding new replacement planks. For more details, check out our article on how to fix buckling in hardwood floors.

buckled hardwood floors

3. Mold Damage

Mold tends to thrive in the presence of moisture and organic material, hence an unattended spill could provide it with the ideal opportunity to spread in your home. The fungus also tends to propagate promptly as well.

The presence of unattended moisture in your floors could attract spores which will begin to reproduce while feeding on the wood. They could also spread to other sources of organic material such as paintings, furniture, drapes, and upholstery and damage them as well.

The presence of mold in your home could irritate the eyes, noses, and throats of residents. It could also trigger allergic reactions and even result in more grievous issues such as serious damage to the lungs.

We recommend going through our article on removing mold on hardwood floors.

What to Do In Case of Major Water Damage to Your Hardwood Floor?

In addition to buckling or cupping, another sign which is likely to alert you to the presence of water damage is the appearance of stains on the affected parts of the hardwood floor.

This discoloration may be caused by nails becoming rusted, the presence of mold, or the reaction of the tannins contained in the wood to the presence of water.  

The following steps will need to be taken depending on the extent and the nature of the damage to restore your floors to normal:

1. Drying

Occasionally, cupped hardwood floors may flatten over time as they dry out. However, this may take up to half a month or even longer. The use of dehumidifiers and special fans can help to shorten this process. 

2. Removing Damaged Planks

In the event of permanent damage to part of your floor, you will need to remove the affected planks. 

It is worth noting that you will also need to remove adjacent planks to those damaged by mold or stains.

This is due to the fact they may very often be affected as well even though it may not be immediately visible.

3. Checking the Subfloor

You will also need to check the subfloor and the underlying concrete to ensure they are both free of mold and moisture. If this is not the case, you will need to remove the subfloor and dry out the concrete. You will also need to replace the subfloor and install a moisture barrier following which you will be able to add the new planks which should ideally be from the same batch as those already used for your floor.

4. Sanding and Refinishing

This procedure is often carried out to correct cupping in flooring. However, special care must be taken to ensure the planks are dried out properly, failing which crowning may occur.

This procedure may also be an option when replacing part of the wood floor with new planks to provide the entire surface with a uniform appearance.

Hardwood floors are known for being durable and resilient, but they have one big weakness: water.

Wood flooring can stand up to years of heavy use, but a little water over time can ruin the beautiful hardwood.

Maybe you moved into a house with a damaged wood floor or maybe you have had a flood from the kitchen or bathroom plumbing. If you are noticing stained or warped wood or big gaps between boards, you have water damage.

There are some ways that you can repair water damage you find on your hardwood floors, but sometimes you will need to replace the flooring altogether.

This guide will help you identify the type of damage, find out how to repair water-damaged hardwood floors, and teach you how to prevent future water damage.

How Can I Tell If I Have Water Damage on My Hardwood Floor?

If you recently had a small flood or water leak, you probably know that your wood floor has some water damage.

But if you’re not sure, you can inspect the floor visually for some of the signs of water-damaged flooring.

Wood Floor Staining

Water stains on a wood floor take the shape of an uneven ring that ripples across the wood from the water source. The stains can be either light or dark. Stains with a white outline are easier to repair at home than darker stains, which indicate a complete soaking of the hardwood floor.

Wood Floor Cupping

Cupping is one of the ways that hardwood flooring can warp out of shape when wet. You can identify cupping on your hardwood floor when the edges of the individual boards bend upward and are no longer even with the center part of the boards. It gets its name from the cup or bowl shape each plank takes when the edges rise up. Cupping can also make the gaps between floorboards expand, leaving uncomfortable cracks.

If you want to learn what to do about cupping on your hardwood floor, check out our article on cupping in hardwood floors.

Wood floor crowning

Wood Floor Crowning

Crowning occurs in a similar way to cupping, except the boards warp the opposite way. Crowning floorboards rise up in the middle, creating a bowed or bumpy appearance on each individual board. This is due to the floor pieces expanding and pressing into each other too much. Once the floor dries, it may leave large gaps between pieces.

Wood Floor Buckling

Buckling in wood floors

Buckling is the most extreme type of hardwood water damage. This is when the floor planks are pushed so tightly together that they actually detach from the subfloor. The extreme moisture in the wood causes each floorboard to expand. This can make a large hump in the floor or break the locking tongue-and-groove systems between boards.

Buckling is most likely if your hardwood flooring was installed poorly to begin with or in an extreme flood (such as gallons of water pouring in from a hurricane or a burst pipe).

If you suspect your water damage is so bad that the hardwood floor is buckling, check out our article specifically on buckling wood flooring.

Should You Fix or Replace Water-Damaged Wood Floors?

Once you have water damage on your wood floor, you might wonder if you can get away with fixing the floor instead of paying to replace it. This is especially tempting if your water damage is only a small area of the room.

It may not be safe to live with a water-damaged floor if it was wet enough for mold and other bacteria to grow.

In cases of severe floods or a leak of tainted water (like sewer water), you probably need to replace the whole floor to be safe. These molds or bacteria can be extremely dangerous to live with. Plus, severe leaks can weaken the subfloor and other structural pieces of your home.

If you are concerned that your wood floor may be growing mold, read our article about how to remove mold on a hardwood floor.

If your water damage came from clean water and you are able to dry the floor out completely, you can think about fixing the floor instead.

The problem with fixing hardwood floors is that it can be difficult to match the finish on a repaired section with the original finish.

If the water damage is in an out-of-the-way place or if you can throw a rug over it to hide the difference, repairing it may be a good option. Or, if the hardwood is only in one room of your house, you may be able to refinish the entire floor so it comes out an even color.

Your choice will depend on safety and whether you want to live with a repaired area that may look different than the rest of the floor.

You might consider replacing a section of the hardwood floor with a cheaper and more durable material, like ceramic tile. This is especially common in front of an entry door. You can remove the damaged section of hardwood and install tiles with a neat transition rather than having a section of hardwood that was obviously repaired.

Identifying the Source of the Water

If you find water damage on your hardwood floor that wasn’t there before, you need to be sure where the water came from. The source of the water makes a big difference in the decision of whether you should fix or replace your floors because some water sources may carry harmful bacteria.

What to Do When You Can’t Find The Leak

Sometimes the source of water damage is not obvious. You will want to fix problems before you fix the hardwood flooring so that you don’t have the same damage again on your newly repaired floor.

You can usually narrow water damage in a home down to two categories: external water sources and internal water sources.

External water sources dampen your home through the walls, roof, or foundation. Common external sources include:

  • Overwhelming amounts of water from a storm or flood
  • Overwatering a yard
  • Doors and windows with leaky seals, or that are left open
  • A leaking roof
  • A cracked foundation or inadequate or broken drainage system (sump pump)

Internal water sources come from inside the house. Some common leaks include:

  • Broken plumbing seals, such as radiator pipes or drains under a sink
  • Leaking pipes inside a wall or floor (especially if the pipes have frozen)
  • Failing hot water heaters
  • Soft hoses such as the water supply on a refrigerator or dishwasher (these often get pinched when moving appliances and should be replaced every few years)
  • Overflow from a sink or shower
  • A spilled mop bucket or mopping with too much water

These examples can probably help you find the source of the leak so it can be repaired. If you still have no idea where your water damage is coming from or you suspect it is coming from inside your walls, you probably need to call a plumber.

Is The Water Fresh or Dirty?

The water that stained your floor should fit into one of the following three groups:

  • Clean Water, such as rainwater from an open window, overflow from a sink or tub, or a leaking hot water heater. This water is mostly pure and will carry very few bacteria. Unless the area was wet for several days (enough for mold to grow), this kind of water damage is probably not dangerous.
  • Used or “Gray” Water, such as that from a drainpipe under a sink or shower, has been exposed to some dirt and other waste. If this kind of damage doesn’t dry quickly, it will grow bacteria and mold.
  • Dirty or “Black” Water is tainted water or sewage. This is from a leaking, overflowing, or backed-up septic line. This water is full of dangerous bacteria. You can try to sanitize the wood if it is only a minor leak (1 or 2 liters), but most of the time a black water leak will require replacing the floor. You should wear gloves and a filtering mask when you clean any area damaged by black water.

Identifying the source of the water damage will help you decide whether it’s safe to repair the floor. Of course, this is also the time to correct the problems that allowed water to get onto your floor such as by replacing window seals or calling a plumber to fix a pipe.

How to Fix Water-Damaged Wood Flooring

Depending on how much of the flooring was affected by water damage, you might need to call a professional to repair your water-damaged wood floors. They will be more experienced in sanding and staining the floor evenly. It can be a difficult process, but if you are confident in your DIY abilities, you should be able to pull it off.

After you get the floor completely dry and knock down the warped and water-damaged areas, the process is mostly the same as refinishing a worn-out floor. Feel free to read our other articles on that process, but we will include the steps here.

Step 1: Dry the Floor if it is Still Wet

If your water damage is new, you will need to dry the boards off before you can really assess the damage or make any repairs.

Standing water on the surface can be sucked up with a shop vacuum on wet mode. A squeegee can help push the water toward the vacuum hose.

Then the wood needs time to dry out internally. You can speed this process up by using fans and open windows to ventilate the room. You can also rent or buy a dehumidifier machine.

Be careful not to dry the floor too fast. Applying heat to a wet floor, for instance, can lead to more cupping or crowning. Hardwood needs to adjust gradually to temperature and humidity changes, so stick to natural airflow methods to dry the wood.

Step 2: Check for Extra Floorboards in Storage and Install Them

Usually, flooring installers will leave a few leftover pieces of wood at the house when they put in a floor. If the flooring in your house is decades old, you probably won’t have this luxury, but it doesn’t hurt to look.

A few pieces of flooring may be enough for a flooring installer to remove the damaged boards and replace them with new ones that will match perfectly. This is potentially the easiest way to repair your water-damaged floor, so look around.

Removing the old boards and laying new ones requires experience and the right tools. This is especially true if the wood floor is glued or nailed down. You most likely need a flooring expert to come to your house and replace the boards.

If the match on the finish is close after you install the new boards, this may be all you need to do. If the color difference is really bad, you will want to go on to the refinishing process.

Note that buffing and refinishing the floor will not only be more difficult, but more expensive. You will have to get the tools and supplies to refinish the floor.

Step 3: Sand the Floor

After you place new planks where the damaged ones were, or if you do not have any planks to weave into the floor, you are going to need to sand the flooring.

The right sander for the job is one that is specifically made for flooring. These have a large sanding wheel and a heavy head so that you can sand large areas quickly and evenly. You will probably need to rent it from a hardware store or flooring company.

Use a coarse grit sanding wheel first (around 60-80 grit) and follow with a fine sander (100-150 grit or a fine sanding screen).

You should sand the edges of the room by hand because it can be hard to maneuver the flooring sander into the edges and impossible to reach the corners. Use a fine sandpaper between 100 and 150 grit. Sand with the woodgrain.

If at all possible, you should sand the entire surface for the hardwood floor, or at least the entire room with water damage.

Move the sander across the entire surface of the floor, overlapping a few inches on each stroke. If you do not get the water-damaged sections flat on the first pass, you can try a second pass.

Do not sand the floor too many times unless you are sure that your planks are very thick. Taking too much thickness off the floor will cause problems.

Note: Wear a mask or respirator when using a flooring scuff sander. These machines will kick up a lot of dust as they sand the finish and wood.

Step 4: Clean the Sanded Hardwood Flooring

Use a vacuum to remove all of the sawdust you created by sanding the floor. Follow the vacuuming up with a dry microfiber cloth or dust mop. This will get the fine dust off of the floor.

This process will also remove other dirt and make the stain adhere better to the wood.

It’s good to do this not just after the sanding is complete, but every five minutes while you sand. 

You can also vacuum the sander wheel to remove the dust. If it clogs up too much, it won’t sand evenly. 

Step 5: Stain the Sanded Wood Floor

Following the directions on the can, apply the desired color of stain to the hardwood floor. Try to select a stain that is specifically made for hardwood floors.

Note that most wood stains will put off some strong fumes. You need to wear a respirator if possible, or at least ventilate the room by opening windows and using fans (not directly as they will dry out your stain too fast and blow dust around).

Start by applying a thin, even coat of stain to a small area (less than 1 square meter). Brush the edges and corners first to make sure you don’t miss them. Use a clean rag to wipe up all the excess wood stain.

You will have permanent lines in the finished coat if you let the leading edge of your stain dry. Try to work quickly and don’t leave any edge to dry for more than 10 or 15 minutes. Apply the stain evenly across the whole room.

Note: Make sure to have an exit strategy when you start staining. You don’t want to step across a wet stain to get out of a corner. Work from the deepest corners of the room toward the door.

Step 6: Apply Polyurethane

A coat of polyurethane on top of the stain will protect the floor from scuffs and create a water-resistant barrier.

You can roll polyurethane onto the floor like paint after the stain is completely dry.

The key to applying polyurethane is that you need a very thin, even coat to create a nice-looking finish. Choosing the right roller will help.

Don’t use a regular fuzzy paint roller or you will leave a coat that’s way too thick. Use a dense foam roller for a smooth finish. Also, use a long handle for the roller so you can see better while you work.

Cut in the edges of the room with a good quality paintbrush first and then use the roller to complete the center of the room.

Give the refinished floor a day to dry before moving furniture back into it and you will have a fully improved hardwood floor!

Preventing Water Damage to Your Hardwood Flooring

It’s always easier and cheaper to take care of problems before they become problems. Take care to avoid wood floor water damage in the first place.

Here are some ideas to prevent water damage to your hardwood flooring:

  • Keep doors and windows closed when you are away from home and repair small leaks as soon as you notice them.
  • Hire only licensed contractors to work on your plumbing.
  • Be especially careful of rubber or plastic hoses on washing machines, dishwashers, and refrigerators tha.t can break over time.
  • Invest in shower curtains, shoe mats, and other items to keep daily water off your floor.
  • When you clean your floor, do not bring a big bucket of mop water where it can spill on your hardwood floor and mop only with a small amount of water.
  • Clean up all spills immediately.
  • Keep your house warm enough to avoid freezing temperatures that can burst a pipe.
buckled hardwood floors

Buckling is the term that’s used when one or more areas of a floor swell or lift upwards.

In some cases, the floor might have only one swollen area whereas, in others, the floor might appear to be wavy or undulating as the floorboards can arch upward several inches.

As you can imagine, the sight of a buckled wood floor can be pretty jarring. Let’s face it; this isn’t something that can be obscured by tossing a throw rug over it. A throw rug also won’t do much to resolve the problem or keep anyone from stumbling over it. Something needs to be done.

If buckling wood floors is a concern, read on to learn about causes, how to fix buckling in hardwood floors, and ways to prevent this situation.

What Causes Wood Floors to Buckle?

Water

Hardwood floors can react to moisture in various ways. Buckling is a very significant reaction. So it’s natural to assume that a significant event preceded it such as a flood or an event that caused prolonged contact with water.

Humidity

There’s a reason gymnasiums have wood floors, but locker rooms do not. Locker rooms can be extremely damp and humid. If you live in a tropical climate, or in a region that tends to be very muggy during the summer months especially, your hardwood floors are at greater risk for buckling.

Lack of or Incomplete Acclimation

Before a wood floor is installed it must be acclimated to its immediate environs. To do this, the floorboards are placed in the room where they’re to be installed, and allowed to remain for at least two weeks before installation takes place. This allows the wood to “breathe” or draw in the moisture in the air so that it can expand as necessary.

This doesn’t mean the floorboards should be acclimated to greenhouse types of conditions or that the floors’ intended substrate shouldn’t have a limited moisture content. The moisture content of the substrate should be monitored using a moisture reader. Ambient air temperature should always be in the 60℉ to 80° range.

Installation Failure

It is only in very rare instances that a professional flooring installer will overlook or forget to do something crucial to a successful installation. 

On the other hand, laypersons are more likely to fail to appreciate critical steps when installing hardwood floors on their own. Overenthusiasm and assumption can play major roles as these can lead to failure to allow for long enough periods of acclimation and failure to leave enough room for their new hardwood floor to expand.

Another reason for buckling hardwood floors is the failure to install a moisture barrier between the substrate and the new floor itself. If a moisture meter wasn’t used prior to installation or the readings were ignored, the resulting lack of protection that a moisture membrane would have provided can cause trouble in the long run.

If you suspect installation failure has caused your hardwood floor to buckle, you’ll need to call your flooring installer right away.

Can You Repair Buckled Wood Floors?

On the other hand, if you and your flooring installer happen to be one and the same, you’ll need to look for ways to remedy the situation. If your wood floor hasn’t buckled too severely, there might be something you can try, but there’s no point in it until you do the following:

Identify The Source

warped hardwood floors

Firstly, it’s important to keep in mind that your hardwood wood floor has warped.

In most cases, the cause of a warped hardwood floor is moisture. So naturally, you’ll need to take measures to locate the culprit.

However, for every action, there is an equal and opposite reaction. Buckling is an extreme reaction. Such a reaction usually indicates that your hardwood floor has been directly exposed to more than mere moisture. Think!

The floor might have been underwater? BINGO!

A flood would certainly account for an extreme reaction.

But if your hardwood floor is no longer submerged for whatever reason (e.g., after being somehow roped into it yet again, while shopping for groceries with your mother, you were so thoroughly captivated by the dulcet tones of her delightful litany concerning the high price of produce, her bursitis, and her last husband, that you remembered you’d left the water running in the tub), then we can assume that the source is no longer an issue, 

However (there’s always a “however”!), because your floor can be directly exposed to water without you being aware of it, it’s time to bring your awareness up to date.

Assuming you don’t hear squishing sounds when you walk on your hardwood floor, you’ll need to look for other telltale signs of moisture.

Telltale Signs of Moisture That Can Cause Your Wood Floor to Buckle

Start by inspecting your walls. You’ll need to inspect your home’s interior and exterior walls. Look for walls that are:

  • Swollen
  • Mossy, moldy or mildewed
  • Bubbled or peeling
  • Water stained
  • Water Streaked
  • Seeping
  • Water, water, water…

These characteristics can be caused by

  • An improperly sealed window or door
  • A leaking pipe or condensation
  • A leaking faucet
  • An exposed sill plate.

A sill plate, also known as a sill, framing sill, or sill piece, is a piece of lumber usually a 2”x4”, that sits atop the length of a structure’s founding walls or footings of a structure. If your home’s foundation is made from poured concrete, a sill plate rests horizontally on top of the foundation and flush along the length of the foundation’s outer edges.

If you have no trouble locating part of your home’s sill plate, then it’s exposed to the elements. An exposed sill plate that’s soggy, swollen, water-stained, or rotting indicates that it is saturated or has been saturated at some point. A saturated sill plate is a potential troublemaker. 

  • A cable (Yes, a cable!)

If you have cable television service, satellite internet service, a low voltage security system, wired security cameras mounted on your home’s exterior walls, or anything that calls for a cable to pass through an exterior wall to some type of terminal inside, then the cable should first be looped before it’s fed into the exterior wall.

To prevent water from traveling along the part of the cable that runs past the exterior wall, this “drip loop” should be lower than the cable’s entry point. A cable that isn’t drip looped or isn’t properly looped can cause water damage.

This might not seem like a big deal, but in climates where there is heavy annual rainfall, the damage that can be caused by water that’s allowed to travel along a cable can become increasingly significant with each drenching.

Put The Cause of Your Buckled Wood Floors in Check

Once you’ve located the source of what’s causing your hardwood floor to buckle, it’s time to eliminate it. This will also help to stabilize your home’s humidity and moisture levels.

Until then, any effort to fix your buckled hardwood floor is likely to be wasted. 

How To Fix a Buckled Wood Floor

If your hardwood floors haven’t buckled too severely, your hardwood floor might right itself as it dries. You can also use a floor dryer to speed up the process. These are usually available for rent at your local home improvement center or you can buy one for under $60.

You can also help to straighten your hardwood floors by placing some weight on them as they dry. Just be sure to start with something light and continue to add weight a little at a time as the pressure helps the boards settle back into place.

If neither of these solutions does the trick, you’ll need to remove and replace the warped floorboards. You can use boards that were saved when your floors were initially installed. Because ten percent is added to the measurement of the planned installation area, there might be enough extra boards to complete the repair. 

If not, you’ll need to buy additional boards at your local home improvement center or flooring specialty store. Be careful to match the wood species and color. If the color of the existing and spare floorboards can’t be matched exactly, it’s best to choose a lighter color so that you can stain them darker to match and blend with the rest. 

buckling in wood floors

Instructions for Replacing Buckled Hardwood Floorboards 

Although the following instructions represent the simplest way to replace warped floorboards, an intermediate skill level is called for. While working outside your comfort zone is always a good way to expand your skillset, be sure to ask for help from a professional if you’re not confident in your skill level. These instructions apply to nailed or glued floors. Repairs to tongue and groove planks call for a more advanced skill level.  

In addition to the floorboards, you’ll need to have these items on hand: 

To replace buckled hardwood floorboards, follow the steps listed below:

  • Use the straightedge and chalk to draw two parallel lines along the length of the plank, about ½” inside the edge. 
  • Set the circular saw to the depth of the floorboard only. 
  • With the circular saw, cut along the chalk lines. 
  • Cut diagonally to form an ‘x’ between the parallel lines. 
  • Beginning at the center of the ‘x’, tap the chisel with your mallet to remove the floorboard piece by piece. 
  • Continue in this way to remove any old glue. Note: Do not attempt to sand the glue. Some older adhesives were manufactured with asbestos which becomes powerfully carcinogenic when sanded or ground. 
  • Uset your pry bar to remove rusted, loose, or protruding nails. 
  • Collect loosened debris with the whisk broom. 
  • Vacuum the area. It’s essential to keep your work area completely free of dust and debris. 
  • If you notice any sign of moisture, aim an electric fan or floor dryer at the affected area until it’s completely dry. 
  • Fit the new floorboard to the exact dimensions of the empty space. 
  • Nail or glue the replacement board (as appropriate) into place.  

Note for nailed or glued wood floors: If the empty space is surrounded by other boards, this final piece will need to be glued in place. 

  • Use weights to hold the glued board flush and firmly in place. 
  • With a water dampened towel, wipe up any excess glue as quickly as possible. Dried floor glue is difficult to remove and will require a different process. 
  • Allow the glued board(a) to set according to the adhesive/floor glue manufacturer’s recommendations. Two hours are usually necessary before removing the weights. 

If you’ve concluded that a moisture barrier might have prevented the source of the damage from having such a pronounced effect, you probably shouldn’t attempt to fix your buckled wood floor on your own. This is a time-consuming and often tricky process that’s best undertaken by an expert. 

Speaking of prevention…

How to Prevent Your Wood Floor from Buckling

It truly is as your mother (the person you can hardly wait to go grocery shopping with) always says. An ounce of prevention really is worth a pound of cure. So, it’s important to be sure not to allow your hardwood floor to be in prolonged or repeated contact with moisture. 

  • Be sure to clean water spills as soon as possible
  • Elevate potted plants
  • Don’t allow wet towels, boots, or shoes on your hardwood floor
  • Keep a rug or doormat outside of exterior doors
  • Keep your home well ventilated to prevent high levels of humidity
  • Refresh the seal. If your floors have a wax seal, this should be done annually. For floors with a polyurethane seal, this should be done every few years
  • Conduct routine inspections as above for leaks and/or excess moisture

Also, be on the lookout for changes as they might not be terribly obvious at first. 

Warning Signs of Buckling Hardwood Floor

A buckled hardwood floor doesn’t necessarily happen overnight. 

In fact, in cases where the buckling isn’t the result of an extreme event, there were probably warning signs that presented themselves on some level or in some way. These signs might be small, but they are clarion calls nevertheless. 

  • Clouding, White Stains: A floor or an area of a floor that appears cloudy or hazy. The appearance is distinctly different from the hazy effect of abrasion.  
  • Dark or Black Stains: Water or moisture that’s underneath the floor or has penetrated the surface can cause this type of stain. You can learn more about this specific issue in our article on removing black stains on hardwood floors.
  • Rust Stains: These usually form at the edges of individual floorboards that have been fastened with nails.
  • Cupping: This is the term for individual floorboards that lift at the sides. The effect is a U-shaped board. Cupping can happen to a single board or entire sections of boards. Learn more about this topic in our guide on hardwood floor cupping.
  • Crowning: A floor that’s crowned will have one or more “humps” in it. 
  • Lifting: As the term suggests, the floorboards lift at the ends.

All these things are evidence of damage from moisture. If the source is eliminated before the damage becomes profound, cupping, crowning, and lifting can resolve themselves. 

However, instead of waiting for these warnings to become more prominent, proactive measures should be taken to ensure the earliest possible intervention. The following items are vital components of such an effort. 

  • Moisture Tester: Klein Tools makes a very decent one that sells for under $40.  In addition to moisture reading of concrete to let you know if installation of a water barrier membrane is called for, you can also use this device to read the moisture content of wood, drywall, and masonry. So, it’s perfect for detecting leaks as well. For the price, you really can’t do much better.
  • Humidity Monitor: For under $20, you can buy a pair of these to alert your phone when the readings are outside of the range you preset by using the app that comes with it. These hygrometers display the temperature as well. Very cool.

The total cost of the three items, above, comes to around $200. Hence, the cost to prevent buckled hardwood flooring amounts to a tiny fraction of the cost to replace it. Prevention also saves a lot of hassle and headache.                        

While it might seem like investing in hardwood floors represents a lot of work, in reality, they’re no more difficult to maintain than any other type of flooring. The difference is that hardwood floors never go out of style and with proper care, yours can last a lifetime.