Tag Archive for: wax

Some things are meant to go hand in hand together, laminate floors and wax, however, do not belong to that select category. 

So what do you do when you find out that your other half, your babysitter, or soon-to-be least favorite cousin has decided to provide an extra touch of shine to your laminate floor, using either floor wax to give it a pleasant polish, or a floor cleaner which contains the substance? 

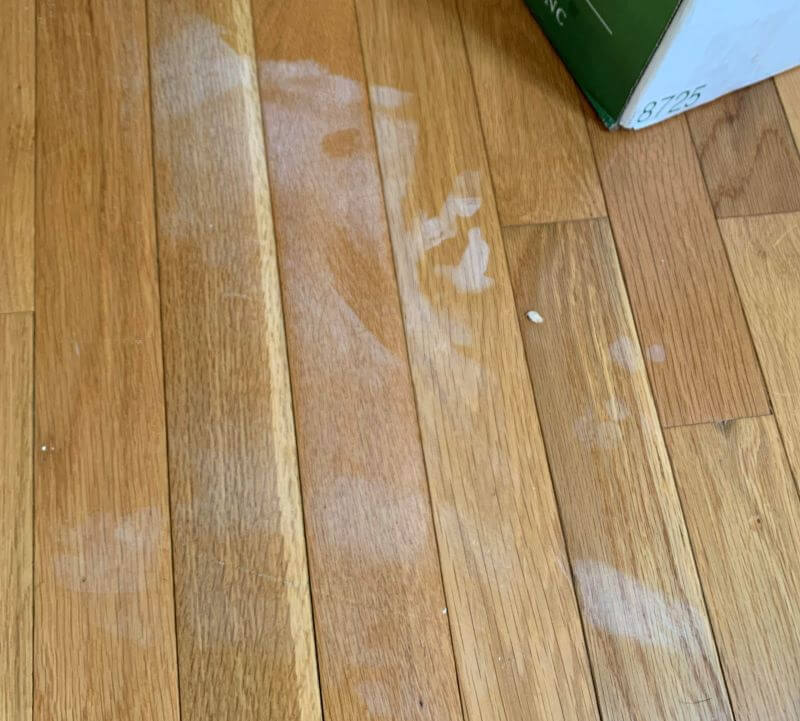
How do you handle the inevitable dullness which sets in making your floor which you were once so proud of seeming as though it needs an immediate and thorough clean?

How can you get rid of all that wax and enjoy a pristine laminate floor once more? 

Find out what you will need and what steps to take to have your floor cleaned to a state of perfection once again.

wax buildup on laminate floors

How To Remove Wax Buildup From Laminate Floors

Things You’ll Need

Removing wax buildup from laminate floors is an undertaking that is likely to require a great deal of elbow grease on your part. Having the right items for the task, however, can ensure all that effort yields rich dividends.

Here are the items you will need to rid your floor of the coating of wax covering it:

  • Hairdryer
  • Plastic drywall scraper
  • Bucket
  • Water and vinegar (for your homemade cleaning solution)
  • Clean cloths
  • Vacuum cleaner

1. Vacuuming Your Floor

This first step will make the entire process easier by removing any lingering debris. You will need to ensure that you do not use the beater bar or rotating brush during the procedure since doing so may result in the floor getting covered in scratches. 

2. Soften the Wax

Wax can be softened by applying heat to it and doing so will make the entire process of removing the wax buildup from your laminate floor easier. 

However, steam mops are not a suitable option for surfaces in this category since manufacturers usually do not approve of using them on floors that have not been completely sealed. 

Using them on laminate floors does mean that the moisture can seep between the planks and cause damage to your flooring.

Hairdryers are the best option and you will need to set the appliance you intend to use to medium before heating the wax with it.

3. Scrape off the Wax

You will need to use your plastic hand scraper to remove the softened wax. For the best results, you should draw the tool lengthwise down the planks. 

Working across their width may not only cause smears but also cause the accumulation of wax between the planks.

A metal scraper should never be used in place of a plastic one.

4. Wipe off the Wax

Once as much wax as possible has been scraped off, you will need to mix your cleaning solution.

This will involve the following items:

  • 1 cup white vinegar
  • 1-gallon hot water

Simply mix the vinegar and hot water together in a bucket and it will be ready to use.

You will then need to dip a clean cloth in the vinegar solution, wring it and use it to wipe the wax, moving the wet cloth in one direction only. You will also need to rinse the cloth in the solution and repeat.

Alternatively, you may also pour the solution in a spray bottle and spray slight amounts on sections that need to be cleaned.

If you prefer to work from a standing position instead of having to kneel, it will also be possible to wrap the cloth around a microfiber mop head.

5. Buff the Floor

Once you have covered the entire surface, you will need to leave it to dry, allowing a minimum of 30 minutes to elapse.

Any spots should be buffed with a microfiber cloth as doing so will ensure the entire floor will have a uniform gleam at the end of the procedure.

Additional Tips: Removing Wax From Laminate Flooring

1. Use Rubbing Alcohol 

Other than a vinegar and water solution, wax on laminate flooring can also be removed using rubbing alcohol.

Simply apply it to a cloth and use it to clean the wax buildup. (You will need to have scraped the surface first.)

2. Use Mineral Spirits and Paint Thinner for Difficult Spots

What happens when you come across particularly stubborn patches of wax that simply will not budge? Apply mineral spirits or paint thinner to remove them and render your laminate floors wax-free.

3. Use the Hard Floor Attachment

When vacuuming, use the hard floor attachment rather than the beater bar. The latter is meant for carpeting and its bristles rotate thousands of times each minute. Using them on your laminate flooring (or even hardwood surfaces) will result in a dull appearance due to the damage caused to the finish.

4. Use a Store-Bought Solution 

There are store-bought solutions that can also be used to remove accumulated wax from your laminate floors.

Trewax Instant Remover is one such example. Versatile and free of any unpleasant odors, this cleaner manufactured by Beaumont Products is both safe and easy to use and has been proven to be capable of stripping off wax from laminate floors and also getting rid of unsightly footprints. It is also ammonia-free which is an added plus since the chemical is unsuitable for laminate floors.

Additional Tips: Cleaning Laminate Flooring

1. Always Use Manufacturer-Approved Cleaning Products

Using manufacturer-approved products will prevent your floors from taking on a filmy appearance which often occurs as a result of using the wrong sort of cleaning solution. 

It can be especially difficult, or might even be impossible to remove, even when a switch to the right kind of cleaning product is made, hence, it is important to use the right products from the outset.

2. Vacuum Frequently

Doing so will prevent the buildup of debris which can cause scratches on your floor. It will also prevent the likelihood of bits of grit getting stuck beneath footwear or in your mop heads and possibly scratching the finish.

3. Wash Your Microfiber Mops Frequently

Doing so will keep them pristine and ensure they can also keep your floors spotless as a result. 

Fabric softener should never be used when washing your mop heads. Doing so will cause the fibers of your microfiber mops to stick together. 

Once this happens, your floors might take on that hazy appearance even though you use the right kind of cleaner.

4. Read Product Labels Carefully

What happens when you need to choose an alternative cleaner in the event of your go-to, manufacturer-approved floor cleaner being unavailable?

To ensure you select the right kind of cleaner, you will need to read the label carefully to check that it does not contain any wax.

Figuring out how to remove haze from a hardwood floor can be frustrating. You might have applied various methods to return your wood floors to their former beauty.

Yet, each attempt seems more disappointing than the last one. You might be wondering if your hardwood floors are actually getting hazier despite your efforts or if it’s your imagination. Relax. You’re not losing it. Honest.

In this article, we’ll discuss the causes as well as what to do about the cloudy film on your hardwood floors.

haze on newly installed wood floors

Why Do Your Hardwood Floors Look Cloudy(Hazy)?

Knowing the cause of haze on your hardwood floor is half the battle won. So, let’s take a look at what the trouble could be:

1) Trapped Moisture

If you’ve noticed cloudiness after refinishing your wood floor, the likely cause is insufficient drying time between coats of varnish. To remove the white haze from your hardwood floor, first, try doing nothing. It might be possible for the moisture to leave on its own in a couple of days.

2) Wax Build-up

Very few hardwood floors are finished with a penetrating seal anymore, but if your floors are sealed with wax, occasional waxing is called for. Frequent waxing is not.

Also, today, most hardwood floors are coated with a polyurethane finish. The coating doesn’t need to be waxed at all. Putting wax over a polyurethane finish will invariably leave a film on your hardwood floor.

Learn: How To Remove Wax Buildup From Wood Floors

white cloudy film on wood floors

3) Inappropriate Cleaning Solution

There are more floor cleaning solutions available on the market than ever. But not all floor cleaning solutions are good. Not all are intended for all hardwood floor finishes. It isn’t always easy to navigate a clear path to the solution that’s best for your hardwood floor. Cleaning a urethane-coated floor with a solution not intended for such can cause trouble. So be sure to read labels.

4) Inappropriate Application Of Cleaning Solution

Applying too much cleaning solution can result in hardwood floors that have an uneven, white, cloudy film over them. Here again, strong emphasis is placed on the importance of labels. Follow application and/or dilution instructions to the letter. More isn’t necessarily better. A stronger solution isn’t necessarily better either. “More” and “stronger” aren’t always as easy to remove.

5) Infrequent Change Of Cleaning Pad

To do its job effectively, a cleaning pad must be clean. Frequent rinsing and wringing will keep the pad clean, but the less you need to touch a dirty mop pad, the better. With plenty of clean mop pads on hand, there’s less chance of dragging dirt and germs across all the hardwood floors in your house. There’s also less handling of dirty pads.

Because most mop pads are machine washable, you can simply toss the used and dirty pads into the washing machine when you’re done cleaning your hardwood floors. Frequent changing of mop pads is better than frequent rinsing of the same mop pad. Better for your floors and better for you and your family.

6) Tap Water, Rain, And Snow

If it comes from nature, it’s good. Right? Mmmm… not necessarily. Your hardwood floors also come from nature. Trees need water to grow, of course. But your floors’ polyurethane coating doesn’t and hopefully, your floors have stopped growing. Your hardwood floors and the polyurethane that coats them should have limited contact with water.

This should especially be the case with hard water. Hard water, rain, and snow can do to the surface of a floor what they can do to a shower door. They leave an ugly white film that’s made from hard water deposits. Use water to damp mop only. Then use a flip-style mop and the chenille side of the mop pad to wipe the surface completely dry. Keep plenty of extra mop pads on hand.

If hard water constantly reminds you of its presence, use a neutral pH solution to clean your floors.

Snow is particularly loaded with salt. This makes long winters even longer for hardwood floors where entry mats have inadequate bristles and poor absorption.

Popular Remedies For Getting Rid of Haze on Hardwood Floors

Here are a few of them:

1) Olive Oil Mayonnaise For Floor Blushing

Blushing is the term used when moisture is trapped between or under the layers of a hardwood floor’s finish. The popular remedy for this involves spreading olive oil mayonnaise over the cloudy areas of the floor.

This might seem a little whacky until you think about the science involved:

Because oil is heavier than water and the two don’t mix, the oil displaces the water. The water has nowhere to go but the surface where it’s met by the mayonnaise. High fives and bonding follow. Wherever one goes, the other goes.

Naturally, when the mayonnaise is removed, the water goes with it. Thus, no more blushing.

Here’s what you’ll need:

Directions:

  • Remove area rugs, furniture, and all other items from the entire room.
  • Dust and damp mop.
  • With the rubber spatula, scoop out enough mayonnaise to spread a layer over the affected area of your wood floor. About ⅛” to ¼” thick.
  • Let the mayonnaise sit without drying, for one hour.
  • Use the paper towels to wipe the mayonnaise from the floor. Depending on the size of the affected area, you might need a generous amount of these.
  • Working in small sections, damp mop with the short-napped side of the mop pad to remove any oily residue.
  • Use the long-napped side of the mop pad to wipe the floor dry.
  • If some haze remains, repeat the process. You’ll need to use your judgment or best guess to increase or decrease the time between application and removal of the mayonnaise.

2) Vinegar To Remove Haze Caused By Hard Water, Cleaning Solutions, Or Floor Wax

Vinegar is another popular remedy for hazy hardwood floors. Most wood flooring manufacturers and professionals advise against it. We’re no exception.

Yet, there’s an increasingly popular belief about certain household products. Accordingly, if a solution is acidic, but diluted with water, it will clean your floor and do it safely. So, it’s the solution to use.

Following that logic, diluted battery acid will also clean a wood floor without damaging it. But no one seems to consider using it to clean a floor. Maybe this is because battery acid isn’t a household product.

Whatever the logic used, people seem to be unshakeably convinced that white vinegar can do no harm. Irreversible staining of raw wood and clouding on coated wood floors aside, this may be true.

Still, this is as good a place as any to offer advice to first try new solutions in an inconspicuous area of your floor.

Here’s what you’ll need:

  • ½ cup Vinegar
  • ¼ tsp. Dish Soap
  • 1 Gallon Warm Water
  • Microfiber Spin Mop and Bucket

Directions: 

  • Remove rugs, furniture, and other objects from the workspace.
  • Thoroughly dust the floor.
  • Mix all ingredients into the bucket.
  • Dip the mop in the bucket and wring it out until it’s almost dry.
  • Move the mop in an ‘S’ pattern across the hazy area of your hardwood floor.
  • To be sure the floor doesn’t dry on its own and leave streaks, dry the floor with a microfiber cloth as you go.

This method is also used to deep clean hardwood floors.

Now that we have the condiments out of the way…

Remedies For Removing Haze From Hardwood Floors That Work

Apart from removing the finish altogether, there are two solutions for removing the ugly white film. In the right measure and correctly applied, the haze will be removed while the wood and finish remain uncompromised using either of these two solutions. Both solutions also function as disinfectants.

1) 3% Hydrogen Peroxide

Hydrogen peroxide is the quintessential cleaning solution. It cleans, disinfects, is odor-free, and very inexpensive to buy. The solution is almost invariably sold in dark brown containers. This is because hydrogen peroxide is sensitive to light. It also has a shelf life of about six months to a year.

Whether or not there’s haze on your hardwood floors, hydrogen peroxide will leave them clean, disinfected, and looking refreshed and restored. To use hydrogen peroxide to remove haze from your hardwood floor, 

Here’s what you’ll need:

  • 1 Bottle of 3% Hydrogen Peroxide 
  • 1 Clean Empty Spray Bottle
  • 1 Flip Style Mop
  • Several Two-Sided Microfiber Mop Pads

Directions:

  • Remove all rugs and furniture from the work area.
  • Dust and damp mop the floor.
  • Transfer the contents of the hydrogen peroxide bottle into the empty spray bottle.
  • Working in 2’ x 2’ sections, spray the floor with the peroxide.
  • Let the peroxide stand for several seconds without allowing it to dry.
  • Use the wet side of the mop pad to work out the haze.
  • Spray again.
  • Use the chenille side of the mop pad to wipe the floor dry. You might need to put a very small bit of back into it.
  • Change the microfiber mop pad frequently throughout the process until the floor is clean.

2) Ammonia Based Or Ammonia Free Window Cleaner

Follow the instructions for cleaning with hydrogen peroxide. Substitute peroxide with an ammonia-free window cleaner. If this doesn’t remove the haze, try substituting with a conventional ammonia-based window cleaner instead.

Once all the haze has been removed from your wood floors, be sure to clean the rugs and dust furniture before bringing them back into the room.

As soon as a floor is installed, day one begins. The fact that day one might have been a long time ago doesn’t necessarily mean there’s anything wrong with your floor. A well-maintained floor can last for generations.

A timeworn floor is another matter. Floors not properly maintained can get old in a hurry. Where floors are finished in some areas, but not others, cleaning them as they are and leaving them that way doesn’t make much sense.

In this article, we’ll discuss how to clean your worn-out hardwood floors without refinishing them so that they preserve their natural, unfinished look. If you don’t care for the idea of a polyurethane finish, you’re not alone. But we’ll be discussing something else as well.

Perhaps your aim is to avoid any more chemicals or chemically-based products in your home than necessary. This makes you part of a growing movement toward a safe and sensible way of life. This movement isn’t merely a popular trend. It’s more of an outlook. This outlook is becoming the norm and it’s here to stay.

If you’re looking for a way to restore your hardwood floors and keep them looking good without spending a lot of money, this has never gone out of style.

Follow along as we look at age-old, natural, low VOC, and inexpensive ways to get and keep your aging, timeworn floors clean and looking good.

old hardwood floors

Sanding Old Hardwood Floors

Over time, a hardwood floor’s finish will become thinner over the high traffic areas first. But getting your floors completely clean and even looking will involve removing the rest of the finish. A floor sander is usually required for this type of work. You can rent one of these at your local home improvement center.

However, if you’re not used to working with a floor sander, this fact could evidence itself later on. Not only will a professional sanding save a lot of frustration, but it could also save your floor.

There Are Limitations When It Comes To Sanding Old Hardwood Floors

A hardwood floor can only be sanded so many times before replacement should be considered. If your hardwood floors have already been sanded too many times to survive another sanding, a professional will be able to determine this.

If replacement isn’t an option, but your floors are still good for another sanding, there’s only one chance to get it right. Let a professional do this.

Removing Finish From Old Hardwood Floors Without Sanding

If you decide to save your hardwood floor’s last sanding for another time, this is understandable, but you can still remove the finish and get the entire floor clean.

In this case, consider a wood stripping product. Granted, it’s a chemical, but considering the likelihood that your hardwood floor is finished with polyurethane and sanding isn’t an option… For a stripping product that’s methylene chloride and NMP-free, we like Citristrip Gel.

As with any product you intend to apply to your hardwood floor, it’s always best to first test it in an inconspicuous place before proceeding. Be sure to follow the instructions printed on the product label.

How To Remove Stains From Hardwood Floors Without Damaging Them

If your hardwood floors are old, sanded thin, and stained, then damage is the last thing you can afford. You’ll need to use extreme caution to get them clean. You’ve already used a chemical to strip them. This alone might have done a good deal to remove dirt.

To assure your floors are as smooth and even in porosity as possible, try not to use an abrasive pad or fabric to remove any residual stain. This is especially important because by the time you’re done reading this, you might change your mind about finishing your hardwood floors. Anything’s possible.

For stains that remain on your hardwood floors, identification of the causes might not be possible. But in most cases, the more troublesome of these are likely to be dark in color. It’s a reasonably safe bet that these stains are the result of spilled food or pet urine. Possibly, a human accident.

black stains on hardwood floors

What if the stains are foul-smelling?

How To Remove Foul-Smelling Stains From Old Hardwood Floors

For foul-smelling stains, this means that whatever caused the stain is still present. Depending on how long this has been the case, the subfloor might be affected as well. Removal of the affected floorboards to address the floor beneath should be considered. Start with the floorboard located at the center of the stain.

With the affected floorboard removed, look at the underside of it. If the stain has saturated it, you’re better off replacing it than trying to get the stain removed.

If it looks like the adjacent floorboards will be in the same shape, remove and check these as well. Continue to work your way outward until you come across floorboards that aren’t stained through and through. That is to say that looking at it from the exposed edge, a significant portion of the floorboard remains unstained. These lesser stained floorboards don’t need to be replaced and therefore, don’t need to be removed.

You can read all about it in our article on how to remove dark stains from hardwood floors.

What To Do If Your Old Subfloors Are Foul-Smelling

If the subfloor has traces of stain on it, try using an enzymatic cleaner to consume what’s left of the problem. Apply it liberally to the affected area of the subfloor only.

Also, be sure not to drench the subfloor or allow any of the solution to puddle. Soak up any excess with a clean, dry rag, The solution will continue to do its job even after you’ve done this.

Return to the area in a few hours. If the floor is dry and the smell is gone, spray the solution onto the subfloor again. The moisture will reactivate any lingering odor. Soak up any puddling and allow the enzymes to resume doing their job. Repeat this process until you’re satisfied that the subfloor is completely odor-free.

You can also try soaking stains with hydrogen peroxide. Saturate a clean terry cloth rag with it and lay it over the stain. Cover the rag with plastic food wrap. Keep the wrap in place by setting something heavy on top of it. A water jug will work.

Leave the saturated rags in place for a couple of hours before checking the stain. You can leave the rags in place for up to eight hours.

If a large area of the subfloor is significantly blackened and foul-smelling, it will probably need to be removed and replaced. A professional flooring installation expert or general contractor would be the one to determine this. Because a subfloor must be completely supportive and stable, it’s best to let a professional do this type of work. A professional will also be able to tell you if and to what extent the floor joists may be affected.

Once you’re sure your subfloors are no longer a concern, replacement floorboards can be installed. If you don’t have any of these left from the time your hardwood floor was first installed, there’s another option; Remove an unaffected floorboard and take it to your local home improvement center or flooring specialty store to match it.

If You Don’t Want To Apply A Polyurethane Finish To Your Hardwood Floors

If your floors have no more sandings left in them, the importance of protecting them can’t be stressed enough. You won’t have another chance. If the look of unstained hardwood floors is what you’re after, you can have this while still ensuring their protection.

After all, there’s no point in going to the trouble of cleaning your old hardwood floors if you don’t want to protect them.  Polyurethane offers superior protection and it’s also the longest-lasting.  But if the idea of polyurethane doesn’t appeal to you, there are alternatives.

Clean Old Hardwood Floors and Make Them Shine Without Polyurethane

Sure, polyurethane is available in different sheens. Just buy some in high gloss and you’ve got a shiny floor.

However, when it’s time to restore floors sealed with polyurethane, the services of a professional are usually required.

Paste wax devotees will tell you they love the fact that they can simply remove wax buildup and re-wax their hardwood floors whenever they want to. It doesn’t require calling on a professional to manage this.

When floors are sealed with wax, they can be easily buffed to a gleaming shine. Again, no pros necessary. A wax seal gives owners more control of their hardwood floors because the cost to keep them in good condition is so low.

Try Using A Penetrating Oil To Seal Your Old, Classic Hardwood Floors

For an old-world look, there are also penetrating oils. These aren’t the kind of oil normally found in the kitchen or garage. Penetrating oils dry to a hard finish. They form a seal by binding to the wood on a molecular level whereas polyurethane seals a wood floor by coating it.

If you’re restoring an old, classic home’s hardwood floors, the application of a penetrating oil should be considered. This is chiefly what was applied to floors before polyurethane was invented. Penetrating oils aren’t glossy or shiny, but they bring out the beauty of wood’s grain and color.

Better still, if you discover a scratch on your hardwood floor, simply work some oil into it and buff

The Choice of Hardwood Floor Sealers Is Up To You

Polyurethane, wax, or oil; the choice is yours. Once your old hardwood floors are clean, whatever you decide to apply to them is fine. Keeping your hardwood floors clean, protected, and looking their best is what it’s all about.

In terms of interior decor, hardwood floors have long been considered ideal for bestowing an ambiance of sophistication, or rustic appeal on homes, schools, or workspaces.

However, they also have very specific maintenance requirements such as waxing. This procedure is ideal for finished and unfinished hardwood floors and can restore their natural sheen. Waxing hardwood surfaces can also enhance their longevity and also protect them from getting stained frequently.

However, over time, the wax used tends to build up. When this happens, your floor will no longer display a smooth polished appearance making it necessary for the excess wax to be removed.

This article takes a close look at this issue and how to resolve it. We discuss how to remove wax buildup from hardwood floors, the best products for doing so, and what products you must avoid.

Why Should You Remove Wax Buildup on Wood Floors?

1. The Accumulation of Trapped Dirt and Blurriness

As wax accumulates, the use of indoor heaters can melt it and cause debris such as hair, pet fur, or dirt to sink into it. It can also result in scuff marks being made in it as well.

Wax buildup will make your floors look blurred and cloudy in addition to trapping particles.

2. The Presence of Scratches

Over time, your hardwood floor will get scratched, either by your pets or simply by grit that clings to the soles of feet, stockings, and footwear. To refinish it, you will need to get rid of the overlying layer of accumulated wax covering it.

3. Slight Water Damage

Occasionally, water damage may cause a whitish discoloration on certain parts of your floor. This is caused by the moisture penetrating the wax and part of the process of remedying the damage will involve removing any wax on the floor.

Checking for Wax Buildup

If you have noticed any stains, scratches, or even general dullness on your floor or simply wish to refinish it, you will need to find out if there is a layer of wax you need to get rid of first.

You can do so by using the following:

  • Sandpaper: Lightly pass sandpaper across the floor. If there is any wax present, it will ball up.
  • Mineral Spirits: Apply a small amount (no more than a few drops) of mineral spirits to a cloth. Next, wipe the floor with it. The presence of a brownish, yellowish, or even whitish smear means that there is wax on your floor.
  • Water: Simply place a drop of water on your floor and wait for a minute. The appearance of a white spot beneath the drop within that timeframe will indicate the presence of wax.

The Best Wood Floor Wax Removers 

Mineral Spirits

Also referred to as turpentine substitute, and white spirit, this petroleum-derived solvent is cheap, mild smelling, and low in VOCs (volatile organic compounds). It is also capable of dissolving the wax on your floor enabling you to remove it from the surface completely.

Although mineral spirits may affect certain surfaces adversely, it does not do so to wood and is therefore suitable for hardwood floors as a result. However, the solvent is unsuitable for no-wax surfaces since it will strip them of their gleaming finish, leaving them with a matte, dull appearance.

It is also flammable and should be handled with caution.

Sunnyside Corporation’s Mineral Spirits is an excellent example of mineral spirits which can be used for this purpose. This particular product has been produced by the Sunnyside brand which has been manufacturing potent solvents for over a century.

In addition to being low odor and suitable for use on wooden floors, it is also ideal for cleaning paint brushes, rollers and sprayers, and degreasing mechanical components.

Products Which Are Unsuitable for Removing Wax Buildup

  • Acetone: A colorless, flammable, and volatile fluid, acetone is also known to be a highly effective solvent. It is capable of dissolving grease and is also capable of stripping wax from hardwood floors. However, acetone is unsuitable for this purpose because it may not only damage the finish of your floors but will also discolor the wood as well.
  • Commercial Wax Removers: Special care must be taken when selecting products in this category since the wrong choice can turn out to be particularly harsh on your hardwood surfaces. As a result, you will need to ensure that the product you select has specifically been manufactured for hardwood floors and is approved by your manufacturer. 
  • Homemade Ammonia/Vinegar Solutions: Hot water solutions of ammonia and vinegar are highly popular homemade remedies for stripping floor wax. And while they may be efficient, it is worth noting that the extensive exposure of your floor to hot water will place it at risk of water damage. 

How to Remove Wax Buildup on Hardwood Floors

Things You’ll Need

  • A soft-bristled brush
  • Absorbent cloths
  • Mineral spirits
  • Steel wool
  • Rubber gloves
  • A face mask
  • Knee pads

1. Prepare the Room

Empty the room of all furniture and open every window and door. Using a soft-bristled brush or broom, sweep the floor clean of dust and debris.

2. Remove the Surplus Wax

This process is especially time-consuming and effort-intensive. You will need to apply the mineral spirits to the floor using a spray bottle and scrub it with the steel wool.

If your floor comes with bevels, you will also need to scrape them manually to get rid of the wax in the crevices.

As the wax is loosened you will need to wipe it off the surface and taking another cloth, wipe the floor clean.

3. Clean Any Left Over Residue 

Once you have finished cleaning each section, you will need to clean the floor with an additional application of mineral spirits to new clean cloths. This last step will ensure that no wax residue has been left behind.

Certain experts recommend carrying out this step twice. To ensure you have been thorough in removing all the wax, simply apply mineral spirits to another clean cloth and go over the section you have cleaned. 

The absence of any residue on the cloth will mean that every trace of wax has been removed. However, the presence of any coloration as noted above will mean that you will need to go over that part of the surface with a cloth and mineral spirits, once more.

What You Can Do Following Wax Buildup Removal 

Now, you know how to remove wax from hardwood floors. But what else will you be able to do following the procedure?

1. Apply a Fresh Coat of Wax

To protect your hardwood flooring from stains and conceal slight blemishes, you will have the option of applying a fresh coat of paste or liquid wax. You can take a look at our article on how to wax hardwood floors – it covers the procedure in detail and looks at the best products for your hardwood floors.

waxing hardwood floors

2. Repair Slight Water Damage

If you intend to get rid of white spots on your floor caused by water as referenced above, you will need to sand the affected area once you have removed the wax, and then wipe it repeatedly with an oxalic acid crystal solution until the stain is eliminated. Once you have done so you will be able to stain or seal it before refinishing it.

3. Eliminate Scratches and Scarring.

If your hardwood floor happens to be excessively damaged by scratches or scarring, you will be able to sand it. And once you are through you will be able to apply a brand new finish of your choice, restoring your floor’s original classic appeal.

Waxing hardwood floors refers to a procedure that involves applying solid or liquid wax to restore the sheen of your hardwood floor.

While it is no longer as commonly relied on as it once was decades ago, several homeowners are now opting for the practice due to its ability to provide their flooring with that elegant sheen that sets it apart from others with a polyurethane finish.

In this article, we examine the specific advantages of waxing your hardwood floors, when to do so and how to wax hardwood floors. We also discuss how to care for your floors once you have waxed them so their trademark gleam will be maintained for longer.

Should You Wax Your Hardwood Floors?

Yes you should, as long your floors do not have a polyurethane finish, are in excellent condition and you are using the right type of wax. 

Below we have listed the benefits and drawbacks of waxing your hardwood floors.

Benefits of Waxing Hardwood Floors

  • Ease of procedure: Unlike certain methods of caring for your hardwood floor, waxing is rather straightforward and can be carried out without professional help.
  • Improved longevity: Waxing your floor can enhance its longevity since the product is capable of seeping into the wood and providing it with additional protection.
  • Enhanced resistance to dirt: The wax applied will harden into a shiny veneer which will cover the floor in a protective layer. This coating can prevent spills from seeping into the wood and also protect it from minor scratches and scuff marks.
  • Safety: Compared to polyurethane floors, most waxes have a low VOC content meaning they are a safer option.

Disadvantages of Waxing Hardwood Floors

  • Substantial effort required: Although waxing is a straightforward process, it also requires a great deal of effort. Liquid waxes, for example, require repeated applications during a single floor waxing session and even solid paste waxes may require more than one coating depending on the type of your hardwood floor.
  • May cause staining: It is worth noting that hardwood floor wax may bring about a change in the color of your flooring, altering its original tones as it seeps into the wood.
  • Lower durability levels: Compared to polyurethane, hardwood floor wax is less durable and it is for this reason that the former is more widely preferred.
  • Difficulty of removal: In spite of the relative ease of applying it, the varnish left behind is rather difficult to remove. You can read our article on how to remove wax buildup from hardwood floors which discusses the procedure in detail.

How Often Should You Wax Your Hardwood Floors?

Hardwood floors should be waxed every 12 to 18 months. 

However, the ultimate determining factor of the frequency with which you will have to carry out the procedure is the amount of traffic received by a particular room or area.

Experts recommend that you do not wax your hardwood floors more than twice a year and that you ensure you wax your wood floors at least every three years.

What Is The Best Wax to Use on Hardwood Floors?

Solid Paste Wax

Products in this category are known to have a heavier consistency compared to their liquid counterparts. This is due to the fact that they come with a higher proportion of wax compared to the latter.

SC Johnson Paste Wax is an excellent example of a product in this category. The manufacturer recommends cleaning your floor with a solvent-based product before applying it with a soft cloth for optimal results.

Liquid Wax or Oil

These products are generally lighter compared to solid paste wax products — liquid wax has a higher solvent concentration (and a lower wax content) compared to paste wax. 

Unlike solid paste wax products they may require several applications although a mop may be used when waxing hardwood floors with them making their application somewhat more convenient compared to that of their solid counterparts. 

An example of a product in this category is the Dura Finish Liquid Wax which only requires occasional buffing and is capable of restoring the luster of your floor. It is also capable of covering 2,000 square feet per gallon and can be applied with lambswool, cloth, or fine steel wool.

Water-based Silicone

Environmentally friendly and toxin-free, water-based silicone products are ideal for hardwood floors that have a polyurethane finish. 

An example is the Quick Shine Multi-Surface Finish Polish which is free from parabens and fragrance and is safe for children and pets. This water-based polish is also capable of filling out minor scratches and of giving your floor a uniform appearance. 

It is also suitable for plank, laminate, and tile surfaces.

How to Wax Hardwood Floors

Things You’ll Need

  • A soft-bristled brush
  • A microfiber cloth or mop
  • A sponge mop (if using liquid wax)
  • A terry cloth (also for liquid wax)
  • Mineral spirits
  • A towel (if using hard wax)
  • A solvent-based cleaner
  • A solvent-based wax product
  • A soft cloth or a mop
  • A pair of gloves
  • A dust mask

Preparing The Surface

  1. Empty room of furniture and ensure it is well ventilated.
  2. Check the floor for any signs of warping since waxing is unsuitable for floors in this state.
  3. Carefully sweep the floor to remove every trace of dust and debris.
  4. Wipe the floor with a cloth dampened by mineral spirits to get rid of any lingering wax residues on it.
  5. Mop with a solvent-based cleaner to ensure the surface is completely clean.
  6. Leave the room in order for the floor to dry and do not permit any entry to it as doing so may result in sand, grit, or dust being reintroduced to it.

Applying Wax to the Hardwood Floor

  1. Before you start to apply the wax to your wooden floors, you will need to wear your mask which will prevent you from inhaling the wax’s fumes. You will also have to wear a pair of robust rubber gloves to protect your skin.
  2. Next, measure out a single spoonful of liquid or solid wax and pouring it on the floor, use your mop (if you are using liquid wax) or cloth (if you are using solid paste wax) to coat the floor with it following the grain.
  3. Repeat the procedure, working your way from the innermost part of the room to its entrance.
  4. If you are using a mop, you may need to use a cloth when waxing the part of the floor close to the wall or in corners.
  5. Once you have finished, you may need to wait for the floor to dry before repeating the procedure, if necessary. The waiting period may range from anywhere between 10 minutes to 1 hour, depending on the type of your hardwood floor and the wax you are using.

How Many Coats of Wax Should You Put on a Hardwood Floor?  

If you happen to be waxing unfinished hardwood floors with solid paste wax,  you will need to coat it twice.

However if you happen to be using the same product for finished surfaces, only one coating will be required.

If you are using liquid wax, two or three coatings at the very least would be required regardless of whether you happen to be working on finished or unfinished floors.

Buffing

This final step involves passing a cloth or a mop over the floor once you have covered it with the required number of coatings.

Buffing a waxed surface is important since it will ensure the wax goes further into the hardwood and is able to protect it more effectively as a result.

How will you know when to proceed to this step? By the wax coating taking on a blurry appearance.

If you have used solid paste wax, a towel would be suitable for buffing the surface.

In the case of liquid wax, you will need to use a terry cloth.

It is also possible for you to rent a buffing machine as well. You will need to ensure you follow the directions provided carefully during the procedure.

Caring For and Maintaining Waxed Hardwood Floors 

  • Check wax coating at intervals: Carry out periodic checks of the coating to determine if a fresh coat of wax is required. You will be able to do so by slightly wetting a soft cloth and wiping it on the surface. The presence of a whitish residue means that no waxing is required.  However if the cloth comes away with none, it will mean that the wax coating has worn off and more must be applied.
  • Buff any imperfections:  If you notice any uneven spots on the hardwood surface, you will need to buff it with a thick towel. Doing so will enable you to restore a uniform luster to your floor.
  • Protect surface with rugs and mats: The waxed hardwood floor should be protected from dirt, possible scratching from grit, and from wear by placing rugs, mats, and runners at high traffic areas and room entrances.