Staggering is one of the most important parts of installing a new laminate floor. If you do it right, it will make your whole space look just as beautiful as the showroom or catalog that made you choose laminate flooring in the first place.
Good staggering technique will make the wood-patterned laminate finish shine and look absolutely beautiful. But staggering your flooring isn’t just a cosmetic choice, it’s also where all the floor’s stability comes from.
You’ve probably walked on a laminate floor that had unattractive gaps between the laminate floorboards or other signs of the floor just not “fitting” together. The majority of the time, these problems come from not staggering the flooring right when you install it.
If you want a smooth, elegant laminate floor that’s going to last for many years, you need to know what you’re doing when it comes to staggering. The good news is it’s not too complicated – this guide will tell you everything you need to know from how much to stagger your laminate flooring boards to what patterns you must avoid, and more.
How Much Should You Stagger Laminate Flooring?
Whenever you are installing laminate flooring, the most important rule is to read the manufacturer’s instructions and follow what they say. Almost all brands and types of laminate need to overlap by at least 6 inches. Some will give a range, like 6 to 12 inches. Even if there is a range, you can overlap the boards by more than that, but never less.
What does an overlap or stagger mean? It means that when you lay a row of laminate lengthwise in the room, you offset the joints between planks from the joints in the previous row. You control the offset by cutting the first board in the row (your starter board) to be at least 6 inches longer or shorter than the starter board on the adjacent row.
You should follow this process on every new row of laminate flooring. While the adjacent rows are the most important, you should also look at the joints 2 and 3 rows away. If you look at any section of flooring (4 or 5 rows), no 2 seams in that section should line up exactly.
The Best Pattern to Stagger Laminate Flooring
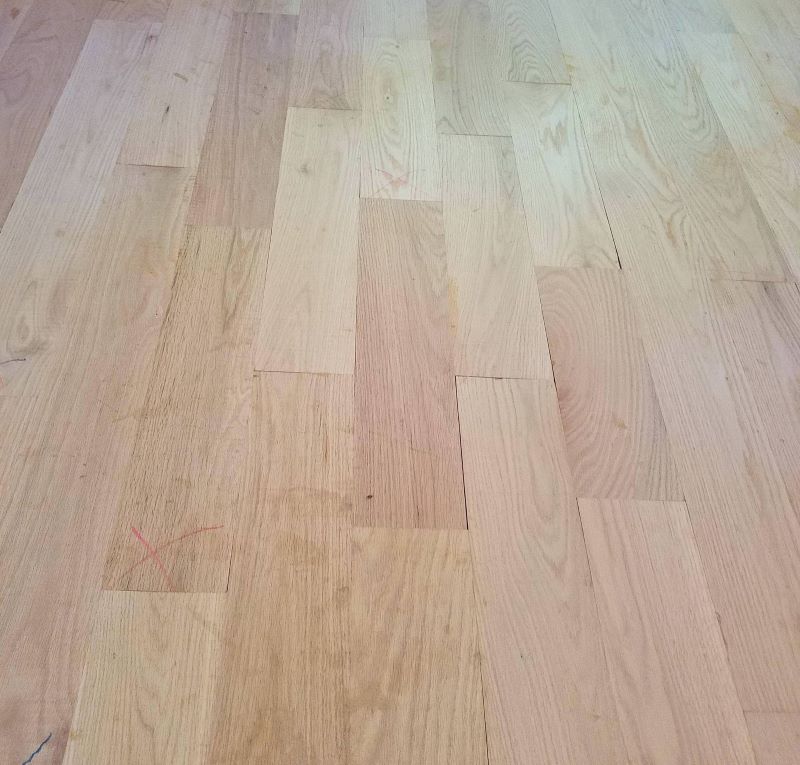
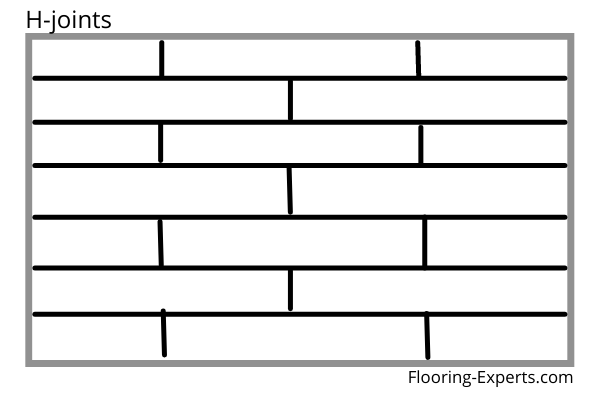
What’s the best pattern you can use when staggering laminate? The answer is that you should avoid creating a pattern at all. This is called a randomized stagger.
A random stagger doesn’t just happen by chance, though. You really need to pay attention to each & every new row to make sure it’s different from the 2 or 3 rows before it. If any seams line up too closely, they will catch your eye from across the room.
Installing the flooring with a randomized pattern will keep your eye from focusing on the seams in between individual boards. Instead, you and your guests will notice the wood pattern on the laminate. The goal is to make the material pop by removing distracting patterns.
Avoid These Common Staggering Pattern Mistakes
You need to achieve a certain level of balance for a strong and beautiful laminate floor. If you don’t stagger the flooring by more than 6 inches on every row, it will be unstable and may lead to damage later on. But on the other hand, a lot of flooring installers get a little too strict when they stagger their flooring.
If you cut all your starter boards to the same length (full board, half board, and repeat) or if you cut them all to regular lengths (6-inches, 12-inches, 18-inches, 24-inches, and repeat), you will create a pattern that sticks out to anyone who looks at the floor.
If you’re the kind of person who really craves an orderly look and a rigid pattern, you can go for one of the staggering patterns I’m about to describe.
But I warn you, in my experience, it always looks better to choose a randomized stagger pattern because the flooring itself is more beautiful than the seams. The brain loves patterns, and if you install your laminate with one of these patterns, it will be the only thing you can see when you look at your new floor.
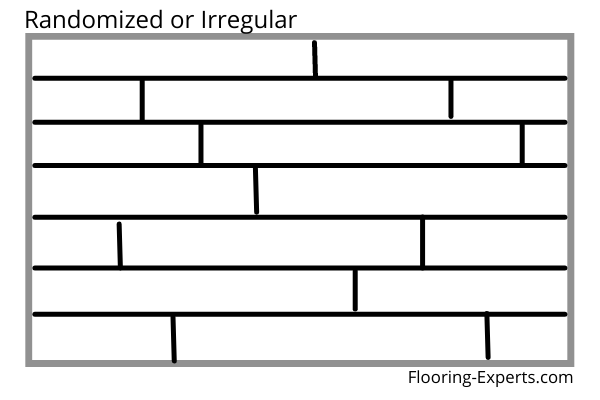
H-Pattern
This is the pattern you will create if you alternate starting boards of full length and half-length. Some installers will use this technique to save time. It’s very easy to tell which length you should use to start each row because you only have two options. It’s also strong because rows will overlap consistently.
The problem is that when you stand up and look at the floor, you will see the seams skipping every other row, looking like two dotted lines across the whole room. The eye and the brain are so good at seeing patterns like this, it will be the first thing you notice every time you see the floor.
Again, it’s not technically wrong to install the floor this way. Professionals do it all the time. If you really like the look, go for it. But remember, patterns like this one take the focus off of the beautiful wood finish you chose and paid for. Randomized staggering will put the focus back on the laminate itself.
Stair Step Pattern
This is the other common mistake you see in laminate flooring all the time. Installers create a stair-step pattern when they use starter boards of several regular lengths and lay them in a repeating order. The first starter may be 6 inches, the next one 12 inches, the next one 18 inches, and so on.
It’s a little more complex and varied than the H-Pattern, but it also creates a strong pattern that will catch the eye every time. It sounds like a strong pattern at first because every row is staggered by a regular amount. However, the regular offset actually creates diagonal seams across the room in a stair step pattern. These can be a weak point across multiple rows. This doesn’t stop professionals from using this method all the time. It’s fast and easy, but you pay for it in quality later on.
Again, it’s not technically wrong to install the flooring this way. If you really like the look, you can choose to stagger your laminate in a stair step pattern. But remember, patterns like this one take the focus off of the beautiful wood finish you chose and paid for. Randomized staggering will put the focus back on the laminate itself.

How to Stagger Laminate Flooring
If you like putting together jigsaw puzzles, you just might like installing laminate flooring. The boards usually click together and it’s fun to watch your progress. To set yourself up for a beautiful staggered laminate floor, keep in mind that prep work and planning ahead are essential.
Prepare the Room for Flooring
To get a room ready for laminate flooring, you usually need to tear out any old flooring material that was down before (unless you plan to install over laminate on top of another hard floor, like vinyl or tile).
Make sure not to miss any staples or nails because even small bumps on the subfloor can affect your finished product.
You should also check the subfloor to make sure it is relatively flat and level. If your subfloor is made of wood and in bad shape, you may need to install a layer of ¼-inch plywood on the whole floor to make it smooth and strong. If it’s a concrete floor, make sure that it’s completely dry and has the right moisture content.
Acclimate Your Laminate Flooring
You must put your flooring material in the room 24-72 hours before you start installing it so that it can adjust to the humidity and temperature of the house. Acclimating prevents problems later on like buckling or bubbling in your laminate floors. Follow the manufacturer’s recommendations for acclimating your laminate so that you can qualify for any warranties.
Our guide to acclimating laminate flooring can tell you everything you need to know.
Use Underlayment
Follow your flooring manufacturer’s recommendations for what type of underlayment to buy. This is a layer of thin foam, paper, or plastic that creates a moisture barrier to protect your flooring from excess humidity. It also helps cushion the flooring to avoid squeaks or hollow sounds when you step.
Cover the whole subfloor with underlayment according to the instructions.
Cut Several Starter Boards
To begin your laminate flooring stagger, use a laminate cutter or chop saw to cut 5 or 6 laminate boards to various lengths. You can use the one end as starters for 5 or 6 rows, and the other end of the boards will be used on the opposite wall to finish your rows (you will probably need to trim these finish boards later).
Laying the Laminate Flooring
Remember that laminate needs an “expansion gap” between the edge of the flooring and any walls, cabinets, or other obstructions. It’s usually ½ an inch. Be careful to leave this gap all around the flooring. If you need to, use plastic spacers.
Lay one of your precut starter boards near the wall in one corner, and continue laying whole boards end to end down the room until you can’t lay any more whole boards in the row. You can then measure and cut the last board to fit.
Now move to your next row. Look at the starter board of your last row and at the other starter boards you cut earlier. Choose one that is at least six inches longer or shorter than the previous row’s starter board.
You may want to lay out several starter boards down one wall and compare their lengths. Are they all at least 6 inches longer or shorter than the row adjacent? Are you avoiding H-patterns and stair-step patterns? You need to constantly look for these patterns in order to avoid them — it’s easy to create them by accident.
I like to lay out 3 rows in front of me without locking them together. Then, I stand up and look at the flooring from far away to make sure that the seams look random and don’t create any type of obvious pattern. When everything looks good, you can go in and quickly snap the rows together.
If you have difficulty locking the planks together, you might need a plastic or wooden block to tap the tongues into place.
Staggering the Laminate Flooring
As you install your flooring, just remember to stand up often and look at the floor from a distance.
Look at the seams. If any of them are creating visual patterns by being too close together or because you created a stair step or H-pattern, adjust these rows before you go on.
Remember that a randomized look is created by carefully selecting our starter board on each row. You might need to measure a specific length for your starter board, especially as you begin the last few rows.
Why Stagger Laminate Flooring?
There are two reasons to stagger your laminate flooring: it makes the floor stronger and it makes it look better.
If you’ve ever built with bricks (or even toy bricks, or any type of block), or if you’ve ever looked at a brick wall, you understand the importance of staggering. If you stack all the bricks up in straight columns, they fall right over. But when you overlap each brick, spacing out the joints, you can build a stable wall.
It’s the same principle in flooring; overlapped or staggered laminate flooring will create a strong floor that can expand, contract, and absorb impact as one big surface. Staggering interlocks the boards like a big puzzle that will never come apart.
Staggering also prevents unsightly problems like warping, buckling in laminate floors, and forming gaps. Avoiding these issues will make your floor look good forever.
And if you do a really good job laying down the flooring in a randomized, irregular pattern, you will hardly notice the joints between boards. Each plank will blend into the next and you’ll see nothing but a big, beautiful room of fine laminate flooring.