Tag Archive for: hydrogen peroxide

As soon as a floor is installed, day one begins. The fact that day one might have been a long time ago doesn’t necessarily mean there’s anything wrong with your floor. A well-maintained floor can last for generations.

A timeworn floor is another matter. Floors not properly maintained can get old in a hurry. Where floors are finished in some areas, but not others, cleaning them as they are and leaving them that way doesn’t make much sense.

In this article, we’ll discuss how to clean your worn-out hardwood floors without refinishing them so that they preserve their natural, unfinished look. If you don’t care for the idea of a polyurethane finish, you’re not alone. But we’ll be discussing something else as well.

Perhaps your aim is to avoid any more chemicals or chemically-based products in your home than necessary. This makes you part of a growing movement toward a safe and sensible way of life. This movement isn’t merely a popular trend. It’s more of an outlook. This outlook is becoming the norm and it’s here to stay.

If you’re looking for a way to restore your hardwood floors and keep them looking good without spending a lot of money, this has never gone out of style.

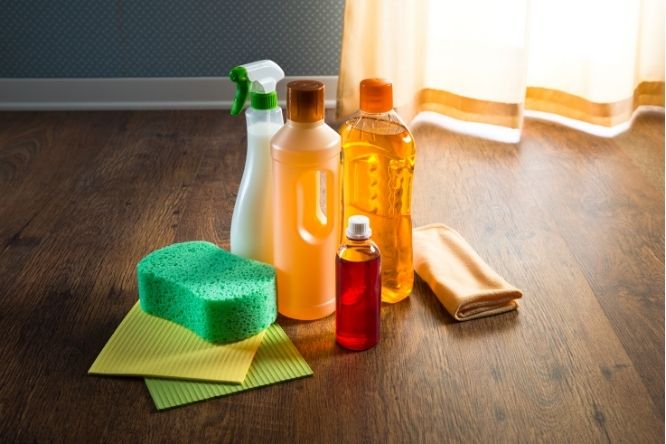
Follow along as we look at age-old, natural, low VOC, and inexpensive ways to get and keep your aging, timeworn floors clean and looking good.

old hardwood floors

Sanding Old Hardwood Floors

Over time, a hardwood floor’s finish will become thinner over the high traffic areas first. But getting your floors completely clean and even looking will involve removing the rest of the finish. A floor sander is usually required for this type of work. You can rent one of these at your local home improvement center.

However, if you’re not used to working with a floor sander, this fact could evidence itself later on. Not only will a professional sanding save a lot of frustration, but it could also save your floor.

There Are Limitations When It Comes To Sanding Old Hardwood Floors

A hardwood floor can only be sanded so many times before replacement should be considered. If your hardwood floors have already been sanded too many times to survive another sanding, a professional will be able to determine this.

If replacement isn’t an option, but your floors are still good for another sanding, there’s only one chance to get it right. Let a professional do this.

Removing Finish From Old Hardwood Floors Without Sanding

If you decide to save your hardwood floor’s last sanding for another time, this is understandable, but you can still remove the finish and get the entire floor clean.

In this case, consider a wood stripping product. Granted, it’s a chemical, but considering the likelihood that your hardwood floor is finished with polyurethane and sanding isn’t an option… For a stripping product that’s methylene chloride and NMP-free, we like Citristrip Gel.

As with any product you intend to apply to your hardwood floor, it’s always best to first test it in an inconspicuous place before proceeding. Be sure to follow the instructions printed on the product label.

How To Remove Stains From Hardwood Floors Without Damaging Them

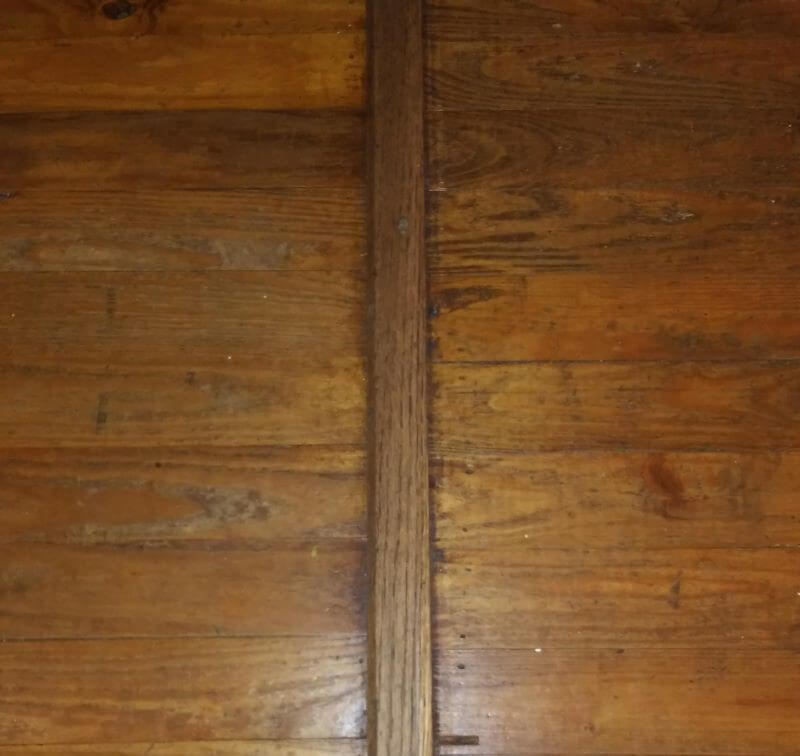
If your hardwood floors are old, sanded thin, and stained, then damage is the last thing you can afford. You’ll need to use extreme caution to get them clean. You’ve already used a chemical to strip them. This alone might have done a good deal to remove dirt.

To assure your floors are as smooth and even in porosity as possible, try not to use an abrasive pad or fabric to remove any residual stain. This is especially important because by the time you’re done reading this, you might change your mind about finishing your hardwood floors. Anything’s possible.

For stains that remain on your hardwood floors, identification of the causes might not be possible. But in most cases, the more troublesome of these are likely to be dark in color. It’s a reasonably safe bet that these stains are the result of spilled food or pet urine. Possibly, a human accident.

black stains on hardwood floors

What if the stains are foul-smelling?

How To Remove Foul-Smelling Stains From Old Hardwood Floors

For foul-smelling stains, this means that whatever caused the stain is still present. Depending on how long this has been the case, the subfloor might be affected as well. Removal of the affected floorboards to address the floor beneath should be considered. Start with the floorboard located at the center of the stain.

With the affected floorboard removed, look at the underside of it. If the stain has saturated it, you’re better off replacing it than trying to get the stain removed.

If it looks like the adjacent floorboards will be in the same shape, remove and check these as well. Continue to work your way outward until you come across floorboards that aren’t stained through and through. That is to say that looking at it from the exposed edge, a significant portion of the floorboard remains unstained. These lesser stained floorboards don’t need to be replaced and therefore, don’t need to be removed.

You can read all about it in our article on how to remove dark stains from hardwood floors.

What To Do If Your Old Subfloors Are Foul-Smelling

If the subfloor has traces of stain on it, try using an enzymatic cleaner to consume what’s left of the problem. Apply it liberally to the affected area of the subfloor only.

Also, be sure not to drench the subfloor or allow any of the solution to puddle. Soak up any excess with a clean, dry rag, The solution will continue to do its job even after you’ve done this.

Return to the area in a few hours. If the floor is dry and the smell is gone, spray the solution onto the subfloor again. The moisture will reactivate any lingering odor. Soak up any puddling and allow the enzymes to resume doing their job. Repeat this process until you’re satisfied that the subfloor is completely odor-free.

You can also try soaking stains with hydrogen peroxide. Saturate a clean terry cloth rag with it and lay it over the stain. Cover the rag with plastic food wrap. Keep the wrap in place by setting something heavy on top of it. A water jug will work.

Leave the saturated rags in place for a couple of hours before checking the stain. You can leave the rags in place for up to eight hours.

If a large area of the subfloor is significantly blackened and foul-smelling, it will probably need to be removed and replaced. A professional flooring installation expert or general contractor would be the one to determine this. Because a subfloor must be completely supportive and stable, it’s best to let a professional do this type of work. A professional will also be able to tell you if and to what extent the floor joists may be affected.

Once you’re sure your subfloors are no longer a concern, replacement floorboards can be installed. If you don’t have any of these left from the time your hardwood floor was first installed, there’s another option; Remove an unaffected floorboard and take it to your local home improvement center or flooring specialty store to match it.

If You Don’t Want To Apply A Polyurethane Finish To Your Hardwood Floors

If your floors have no more sandings left in them, the importance of protecting them can’t be stressed enough. You won’t have another chance. If the look of unstained hardwood floors is what you’re after, you can have this while still ensuring their protection.

After all, there’s no point in going to the trouble of cleaning your old hardwood floors if you don’t want to protect them.  Polyurethane offers superior protection and it’s also the longest-lasting.  But if the idea of polyurethane doesn’t appeal to you, there are alternatives.

Clean Old Hardwood Floors and Make Them Shine Without Polyurethane

Sure, polyurethane is available in different sheens. Just buy some in high gloss and you’ve got a shiny floor.

However, when it’s time to restore floors sealed with polyurethane, the services of a professional are usually required.

Paste wax devotees will tell you they love the fact that they can simply remove wax buildup and re-wax their hardwood floors whenever they want to. It doesn’t require calling on a professional to manage this.

When floors are sealed with wax, they can be easily buffed to a gleaming shine. Again, no pros necessary. A wax seal gives owners more control of their hardwood floors because the cost to keep them in good condition is so low.

Try Using A Penetrating Oil To Seal Your Old, Classic Hardwood Floors

For an old-world look, there are also penetrating oils. These aren’t the kind of oil normally found in the kitchen or garage. Penetrating oils dry to a hard finish. They form a seal by binding to the wood on a molecular level whereas polyurethane seals a wood floor by coating it.

If you’re restoring an old, classic home’s hardwood floors, the application of a penetrating oil should be considered. This is chiefly what was applied to floors before polyurethane was invented. Penetrating oils aren’t glossy or shiny, but they bring out the beauty of wood’s grain and color.

Better still, if you discover a scratch on your hardwood floor, simply work some oil into it and buff

The Choice of Hardwood Floor Sealers Is Up To You

Polyurethane, wax, or oil; the choice is yours. Once your old hardwood floors are clean, whatever you decide to apply to them is fine. Keeping your hardwood floors clean, protected, and looking their best is what it’s all about.

Unless you’ve just returned from spending the past year and a half on another planet, you don’t need this or any other article to explain or emphasize the importance of taking precautions against the transmission of disease. The COVID-19 pandemic has taught us a lot.

The past forty years have given rise to infectious diseases that had previously been unheard of. But COVID-19 is the virus that changed the way the whole world thinks about disinfection. It changed our entire approach. For some of us, COVID-19 even became a partisan issue.

In this article, we’ll discuss combating the COVID-19 virus and other pathogens on a wood floor. The article will also answer some frequently asked questions about how to do this, and what to expect.

The following assumes that your hardwood floors are finished with a urethane type of sealant. As always, follow the manufacturer’s recommendations and directions.

Is There A Way To Disinfect Hardwood Floors Without Using a Bucket and Without Rinsing?

We’re not terribly high on the mop and bucket idea. This is mostly because we understand how damaging it can be to drench hardwood or expose it to more moisture than absolutely necessary. Mopping calls for this as part of the process and rinsing calls for the process to be repeated.

There is indeed an easier way to disinfect hardwood floors.

In fact, there are a few easier ways. Let’s discuss what you should know.

Sanitizing vs Disinfecting A Wood Floor: What’s the Difference?

According to The Centers For Disease Control and Prevention (CDC):

  • Cleaning is a process where soap and water is used to remove germs, dirt and impurities. By reducing the number of germs, cleaning reduces the risk of infection.
  • Disinfecting uses chemicals to kill germs. Disinfecting doesn’t necessarily target dirt and impurities. By killing germs, disinfection reduces the risk of infection.
  • Sanitizing lowers the number of germs on surfaces or objects to a safe level, as judged by public health standards or requirements. This process works by either cleaning OR disinfecting to lower the risk of spreading infection.

With these facts in mind, cleaning should precede disinfecting.

According to the U.S. Environmental Protection Agency:

EPA expects all products on List N (EPA’s list of approved disinfectants) to kill the coronavirus SARS-CoV-2 (COVID-​19) when used according to the label directions.

This means that no matter what organisms it kills, in order for a product to call itself a disinfectant, organisms that are COVID-19 pathogens must be included in the scope.

Using an Antibacterial Wood Floor Cleaner to Disinfect Hardwood Floors

cleaning products for hardwood floors

Antibacterials focus on reducing the number of bacteria whereas the focus of disinfectants is broader. Disinfectants (antimicrobials) reduce the number of bacteria, viruses, fungi, and certain types of insect vermin. All products labeled “disinfectant” kill COVID-19 microbes.

While many products reduce the number of many types of microbes, and meet the standards for categorization as a disinfectant by the EPA, some manufacturers choose to label their products as antibacterials instead. We can only assume that such decisions are driven by marketing strategies. But depending on the active ingredients, products labeled “antibacterial” can be used to disinfect. Product labels are key.

Although they seem to be few and far in between, there are a few disinfecting floor cleaners available on the market. Rejuvenate® makes an antibacterial wood floor cleaning product that’s also approved as a disinfectant by the EPA.

Rejuvenate® antibacterial wood floor cleaner still needs to be rinsed. But for bargain hunters and for those who prefer not to work any harder or longer than necessary, the term, “two-fer” (two for one/two in one) applies. For those who consider themselves to be devotees of both, you’ve hit paydirt.

Should You Use Bleach To Disinfect Hardwood Floors?

To be clear, bleach is a disinfectant. Clorox is the most popular brand of bleach.

Yet, Clorox manufactures disinfecting wet mopping cloths that do not contain bleach. Clorox also recommends its non-bleach wood floor cleaning product over bleach for cleaning wood floors. These two facts should tell you everything you need to know about using bleach to disinfect hardwood floors.

Undiluted bleach should never be applied to a wood floor unless removing the finish and/or the color is the goal. Applying a dilute form offers no relief from rinsing. So, let’s cross bleach off the list..

Should You Use A Steam Mop To Disinfect Hardwood Floors?

Try thinking of it this way; If it isn’t safe to transfer a product’s use as directed to the palm of your hand for a full five seconds, it probably isn’t a good idea to use on hardwood floors. Does that seem extreme? Then, check out your wood floor manufacturers’ recommendations. If the manufacturer recommends the use of a steam mop to disinfect your hardwood floors, raise your hand.

See what I mean?

Of course, the reason for not applying steam to hardwood floors might not be quite the same as the reason for not applying it to your skin. But by sticking with this rule of thumb, you’ll be giving your wood floor the gentle treatment it requires.

As a cleaning solution, antibacterial, antiviral, antimicrobial, boiled water, and steam are equally effective options. But applying a high-temperature solution to a wood floor will do more harm than good.

For floors installed with glue (floor adhesive), applying extremely hot water or steam is likely to cause the glue to lose its adhesive properties,

For wood floors installed with nails, a boiling hot solution would cause both the nails as well as the floorboards to expand considerably. The nails are more apt to rust and stain your hardwood floors before ultimately causing the floorboards to become less securely fastened.

This isn’t to say that steam can be applied to a floating wood floor without consequence either.

As it is, a hardwood floor’s exposure to moisture should be limited. Where wood floors are warped or have dark stains on them, moisture is the culprit. To expose a wood floor to moist heat or to do so on a routine basis doesn’t align with the effort that should be undertaken to limit the floor’s contact with moisture.

How to Disinfect Hardwood Floors without Damaging Them

Despite the best intentions, and sometimes, because of them, wood floors can be damaged. But this doesn’t need to happen. As long as exposure to water, harsh chemicals, and extreme measures is limited, the risk of damage is minimal. Hence, the rule of thumb as discussed earlier.

How to Disinfect Hardwood Floors Naturally

The terms “natural”, “naturally”, and “nature” conjure ethereal images of flowered meadows where the sun shines and breezes blow gently.

They might not be as pleasant as the scenario above, but chemicals, chemical bi-products, and chemical reactions are also natural.

The active ingredients usually contained in an EPA registered disinfectant are natural in that they are environmentally safe.

Of course, it would be nice to find a disinfectant that’s safe to use around children and pets as well. An inexpensive supermarket or drugstore product that doesn’t need to be rinsed would also be helpful.

There’s only one product that ticks all the boxes – hydrogen peroxide. Where the previously discussed “two fer” is analogous to paydirt, hydrogen peroxide is the motherlode.

Hydrogen peroxide is usually sold in concentrations of 3% or 6%. You can use the 3% concentration to disinfect your hardwood floor without first diluting it.

Hydrogen peroxide is sold in dark brown colored or opaque containers to protect it from light. Prolonged exposure to light and temperatures above 80F can cause the solution to become inert. It’s best used within a couple of months of purchase as it will expire in six months and will lose its effectiveness.

Use Hydrogen Peroxide To Disinfect Hardwood Floors

Transfer hydrogen peroxide from its original container to a clean spray bottle. Be sure to set the original aside so that you can transfer any remaining peroxide back into it when you’re done disinfecting your floors.

If you have a wet mop with a built-in cleaning solution container, you can bypass the spray bottle and pour hydrogen peroxide directly into the container instead.

You’ll also need several clean microfiber sleeves for your flat mop or untreated cleaning cloths for your Swiffer-style mop.

Working in sections:

  • Spray the hydrogen peroxide directly onto your hardwood floor.
  • Allow the floor to remain wet for 30-40 seconds.
  • Use a dry, microfiber mop head to wipe the peroxide from the floor.
  • Continue wiping the floor until it’s completely dry. Doing this will remove any haze that might remain. If the mop head becomes saturated, replace it with a clean, dry one.

Many people report that using hydrogen peroxide to clean and disinfect their hardwood floors also left them looking almost new. A pleasant side-effect.

How To Disinfect Hardwood Floors Without Lifting a Finger

Although you’ll still need to vacuum your wood floor to remove dust and other particles, the number of pathogens and insect vermin are very effectively reduced with the application of ultraviolet light. Many ultraviolet light fixtures designed with disinfection and elimination of insect vermin in mind are available for household use at reasonable prices.

Of course, because ultraviolet light isn’t the type of disinfecting medium evaluated by the EPA, it is neither approved nor rejected for categorization as a disinfectant. But ultraviolet lamps are frequently used in patient facilities where pathogens can be especially problematic if not immediately eliminated.

How To Prevent Pathogens From Contaminating Your Hardwood Floors

For the vast majority of the world population, it is customary to remove shoes before or immediately upon entering a home. Why this isn’t customary in the U.S. is not certain. Given the enormity of our science and technology community and all that we know about the spread of disease, there’s no excuse for not adopting this custom.

Shoes are dirty and should not be worn inside the home any more than they should be worn to bed. When shoes are worn outside, they pick up organisms that are present on sidewalks, streets, and gutters.

Naturally, these organisms will be transported from the street to locations inside the home if the shoes that transport them aren’t first removed. Removal of shoes also keeps dirt, mud, and sand from being tracked in and scratching your hardwood floors.

Ultraviolet light units are available in the form of hand-held wands. If shoes must be worn inside, passing a wand over the uppers and soles couldn’t hurt.

If you’ve had hardwood floors in your home for longer than about five minutes, you’ve probably heard or read about all kinds of solutions and ways to get and keep your floors, cleaner, shinier, better, etc.

It’s pretty tough to mention hydrogen peroxide while suppressing the urge to sing its praises. Its use as an antiseptic on topical cuts, scratches, and abrasions is widely known. Where oral care and hygiene are concerned, its benefits are touted by dentist and ear, nose, and throat specialists.

However, depending on your reasons for using hydrogen peroxide on hardwood floors, and the results you’re after, there might be a downside.

Read on to learn about cleaning hardwood floors with hydrogen peroxide, its benefits, and drawbacks.

The Effects of Hydrogen Peroxide on Wood Floors

According to the Centers For Disease Control (CDC), hydrogen peroxide is an effective antiseptic that also kills fungi, mold spores, yeast, viruses and bacteria.

Because these dangerous organisms are known to be present on floors the world round, using hydrogen peroxide as a homemade wood floor cleaner is an excellent choice.

Moreover, although the term, “homemade” suggests that some sort of alchemy or mixing of substances, is involved in creating hydrogen peroxide, in truth, having a jug of it on hand is as easy as picking it up on the next trip to the supermarket for only a few dollars.

Among the other benefits of hydrogen peroxide — when applied to floors and other surfaces, it’s a very effective and environmentally safe, kid-safe, and pet-safe cleanser and antiseptic.

Also, most people who use hydrogen peroxide to clean hardwood floors report that their floors look new.

Still, cleaning hardwood floors with hydrogen peroxide can have unintended results.

Will Hydrogen Peroxide Damage Hardwood Floors?

No, it won’t.

The word, “damage” might be a bit over the top because unless full-strength hydrogen peroxide is applied, there are very few negative effects that can’t be remedied. So the worst that can be said is, “hydrogen peroxide can be something of a trouble-maker.”

One of the negative effects is clouding. The chemical properties of hydrogen peroxide can have a bleaching effect. Thus, people with floors that are polished with wax or oil, or sealed with acrylic or urethane coating might find that using hydrogen peroxide caused the finish to become cloudy and dull — but this is very rare.

When applying hydrogen peroxide to unfinished floors to remove pet, food, or other types of stains, it’s possible for some of the surrounding wood to also become involved in the process. Hence, the result can be an unintentionally lightened area of wood.

However, a cloudy finish can be screened and recoated, and bleached wood can be stained to match the color of the rest.

Another negative aspect ─ prolonged exposure to moisture can cause hardwood floors to cup, buckle, lift, or become water-stained. Moisture can even cause mold growth or wood rot.

Yet, although hydrogen peroxide is a watery substance, if used to clean the floor’s surface, it isn’t necessary to apply very much of it. If you work in small sections, the floor can be clean and dry long before moisture has time to do any damage.

If used in the right concentration and in the right way, the benefits of using hydrogen peroxide to clean hardwood floors outweigh the risks.

How to Clean Hardwood Floors With Hydrogen Peroxide

Firstly, you’ll need to decide whether you want to clean your hardwood floor or just the surface layer of your floor, e.g., wax, oil, or lacquer-type finish.

Sometimes only the surface layer of the floor needs to be cleaned. This is usually characterized by a dull, dingy, or scuffed-up appearance.

In other cases, the wood itself might be stained. There are too many types and causes of stains to list them all, but pet urine is one of the more common types. Pet urine is characterized by an area(s) that is/are blackened.

This blackened look usually indicates a chemical reaction has taken place where uric salts or crystalized urine came into contact with the hardwood’s tannin. Because there’s less tannin in softer woods, the stain may be a grayish color.

To Clean The Surface Of A Finished Hardwood Floor:

Firstly, whatever you do, whatever you try, test it in a small, inconspicuous area.

Next, you’ll want to remember to clean the floor in sections.

Stuff You’ll Need To Have:

  1. Cleaning-grade hydrogen peroxide (35%)
  2. Spray bottle
  3. Microfiber mop and several extra mop heads.
  4. Vacuum with floor accessory attachment. (It’s that sort of flat one with little, tiny rollers and a fringe or felt on the bottom. …Yes, that one.)

For Cleaning Stains From An Unfinished Floor, Add:

  1. A roll of cellophane and
  2. A roll of paper towels or several terry cloth rags.  

Stuff You’ll Need To Do:

  1. With the floor accessory attached, vacuum the floor. Be sure to get close to the baseboards to remove any hidden dust and debris.
  2. Mix a solution of ½ cup peroxide and ½ gallon of water.
  3. Fill the empty spray bottle with the solution. Set the rest aside.
  4.  Spray a thin film of solution over the first section of floor.
  5. Use your microfiber mop to wipe the section dry.
  6. Spray and mop the next section and the next until you’re done. If your mop head         becomes too wet to dry the floor, replace it with a fresh, dry one.         

There. All done. Feel free to invoke your bragging rights in the comments section below, before and after photos, the whole shabang.

Huh? What? Oh yeah! The rest of the solution. Use it to clean and disinfect the rest of your home’s surfaces, of course!

To Clean An Unfinished Hardwood Floor

Assuming you’ve sanded the floor down to the raw wood, you’ll be pleased to know the toughest part of the job is behind you.

  1. Saturate several layers of paper towels with hydrogen peroxide.
  2. Lay the towels over the stain or a section of it.
  3. Lay cellophane over the towels. Use something heavy to keep the cellophane in place over the soaked towels.
  4. Check the underside of the towels occasionally to be sure they haven’t become too saturated by the stain to keep absorbing it. If they have, replace them with fresh ones that have been soaked with the peroxide solution.
  5. Allow the towels and cellophane to remain in place up to eight (8) hours.
  6. Remove the towels and repeat the process for each section of floor or stain to be cleaned.         

Note: There’s no requirement of completing the entire eight hour process before starting the next section. To clean several sections or an entire room full of sections, the work can proceed in phases.

Once the floor is completely dry, it will need to be stained to match the color of the rest before a new finish is applied.

Of course, if you’re unsure of your proficiency at color matching or of any of the steps in the process, you can always let a professional flooring expert do the job.