Tag Archive for: laminate flooring care

Convenience, cost, and versatility mean laminate flooring is distinct from hardwood surfaces. However, as is the case with both solid and engineered boards, you must also provide a space between the planks closest to the walls, when installing laminate floors.

This space is referred to as an expansion gap and ensures your floor surface will remain even when the boards expand due to rising humidity and temperature levels.

Experts recommend a minimum of 8 – 10 inches (or a quarter of an inch, in some cases).

However, the right size depends on the size of the surface being covered.

Here we discuss the importance of expansion gaps and possible issues involving them to ensure you are equipped with the knowledge you need to get started with your laminate flooring. 

Do You Need An Expansion Gap for Laminate Flooring?

Yes, you do. To understand why this is the case, it is important to take a glimpse at the structure of a laminate floorboard and also to understand what happens if you do not provide an expansion gap during installation.

The Structure of Laminate Flooring

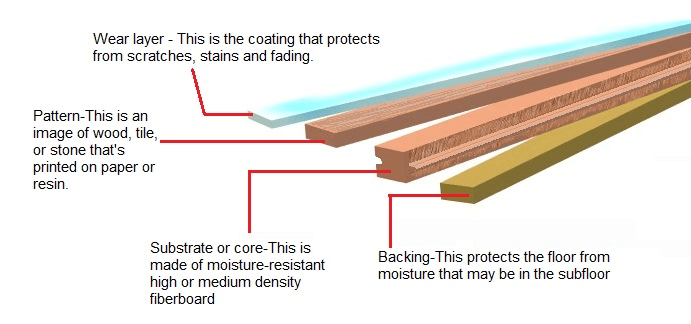
Laminate floor planks consist of four layers.

The first is the wear layer which is transparent and designed to protect the lower photographic layer from UV damage and wear and tear.

Next comes the photographic layer which consists of a high-resolution image of either wood, marble, or even non-conventional designs such as greenery or imagery.

Below this comes a board layer which is made from high-density fiberboard (also referred to as HDF) in laminate flooring produced according to the highest standards.

It is this layer that consists of wood that has been milled and combined with a binder and pressed into planks.

The entire structure is supported by a base layer, which provides it with stability.

The presence of the HDF layer (certain manufacturers may use MDF or medium-density fiberboard), means that a significant portion of laminate flooring consists of wood.

As a matter of fact over 90% of a board is made of this organic material which is not only porous but hygroscopic, i.e., capable of attracting moisture.

As a result, laminate planks are susceptible to the relative humidity of their surroundings.

That means that they will contract or expand owing to changes in this all-important factor, just like solid or engineered hardwood would, as well.

For this reason, a gap must be left between the row of boards closest to the wall and the wall itself during installation. 

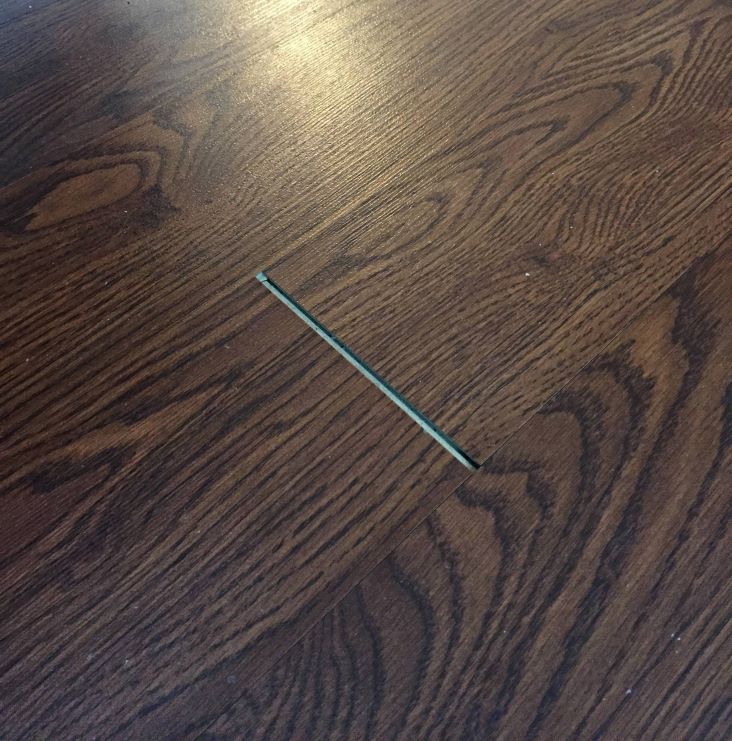
What Happens When You Don’t Install an Expansion Gap?

When humidity levels rise, particularly during warmer seasons, the wood in your laminate flooring will expand.

If there is no space between them this may result in the following issues with your planks:

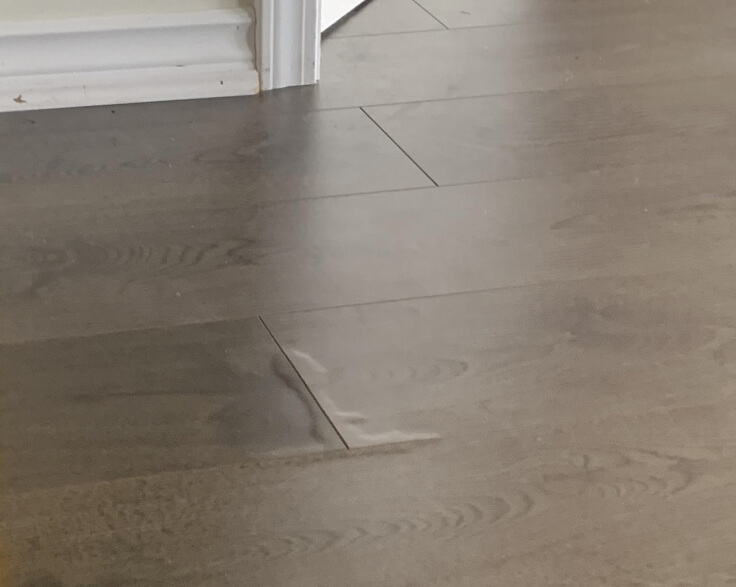
1) Peaking: This problem occurs when laminate boards push up against each other at the seams creating slopes on your flooring surface. 

It can be resolved by noting the direction in which the expansion occurs, removing the molding on the facing wall, and cutting the board which happens to be pressing into the wall causing the peaking in the floorboards.

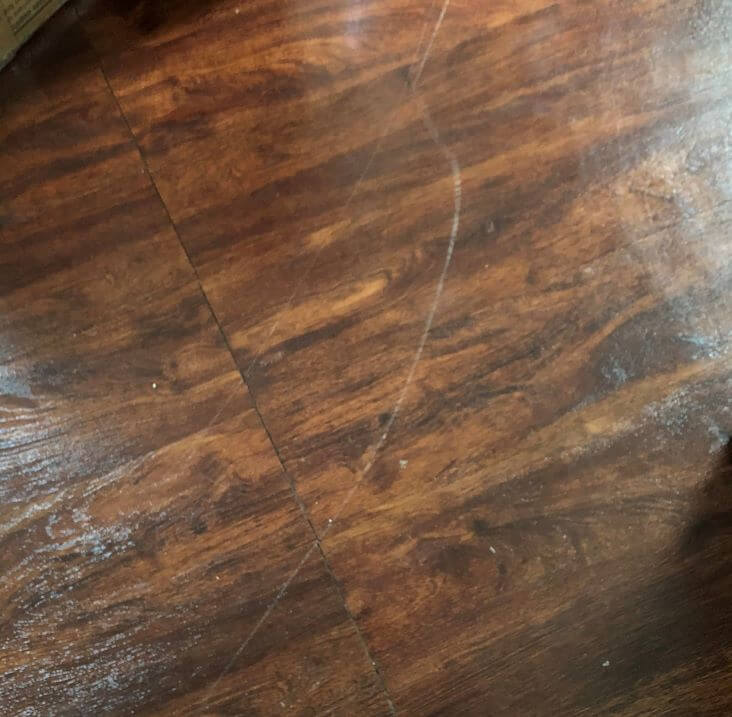
2) Buckling: Like peaking, buckling in laminate floors is caused when humidity levels rise. However, it can also be caused by the direct exposure of the laminate floorboards to moisture as a result of wet mopping, neglecting to clean spills at once, or undetected leakages.

In the absence of sufficient space to expand, i.e., the absence of an expansion gap, the floorboards will push up against each other.

For the problem to be resolved, you will need to ascertain the cause of the excess moisture and repair any leakages or clean any spills. It may be necessary to replace your moisture barrier if it is insufficient for handling moisture from the concrete subfloor.

You will also need to remove the molding and cut an expansion gap if none has been provided.

What Size Expansion Gap Is Needed for Laminate Flooring?

The size of the expansion gap required for your floor will depend on the size of your surface and most manufacturers will provide you with the measurements you need. 

That said, most experts recommend a minimum of one-quarter of an inch.

Expansion gaps aren’t just needed close to the walls of a room but may also be required at the centers of rooms exceeding 8 meters in width and 12 meters in length.

They are also required when transitioning from one room to another, particularly in the event of different surfaces being involved, i.e., laminate and tile, for example.

Transition profiles that serve to cover these gaps will come in handy here: each board on either side will have to be placed 5 millimeters on either side of the bar of each profile.

Can You Have Too Big of an Expansion Gap for Laminate Flooring?

Yes, you can. There are a few issues that could cause the problem such as neglecting to use floor spacers.

This issue could also be caused by failure to acclimatize your laminate boards by placing them on the floor of the room in which they are meant to be installed for a minimum of 48 hours.

Failing to take these precautions may result in you having to fix expansion gaps which turn out to be too large as a result.

How to Hide an Expansion Gap?

Several methods can be used to resolve or even prevent large expansion gaps.

These include:

1. Adding Molding or Beading

When using either option you will need to select a product that matches your color scheme as closely as possible. 

You will also need to ensure you select the appropriate size of molding or beading and nail it into the skirting board as opposed to nailing it in the planks since doing so will restrict them from expanding or contracting.

2. Adding Caulk

Caulk can be an especially versatile solution in this regard. It is not only capable of accommodating the expansion and contraction of your boards but can also be used to enhance the water resistance of laminate surfaces in rooms exposed to a high degree of moisture.

It will also be possible for you to obtain products that match your preferred color, with this option.

3. Make Use of Flooring Spacers

These accessories are extremely useful for ensuring you get your expansion gap right the first time and come in different varieties.

Some of the most popular examples include:

a) T Floor Spacers

Robust enough to withstand minor accidents, these spacers will remain in place, unlike tabs that may slip during the installation process.

As a result, these accessories which are capable of measurements of ¼ and ⅜ inches (depending on which sides you use) will enable you to lay your laminate boards in a straight line.

And they’re affordable too, making them well worth their value for money.

If the room you happen to be working on is larger than 500 square feet in size, you may need to consider buying more than a single pack.

b) Tezoro Floor Spacers (24 pack)

These scientifically designed triangular floor spacers are just what you need to achieve that perfect quarter-inch expansion gap.

And they’re pretty stable too. That means you’ll be able to focus on installing those boards without having to keep a sharp lookout for spacers that simply won’t stay put.

All of which makes these accessories ideal whether you happen to be a professional or DIY enthusiast installing a laminate surface.

c) Bessy Floor Spacers

Made from glass-filled nylon, these spacers are adjustable in terms of measurements and tightness.

Their size also means they won’t slip out of sight while you work with them.

What’s more, their special design means you will be able to lay impressively straight rows even when working with slightly irregular walls.

And once you’re through, you will simply be able to loosen them with a twist.

These features ensure the Bessy Floor Spacers are able to provide the ideal blend of convenience and accuracy. 

Conclusion

Expansion gaps are necessary when installing laminate surfaces since they provide the space the planks will need to expand as ambient moisture levels change.

If they are omitted issues such as peaking or buckling may result.

According to experts, the minimum recommended size for expansion gaps is a quarter of an inch. However, the size of the gap will depend on the size of the surface being installed. 

It is worth noting that this gap will also be required at intervals for areas larger than 12 meters in length and 8 meters in width. Expansion gaps are also necessary when transitioning from one surface to another and may be concealed by transition profiles.

To prevent your expansion gaps from becoming too large or visible as humidity levels fall, you will need to make use of spacers and also acclimatize your laminate flooring. You may also need to use humidifiers during colder seasons.

In the event of your expansion gaps being too large or becoming noticeable, you will have the option of concealing them with molding, beading, or caulk.

The laminate flooring in warm golden brown tones not only looked just like real wood but also came at a price that was a fraction of the real deal. What’s more, your favorite cousins promised you it would be easy to install. 

And when they were all done it made your dining room look as though it was worthy of a feature in Architectural Digest. Until you started noticing the presence of tell-tale spaces close to the walls, when winter set in.

Were the expansion gaps left when installing your floor actually too big? Or could the issue have been caused by other factors? What could the reason be for their becoming especially noticeable?

Laminate floor planks are mostly made up of wood (about 90%). Owing to the porosity of this material they tend to shrink and expand due to changes in humidity and temperature, just like solid or engineered hardwood planks.

As a result, they can expand when the weather gets warmer and contract when it gets colder, making any gaps or spacing especially visible.

Noticeable expansion gaps can be fixed by the following methods:

  • Removing and replacing your planks
  • Adding molding 
  • Adding beading
  • Caulking

Below you will be able to find detailed information on each of these options. You will also be able to find additional helpful pointers such as the perfect size for expansion gaps and how to ensure you get it right the first time. 

How Big Should Expansion Gaps For Laminate Floors Be?

Expansion gaps are essential when installing your laminate floors to ensure your planks have enough space for movement when they start to expand during those sunny summer months.

Failure to account for this may result in their pushing against each other as temperature and humidity levels rise, an incidence which may result in buckling laminate floors. (Conversely, falling  temperatures, and humidity levels may result in your laminate floor planks separating.)

In addition to detracting from the aesthetics of your surroundings, buckling can also damage the interlocking mechanism of your laminate planks, resulting in extra expenditure to have them replaced.

The minimum recommended size for an expansion gap is a quarter( ¼ ) of an inch. This precaution must be taken around any structures such as cabinets, stairs, and pillars.

How to Fix an Expansion Gap That Has Gotten Too Big

If your laminate flooring expansion gap has gotten too large, you will be able to rectify the issue using a number of straightforward methods explained in detail below.

1. Replace the Entire Floor

Depending on the size of the floor and the state of the room and whether you have furnished it, this may prove to be rather labor intensive.

What you will need to do is remove the molding and then starting with the first row closest to the wall remove each plank. You will need a chisel to lift up each board.

Special care should be taken when removing the planks to avoid damaging the click mechanism.

You will then need to reinstall your floorboards taking special care to leave the required expansion gap recommended by the manufacturer of the laminate floor.

2. Make Use of Molding

Molding can prove especially helpful in concealing wide expansion gaps in your laminate floor.

Ensure you select the correct size which will cover the spaces between the walls and your floor; the material should be solid wood.  

It is also a good idea to select molding in a color that is as close as possible to your laminate flooring. However, it may also be possible to stain it.

Once you have obtained a suitable product, you will need to nail the molding into the baseboard.

The molding must never be nailed into the laminate itself since the floor needs to be left free to contract and expand.

3. Make Use of Beading

When using this option you will need to measure the length required as well as the width of the visible part of the expansion gap to ensure you make the right selection. 

(As is the case with molding, you will also need to ensure that the color of the beading is pretty close to your laminate flooring. You should also make sure it is waterproof if you intend to use it in a kitchen, bathroom, or mudroom.)

You may also need to cut a 45° angle at the end if the length you will be fitting will also be meeting another at a corner in the room. You will need to use a miter saw to achieve a perfect cut. 

An adhesive such as super glue will be suitable for sticking the angled ends together before fitting them into a corner. (Holding them together for a quarter of a minute will ensure the glue will bond both pieces together effectively.)

As is the case with molding, the beading should be attached to the skirtboard and not the laminate flooring to allow for contraction and expansion or even movement as a result of traffic.

If using glue, opt for a strong variety and wipe the excess off with a cloth once you are through. (You may also need to push heavy objects up against the beading until the glue dries.)

Alternatively, you may also use nails to fasten the beading to the skirtboard.

4. Make Use of Caulking

This method can be especially beneficial owing to the ability of caulk to accommodate the movement of your floor. It is also possible to obtain a product which matches your preferred color.

The first thing you will need to do before getting started is to use a vacuum cleaner to thoroughly clean the expansion gaps you intend to cover. 

When applying the caulk, you will need to apply consistent pressure on the trigger of the caulk gun while drawing it backwards.

Next, you will need to pull your finger along the line of applied caulk to press it down lightly. It will take about an entire day to dry.

Caulking can also be used to seal the space between tubs and shower stalls and reduce the susceptibility of your flooring to damage by water that may seep beneath the planks.

Building experts specifically recommend the use of silicone caulk for this purpose.

How to Prevent Big Expansion Gaps

Remembering to provide expansion gaps when installing your laminate flooring is important. However, it is just as essential to ensure they are the right size while also taking into account the sensitivity of laminate flooring to changes in temperature and humidity.

Taking the following precautions will enable you to do so:

1. Make Use of Floor Spacers

Floor spacers come in different measurements and varieties. There are those which come in the form of rectangular tabs which you simply slip in between the laminate boards and the wall when installing your flooring. There are also those which are shaped like triangular tabs and tend to have greater stability.

You are also likely to come across floor spacers that lie flat on the floor and can be adjusted and tightened. They are reputed to be especially useful in terms of being able to assist you to lay your laminate flooring in a straight row. Their stability is also another plus.

Alternatively, it is also possible to make floor spacers yourself from yardsticks, for example.

Regardless of which option you choose, you should ensure the expansion gap is the right size recommended by the manufacturer to prevent problems with your flooring. If you are not certain, you may verify it with them since this value is often determined by the size of your floor.

2. Acclimatise Your Flooring

Like solid and engineered hardwood floors, laminate floors need to be acclimatised. This process will ensure your laminate floor planks become accustomed to humidity and temperature levels in the room in which it is meant to be installed.

Failure to take this step will lead to the boards expanding or contracting once they have been installed and may even result in your warranty being voided by your manufacturer.

3. Make Use of Humidifiers in Cold Weather

Laminate planks are especially prone to shrinking in winter and autumn due to falling temperatures and humidity levels. Making use of a humidifier during those colder months could add some much-needed moisture to your surroundings, and possibly prevent shrinking in your laminate floorboards.

Conclusion

Laminate floor planks mostly consist of high-density fiberboard, and as a result, are rather porous. This quality means that they will either shrink or expand depending on the weather or season.

This may affect your expansion gap and make it appear visible. However, by shifting the boards together, using molding or beading, or simply relying on caulk, you will be able to conceal them.

This condition can also be prevented by ensuring you obtain the recommended expansion gap size for your floor from the manufacturer, acclimatize your laminate boards, and use a humidifier during colder weather.

Yes. You can use a steam mop on laminate floors. 

If you are among so many people looking for a definitive answer to this question, there you have it.

However, this answer doesn’t apply to all laminate floors. 

In fact, it doesn’t even apply to laminate floors in general. Not yet anyway. 

Currently, the answer only applies to waterproof laminate floors. As this type is expected to sell as well as the water-sensitive type that’s more familiar to most consumers, the water-sensitive kind will in all likelihood be phased out. So, ultimately the answer might apply to all laminate flooring. 

In this article, we’ll discuss what you need to know for a better understanding of how the answer applies to your circumstances. 

steam mops on laminate floors

The Purpose of A Steam Mop

It’s reasonable to assume that because steam is a safe, chemical-free way to sanitize surfaces, it’s safe for all surfaces. 

“Dust mops are used to dust floors. So steam mops must be intended for floors or they wouldn’t be called steam mops”. 

This is true. Steam mops are indeed intended for use on floors. 

“If it wasn’t for steam mops, people would still be on their hands and knees to scrape up crud and goop.” 

“If a steam mop can do this, how bad can it be?”

Good arguments, but unless they’re used judiciously, steam mops can do more harm than good.   

Can A Steam Mop Be Bad For Laminate Floors? 

The short answer is, yes. 

If your laminate floors aren’t waterproof, water can seep through the seams and be absorbed by the floorboards’ substrate. The substrate is made of medium or high-density fiberboard. 

While it may be moisture resistant, fiberboard isn’t necessarily waterproof. It can swell when it’s exposed to water. 

Even after the fiberboard has dried, the swelling remains.  

Can Water-Damaged Laminate Floors Be Repaired?

A solid wood floor that’s swollen can be sanded back down to level. 

Although the number of times is limited, engineered wood floors can also be sanded.

Laminate floors are another story.

laminate floor structure

Just below the wear layer of a laminate floor, is the pattern layer. The pattern is an image of tile, stone, or wood. This image is printed on paper or resin. 

Attempting to sand the pattern layer to get to the swollen substrate would result in the removal of the pattern itself. This would also leave the substrate exposed.  

The only way to repair a water-damaged laminate floor is by replacing the damaged floorboards. 

Laminate Floors That Can Be Steam Mopped

Because laminate flooring is considered to be a relatively new concept, the year 2018 marks a line between new and “newer”. 

In 2018, the first line of water-resistant laminate floors was launched. This was a game-changer. 

More improvements have since followed. 

Today, laminate floors are available with water-tight seams between the floorboards. This makes them virtually waterproof. 

Where consumers were once advised against installing laminate floors in kitchens and bathrooms, they’re encouraged to install the waterproof type throughout the entire home. 

As with most things, you get what you pay for. Waterproof laminate floors are priced at the high end (about $8/sq ft). But even the most expensive laminate is less costly than wood, engineered wood, or even carpeted floors.

Here’s why:

  • By the time carpets are a couple of years old, they begin to look that way. Sometimes, it isn’t until after paying for a few rounds of professional cleaning, that consumers realize that laminate floors would have cost less than carpet.  
  • Unlike wood and engineered wood floors, laminate floors don’t need to be refinished every few years
  • Wood and engineered floors can be sanded in the event of water damage, but with waterproof laminate floors, there’s no water damage to speak of.
  • The more robust wear layer makes laminate floors more resistant to scratches, dents, and stains than wood, engineered wood, and carpet. 

How To Know For Sure If Your Laminate Floors Can Be Steam Mopped

It’s important to understand that if your floors were manufactured after 2018, this doesn’t necessarily mean that they’re the waterproof kind. 

The best way to know how to care for your particular floor is by referring to the manufacturer’s care and maintenance guidelines. These come with the purchase of every box of flooring. 

Of all the manufacturers’ guidelines for care and maintenance that we were able to find, none specified the use of a steam mop as the primary cleaning method. 

However, they did specifically call for dusting followed by damp mopping if necessary to clean laminate floors. 

if your floors’ manufacturer’s guidelines call for a specific method, then this is the method to use. Deviating from it could void the warranty.

Unless they’re somehow defective, how well your laminate floors hold up and how long they last are up to you. Following the manufacturer’s guidelines offers the best chance of having floors that last as long and look as good as they should. 

Here’s How To Use a Steam Mop on Waterproof Laminate Floors

  • Be sure to set your steam mop to the lowest setting. 
  • To avoid spots and streaks, dry your floors with a microfiber cloth or dry microfiber mop pad. 
  • The rest of the rules for floor cleaning still apply:
  • Be stingy with water
  • Don’t allow puddling or ponding
  • Clean spills right away
  • Also, damp mopping should still be considered first

What Type Of Steam Mop Can Be Used On Waterproof Laminate Floors? 

Because manufacturers recommend setting your steam mop to the lowest setting, it’s important to use one with a steam control feature. Many steam mops don’t have this. 

Of those that do, here are a few that we like: 

Steam Mops and Laminate Floors: The Bottom Line

As for waterproof laminate, if you long for the good ol’ days, you might also be pleased to know that you can occasionally break out your old mop and bucket. 

For most people, however, this option is not a selling point. If you ask around, you’re sure to find that of all household chores, floor cleaning is the least popular.  

If your laminate floors aren’t waterproof, steam mopping is risky and unnecessary. 

Yet, if they are waterproof, steam mopping is acceptable, but it’s still unnecessary. 

Either way, dusting, and occasional damp mopping are all that’s required to keep any type of laminate floors looking their best. 

After all, easy care is one of the biggest reasons for their popularity. 

If you think about it, house cleaning is tough enough and there will always be plenty of it to last a lifetime. So when a break like this comes along, instead of adding to the load unnecessarily, why not simply enjoy it? 

The last thing you expect to happen when looking at your newly laid surface is to spot a few planks of your laminate floor coming apart. Especially if you were hoping to enjoy a gleaming expanse of wood-like flooring for the near foreseeable future without any hiccups..

So what steps would you need to take to resolve the issue? Find out all you need to know about how to fix laminate flooring that is separating, right here.

laminate floors separated after 18 months

Why Are My Laminate Flooring Separating?

There are a number of reasons why gaps are appearing on your laminate floor. Some of the most common of them are:

Changes in temperature and humidity

Laminate flooring is affected by changes in temperature and humidity just like wood floors are. Laminate floors contract & expand as their values decrease and increase.

Ambient humidity levels should be maintained between 30 – 60 percent. If they fall outside these limits,  your laminate flooring planks may start to separate.

Problems with interlocking

Laminate floor planks have a click and lock system. If they do not interlock properly, they may separate later on once the floor has been installed.

This issue is generally caused by the presence of debris in the groove system, or a faulty tongue or groove.

Failure to acclimatize flooring

Like wood flooring, laminate boards need to be acclimatized before being installed.

This can be done by leaving the flooring in its container in the room in which it is meant to be installed for a minimum of 48 hours.

Unprofessional installations

There are several issues a non-professional or first-timer may overlook when installing a laminate floor.

For example, they may not leave an expansion gap; they may also fail to notice that the subfloor is uneven, and is therefore unsuitable for having laminate flooring installed over it.

An uneven subfloor

Installing your laminate flooring over an uneven subfloor can actually affect the interlocking mechanism of the boards and cause them to separate, later on.  

As a result, it is important for you to check the level of the subfloor before you begin the installation process.

How to Repair Separating Laminate Floors 

Fixing laminate planks that are separating is a straightforward affair. Below we have provided the items you will need and the steps you will have to follow to reconnect laminate floors in order to close up any gaps. 

Items you will need:

  • Floor gap fixer
  • Mallet
  • Clear wood glue (optional)
  • Putty (optional)
  • 180 grit sanding paper (optional)

1. Clean the Gaps

Using a vacuum cleaner clean up any debris between the gaps you are about to fix and then wipe the planks clean with a damp cloth.

Doing so will eliminate any lingering dirt or particles which might prevent the boards from fitting together perfectly.

2. Apply the Floor Gap Fixer

Select the first plank you need to work on. You will need to ensure you work outwards away from the closest wall. (This is important since any outstanding gaps which remain once you have moved separated planks close to each other,  will be closest to the wall where they will be less noticeable.)

Next, place the floor gap fixer one inch from the gap (ensure you have removed its adhesive strip first of all).

Using your mallet, give the end of the floor gap fixer a sharp tap until the gap between the two boards is closed completely.

You will need to ensure you maintain a firm grasp on the gap fixer during the process.

You may need to give a  few taps before the board fits snugly against the one in front of it.

However, you should take special care not to strike the gap fixer too hard with the mallet.

3. Apply an Adhesive

You may also be able to add glue to the tongue and groove of the planks you intend to join using a cotton swab or a toothpick. You will need to promptly push the boards together, and wipe away any excess glue.

Alternatively, you will also be able to use putty in place of glue. However, you will need to sand it down with sandpaper (at least 180 grit) once it is dry. 

Using an adhesive is optional but can serve to decrease the likelihood of any gaps reoccurring in the future.

separating laminate floors

How to Keep Laminate Floors From Separating

There are a number of precautions you can take to ensure your surfaces will remain in excellent condition once they have been installed. Below, we examine what they are and how to keep your laminate floors from separating.

Regulate humidity levels 

Humidity levels should be monitored carefully ensuring they do not fall outside the range of 35 – 55%.

Hygrometers are particularly useful instruments for measuring these values.

It is also important for you to ensure that you use dehumidifiers during warmer summer months when humidity levels are likely to rise (air conditioning can also help as well since it has a similar effect).

During colder months when humidity levels tend to fall, you may need to use a humidifier instead to prevent them from falling and your floors from shrinking as a result.

Ensure proper installation

Although laminate flooring is comparatively easy to install, special care must be taken to ensure the appropriate steps are followed in each instance. 

This is because different manufacturers provide varying tongue and groove systems (for example, certain varieties of laminate flooring can be installed without the use of a mallet). Failing to follow the correct procedure might not only damage the planks and possibly result in gaps, but also void your warranty.

It is possible to order sample boards and practice with them.  Doing so can enable you to get the hang of working with your flooring efficiently and decrease the likelihood of any possible hiccups occurring during the installation process.

Acclimatize your flooring

During the manufacturing and storage process, your laminate flooring would have gotten exposed to varying levels of temperature and humidity.

Acclimatizing it will enable it to become accustomed to the ambient humidity and temperature in your home.

Generally, laminate flooring should be left in its original packaging on the floor of the room in which it is meant to be installed.

The process usually lasts for a maximum of three days (and a minimum of two), unlike solid hardwood flooring which can take as long as one week.

Failing to acclimatize your laminate flooring may result in your warranty being voided.

Enlist the services of a professional 

Although laminate flooring is pretty easy to install, getting a professional can turn out to be beneficial in the long run. Especially if you are unacquainted with the procedure yourself.

A professional will be more skilled at cutting boards to fit irregular shapes and laying diagonal flooring, for example.

Examine your subfloor before installation 

Before installing your laminate flooring, you will need to ensure that the available subfloor is appropriate for it and is in excellent condition.

Subfloors of carpet or glued vinyl, for example, are unsuitable for laminate flooring, while concrete, plywood, or tile, on the other hand, are ideal options for surfaces in this category.

It is also important for the subfloor to be level. Irregular subfloors can be made so by the use of self-leveling compounds or a floor grinder or sander. The services of a professional may be required if the structure happens to have more than a few irregularities.

Conclusion

Gaps in laminate flooring can easily be rectified by means of a straightforward, inexpensive procedure.

However, care should be taken to work towards the center of the room to ensure any outstanding gaps end up closest to the wall where they will be least noticeable.

Taking the appropriate preventative measures before installing your flooring, such as ensuring the subfloor is of a suitable material and is level can significantly lower the likelihood of gaps occurring.

The best laminate floors can represent quality meant to last. Thanks to their wear layer, they are not only resistant to fading from sunlight but are also resistant to wear and scratching.

However, no floor, irrespective of how expensive it is, is completely resistant to the claws of your furry friends, a fork being wielded by a toddler, or that huge bit of grit stuck beneath one of your preschooler’s sneakers.

Thankfully, minor scratches on your laminate floor do not have to be permanent. Here we will show you how to remove scratches from laminate flooring using simple techniques and inexpensive items which can have your surfaces looking just the way you love them, in no time at all. 

scratch on laminate floor

How to Remove Scratches From Laminate Flooring

The first thing you will need to do before applying any of the options provided below is clean the affected area and leave it to dry.

Once your floor is ready, you will be able to use colored putty, pencils, markers, burn-in sticks, or even oil to get rid of the blemishes on your floor. The first three items are often provided as part of a laminate floor repair kit or can be purchased separately.

We have provided detailed steps on how to proceed below.

1. Burn-In Sticks

These products can be used for shallow scratches. However, they require a burn-in knife or flameless heat gun to melt them.

Once the tip starts to gleam, you will need to apply it to the scratch. You will then need to scrape off the excess with a hard flat object such as a credit card, and then buff your floor.

2. Colored Putty

This method is best used for removing scratches that are somewhat larger but do not necessitate the removal of the affected board.

You will need to apply some of the paste to the scratch you wish to conceal, using a putty knife.

You will also need to remove any excess quantities using the knife and then use a cloth to buff the floor.

3. Home Remedies

If you happen to be dealing with a particularly superficial scratch, you will be able to use some oil applied to a cloth to conceal it by rubbing it gently. Coconut or olive oil will be suitable in this instance.

4. Pencils and Markers

Options in this category are ideal for removing minor scratches. When using either option, you will need to ensure that the color is an exact match for your floor. You will then need to gently apply the pencil or the marker across the scratch until it is completely concealed. 

Once it becomes indistinguishable from the rest of the plank, you will need to stop as continuing may leave a darker trace on the board. Finally, you will need to use a clean cloth to buff the floor.

(Both pencils and markers happen to contain the same material and are effectively the same thing in different forms.

Those used for wood floors will also work perfectly on your laminate floors and you will be able to use them instead if you already have one available in the color and shade that you need.)

5. Wax Sticks

This alternative is ideal for the deepest scratches on your laminate floors. It is actually possible to mix colors when using them to obtain the perfect hue for your floor. 

Once you have gotten the color you want, you will simply need to apply the product you have purchased following the manufacturer’s instructions and wait for it to dry.

6. Replace Affected Planks

If the scratch happens to be particularly deep, you may need to remove the affected planks and replace them with alternatives from your surplus supply.

You will be able to do so by removing the base molding, working your way toward the damaged plank, and removing the other boards in front of it. You will also need to replace it with a brand new board and replace the other planks which are in excellent condition, and finally, put back the base molding.

If you happen to have glued your planks, you may need to cut out the damaged board. However, it is worth noting that a fair amount of skill will be required to do so and you may need to call on a professional to carry out the procedure.

Best Laminate Flooring Scratch Removers 

There are several products in this category that can be used to restore a uniform, even appearance to your laminate floors. Some of the most effective of them have been provided below:

1. Katzco Repair Kit 

This wax stick and marker laminate floor set comes with an impressive variety of colors that you will be able to blend to obtain the ideal hue for your floor. (The manufacturer has also provided a color matching guide to assist you in this regard.)

The markers are quick drying ensuring the process of repairing scratches will be completed as soon as possible, providing you with an even, scratch-free surface.

Just small quantities are needed, ensuring you will be able to make use of it for as long as possible, and any repaired spots will be virtually indistinguishable from the rest of the floor.

2. Fortivo Repair Kit

With this repair kit consisting of putty and stains, you will be able to take care of moderate scratches on your laminate surfaces.

Color matching support is also provided to ensure you get it perfectly right.

There are also clear tips provided by the instruction manual, which will enable you to take the right steps towards achieving a floor that seems almost brand new. 

3. Mohawk Quick Fill Burn-in Stick

This burn-in stick is nimble enough to get into small cracks once heated. It will also set impressively firmly as well once it has cooled. You will also be able to remove any surplus with ease using a credit card.

Special care should be taken to select the right color before purchasing.

How to Prevent Scratches on Laminate Flooring

Protective measures can go a long way towards preserving the sheen of your laminate floor and preventing the occurrence of scratches which can mar its elegance.

Here are a few cost-effective methods that will enable you to protect your floors:

1. Using Rugs and Runners

These features are great for enabling your laminate floors to better handle the inevitable wear and tear of high traffic areas, energetic kids, and playful pets. 

What’s more, they can also serve to enhance your decor ensuring you get to enjoy additional benefits for placing them around your home.

2. Doormats

Placing doormats outside and inside entrances to your home can protect your floors. External rugs will remove most of the grit and those used in the interior will protect your floors from any lingering debris, while also serving as a spot at which visitors and residents alike can leave their footwear.

3. Furniture Protection Pads

Placing felt furniture protection pads beneath the legs of your tables, stools, and chairs can significantly reduce the risk of scratches and dents on your laminate floors. Heavy-duty felt pads with a firm adhesive grip are highly recommended.

However, the presence of these pads does not mean that you should permit your furniture to be dragged rather than lifted.

(Furniture protection pads should also be replaced three times a year.)

Conclusion

Owing to an abundance of cost-effective remedies, scratches on laminate floors happen to be an issue that is generally easy to resolve.

Taking protective measures as an extra precaution can also go a long way in reducing the risk of such blemishes affecting the surfaces in your home, ensuring they can effectively enhance the elegance of your living space, as a result.

Despite being a more functional option compared to hardwood flooring in terms of cost, ease of installation, and resistance to water and staining, laminate flooring can be affected by certain issues.

One of these is bubbling. But what is it and how can you resolve it when it occurs? Find out right here where we discuss how to fix laminate floor bubbles in detail.

What Is Laminate Floor Bubbling?

Laminate floor bubbling refers to a condition that causes small parts of surfaces in this category to rise up close to the seams or at the center of planks, giving the impression that your floor is peeling slightly.

bubbling in laminate floor

Causes of Bubbling in Laminate Flooring

1. Excessive Moisture in the Air

The presence of excess moisture in the air may cause bubbling in laminate floors. This could occur during the summer, or even if you happen to live in excessively humid areas.

This issue could also be further exacerbated by a lack of adequate ventilation as well.

2. Neglecting Spills

Spills should be cleaned up instantly since laminate floors are not waterproof. Failure to do so could result in your surfaces bubbling. 

3. Using the Wrong Cleaning Methods and Products

The use of mops (either those of the manual or steam variety) can result in excess water seeping into the laminate floor and causing the layers of the plank to separate. This issue can also be caused by using the wrong cleaning products which may affect the adhesive used to hold the layers together.

The loosening of the glue may result in the veneer layer being separated from the plank which may manifest as bubbling. (This separation is also referred to as delamination and may also be caused by low-quality laminate products.)

4. Lack of an Expansion Gap

Laminate floor planks are not meant to be in contact with the walls of a room, stairs, or cabinetry.

Failure to provide an expansion gap between the planks and these components when the laminate floor is installed will result in the planks pushing up against each other during the onset of warmer weather possibly resulting in bubbling in the surface.

Leaving an expansion gap bigger than the recommended size can also lead to issues. 

5. Failure to Take Required Precautions With the Subfloor

Concrete subfloors are not impervious to water and due to their porous nature, moisture will seep through them.

If laminate flooring is installed without permitting an adequate curing period for the subfloor or without the presence of a suitable vapor barrier, it may cause moisture-related issues such as bubbling or buckling in laminate floors.

How to Fix Bubbles in Laminate Flooring?

There are several options for repairing bubbling in laminate flooring which each depend on the cause of the issue. As a result, you will need to examine the floor to determine the reason for the bubbling and select one or more of the appropriate solutions provided below:

1. Check the Extent of the Damage

If only a single plank is damaged, you will simply need to remove the molding, and then the planks from the wall, until you get to the affected plank. You will then need to remove the damaged board and replace it with another from the original batch. 

If the bubbling is more widespread, you may need to replace the entire surface since the issue is likely to be due to the floorboards being of poor quality.  

2. Provide an Expansion Gap

Are the walls level with the laminate floor planks or do they even slightly overlap them? To resolve the issue, you will need to remove the molding and cut a gap of at least a quarter of an inch to provide sufficient space to allow for the expansion of the floors during warmer weather. (The larger the surface of the laminate floors, the larger the gap will have to be.)

To cut in straight lines you will need a circular saw while a jigsaw will do for circular contours. 

A degree of skill is required to cut laminate flooring and so you may need to rely on the services of a professional.

Once you have provided the expansion gap and replaced the molding, you may need to place weights on any uneven planks to restore the smoothness of your floor.

3. Cut Through Bubbles on Planks

It is possible to cut and glue bubbles on planks. You will require the following tools:

  • A sharp knife
  • Wood glue

You will also need to:

Cut a slit through each bubble

For each affected plank you will have to make an incision through every bubble.

Apply the wood glue

Wood glue can stain the flooring and so care will need to be taken when applying it. You will need to squeeze a small amount through each incision and smoothen it. 

A weight should be applied for 24 hours to give the wood glue time to dry.

4. Glue Delaminated Wear Layers

Loose wear layers can be fixed by gluing them. You will need the following tools:

  • Putty knife
  • Wood glue
  • Clamps
  • Compressed air

For each affected spot on each plank you will have to do the following:

Apply compressed air beneath the delaminated layer

This can be done by inserting the blade of the putty knife beneath the wear layer and applying the compressed air. Doing so will enable you to ensure it is clean enough to apply the glue.

Apply the wood glue

You will have to apply the adhesive while taking care to hold the layer up with the knife and press a small quantity of wood glue beneath the topmost layer of the plank.

Clamp the planks

You will have to apply the clamps to the parts of the planks to which glue has been applied making them pretty tight.

You will also need to leave the clamps in place for 24 hours which is the period the wood glue will need to dry.

Preventing Laminate Floor Bubbling

Laminate floor bubbling can be prevented by taking the following precautions:

1. Installing Moisture Barriers

Moisture barriers with a minimum of 6mm must be installed above concrete subfloors. If you live in particularly humid areas, you will need to ensure they are at least 12 mm thick.

2. Using the Right Cleaning Methods

Excessive amounts of water should be avoided when cleaning since, it will penetrate the planks and subsequently damage them.

Acidic cleaning agents such as vinegar are also unsuitable   for laminate floors since they will affect the glue holding each plank together and cause loose veneers.

3. Making Use of Dehumidifiers 

This is especially important during summer when humidity can be rather high. Switching on your air conditioning units can also help to reduce moisture levels in the air and reduce the risk of any resulting damage to your floors.

4. Pay Close Attention to Humidity Levels

The recommended levels of humidity for laminate flooring range between a maximum of 60% and a minimum of 30%. Ensuring humidity is maintained between this range will enable you to protect your floors from the risk of any damage from excess moisture in the air.

FAQs

Can I repair swollen laminate flooring without replacing it?

It will depend on the underlying cause of the swelling. When laminate flooring swells due to the presence of excess moisture, it will not regain its original size back even when dried. Under such circumstances, it is best to replace the affected part of the floor.

However, if the swelling in the floor planks is due to the use of glue to install them, the issue would ordinarily be resolved when the moisture from the adhesive dries out (this should take about a month). There will be no need to replace the boards in this instance.

What parts of the home are the least suitable for laminate floors?

Parts of your house that will see a great deal of moisture are the least suitable for laminate floors. This includes kitchens, bathrooms, mudrooms, basements, and covered porches. It is best to opt for more water-resistant flooring choices such as ceramic tiles or vinyl instead.

How can I get rid of water under laminate flooring?

Simply remove the boards and remove the excess water using a wet vacuum. Next, allow it to dry out completely. 

However, it is worth noting that the water may actually extend to other areas,

You may need to call on the services of a professional to ensure they are able to detect any further damage and thoroughly eliminate any excess moisture present, forestalling any risk of mold or mildew.

Conclusion

The main cause of bubbling in laminate floors is moisture although it may also be caused by poor quality flooring or the lack of an expansion gap.

It can easily be fixed by using wood glue, replacing the entire surface (in the case of widespread damage), or cutting an expansion gap.

Like the most bothersome issues, buckling in laminate floors seems to almost happen overnight. One moment, all seems right with your laminate floor and the next, it seems to be doing its very best to defy gravity. 

What could be the cause of that unwelcome rise right in the middle of your living room floor? Can it be rectified? If so, how to fix buckling in laminate floors?

We’ll discuss in detail each of these questions along with preventing buckling in laminate floors.

What Is Laminate Floor Buckling?

Laminate floor buckling is a condition that causes laminate floors to take on an uneven appearance due to their planks seeming to lift and split. This results in raised ridges at specific points on affected laminate floors.

laminate floor buckling

Why Do Laminate Floors Buckle?

Moisture and changes in temperature are two of the main causes of buckling in laminate floors. Quite often, the problems they cause in this regard could be as a result of the following issues:

1. Failure to clean spills on time

Although laminate flooring may possess some moisture resistance, it is not completely moisture-proof. Hence any spills should be cleaned promptly. Leaving any spills for long periods could result in moisture seeping between the floor planks, damaging them as a result.

2. Inappropriate cleaning methods

Laminate flooring is not meant to be cleaned with copious amounts of water or with a steam mop. Doing so will ensure moisture can reach the core of the planks and cause damage to them.

3. Lack of a moisture barrier

This is especially the case when installing flooring over a concrete surface. This subflooring secretes moisture over time which can affect the laminate flooring installed over it, resulting in swelling in the planks.

4. Lack of expansion gaps

Laminate floors tend to contract during colder weather and expand during warmer weather. As a result, it is important to leave expansion gaps during the installment process to accommodate such changes. Failure to do so will result in buckling when floor planks expand against each other in the absence of sufficient room for their new sizes.

5. Installing the wrong type of flooring

Not all laminate floors are suitable for rooms exposed to a great deal of moisture (such as kitchens, mudrooms, and bathrooms). Using the wrong variety which is especially susceptible to water can result in buckling.

6. Failure to acclimatize flooring

Like hardwood and vinyl flooring, you need to acclimatize laminate flooring so that it can adjust to the temperature and moisture levels of its surroundings.

To do so, you will need to leave the flooring in its packaging, lying flat on the floor for a minimum of 48 hours, in the room it is to be installed in.

How To Fix Buckling In Laminate Floors?

Buckling in laminate floors can be fixed. However, different measures may be required depending on the nature and the extent of the damage.

As a result, you will need to take the following steps:

1. Ascertain the source of the moisture

You will need to first ensure that the buckling is not being caused by leakage of some sort. For example, if the flooring surface in your kitchen happens to be affected, you will need to ensure that it is not a result of any leaking pipes or appliances.

If you happen to have a concrete subfloor, you will need to ensure that a vapor barrier has been installed to protect your laminate planks from any moisture which may seep through the concrete.

You will also need to wipe any spills which may have been left unattended.

Once you have done so you will need to switch on your dehumidifiers. However, it is worth noting that while dehumidifying the affected area may resolve the issue if it happens to be minor, you may need to implement one or more of the following steps presented below in the event of the damage being somewhat more extensive.

2. Replace part of your floor

If a relatively small part of your floor happens to be affected, you will need to remove the damaged portion by implementing the following steps:

  • Remove the molding closest to the part of the floor which needs to be replaced.
  • Remove the tongue of each plank from the groove of the one closest to it, and then remove the segment of laminate flooring. (This should be repeated  until you get to the damaged part of the floor, and you should discard any planks which happen to be damaged.)
  • Replace the damaged planks with boards from the new batch, locking them as you proceed to the molding (simply locking in any planks you have retained to their former position as well). Special care should be taken to ensure that an expansion gap is left to prevent buckling in the future.
  • Tap the planks with a hammer and a wood block to ensure they are firmly set.
  • Replace the molding.

It is also possible to saw off the affected part using a circular saw and tape, however, this method is somewhat more complex and may require the services of a professional.

The possibility of having to replace part of your floor means that ordering surplus quantities is always recommended. If not, you may have to order another batch if possible.

3. Provide an expansion gap

If the issue is caused by the lack of an expansion gap, you will need to remove the molding. You will also have to create the gap using spacers and cutting out part of the floor close to the walls. The minimum recommended size for an expansion gap is a quarter of an inch. Also, make sure that the expansion gaps left when installing your floor aren’t too big.

The molding will need to be replaced following the procedure.

How To Prevent Buckling In Laminate Floors?

Unlike hardwood flooring, laminate flooring cannot be sanded. It will also not return to its original state when dried in the event of sustaining significant water damage. As a result, taking special precautions to protect your floor is rather important. Here are how you will be able to do so:

1. React promptly to spills

Any spills should be promptly cleaned up. If necessary, you may need to use a wet-dry vacuum to ensure as much water as possible is removed from the seams.

2. Check plumbing and appliances regularly

If you have installed laminate flooring in kitchens or bathrooms, you will need to regularly check the plumbing in those rooms to ensure it is in peak condition. Potential problem spots such as toilets, sinks, and heaters should be inspected closely.

You will also need to inspect your appliances as well, to ensure none of them happens to be leaking, constituting a buckling hazard as a result.

3. Opt for other flooring surfaces where possible

Although laminate flooring is more water-resistant than hardwood, it is by no means waterproof.

Hence, installing it in rooms where spills and leakages are more likely to occur, will significantly increase the risk of buckling.

As a result, opting for waterproof options where possible is highly recommended. It is actually possible to obtain high-quality vinyl flooring which will enhance the esthetic quality of your kitchen, shower room, and mudroom.

4. Choose the right kind of flooring

If you are intent on installing laminate flooring in rooms where a great deal of water is used, you will need to ensure you select a water-resistant variety.

You will also need to take special care during installation to ensure that the seams are as tight as possible.

It may also be possible for you to use a polyurethane laminate floor sealant for the entire floor. 

However, it is also worth noting that doing so may actually void your warranty and so you will need to pay close attention to the manufacturer’s stipulations in this regard before proceeding with this step.

Some things are meant to go hand in hand together, laminate floors and wax, however, do not belong to that select category. 

So what do you do when you find out that your other half, your babysitter, or soon-to-be least favorite cousin has decided to provide an extra touch of shine to your laminate floor, using either floor wax to give it a pleasant polish, or a floor cleaner which contains the substance? 

How do you handle the inevitable dullness which sets in making your floor which you were once so proud of seeming as though it needs an immediate and thorough clean?

How can you get rid of all that wax and enjoy a pristine laminate floor once more? 

Find out what you will need and what steps to take to have your floor cleaned to a state of perfection once again.

wax buildup on laminate floors

How To Remove Wax Buildup From Laminate Floors

Things You’ll Need

Removing wax buildup from laminate floors is an undertaking that is likely to require a great deal of elbow grease on your part. Having the right items for the task, however, can ensure all that effort yields rich dividends.

Here are the items you will need to rid your floor of the coating of wax covering it:

  • Hairdryer
  • Plastic drywall scraper
  • Bucket
  • Water and vinegar (for your homemade cleaning solution)
  • Clean cloths
  • Vacuum cleaner

1. Vacuuming Your Floor

This first step will make the entire process easier by removing any lingering debris. You will need to ensure that you do not use the beater bar or rotating brush during the procedure since doing so may result in the floor getting covered in scratches. 

2. Soften the Wax

Wax can be softened by applying heat to it and doing so will make the entire process of removing the wax buildup from your laminate floor easier. 

However, steam mops are not a suitable option for surfaces in this category since manufacturers usually do not approve of using them on floors that have not been completely sealed. 

Using them on laminate floors does mean that the moisture can seep between the planks and cause damage to your flooring.

Hairdryers are the best option and you will need to set the appliance you intend to use to medium before heating the wax with it.

3. Scrape off the Wax

You will need to use your plastic hand scraper to remove the softened wax. For the best results, you should draw the tool lengthwise down the planks. 

Working across their width may not only cause smears but also cause the accumulation of wax between the planks.

A metal scraper should never be used in place of a plastic one.

4. Wipe off the Wax

Once as much wax as possible has been scraped off, you will need to mix your cleaning solution.

This will involve the following items:

  • 1 cup white vinegar
  • 1-gallon hot water

Simply mix the vinegar and hot water together in a bucket and it will be ready to use.

You will then need to dip a clean cloth in the vinegar solution, wring it and use it to wipe the wax, moving the wet cloth in one direction only. You will also need to rinse the cloth in the solution and repeat.

Alternatively, you may also pour the solution in a spray bottle and spray slight amounts on sections that need to be cleaned.

If you prefer to work from a standing position instead of having to kneel, it will also be possible to wrap the cloth around a microfiber mop head.

5. Buff the Floor

Once you have covered the entire surface, you will need to leave it to dry, allowing a minimum of 30 minutes to elapse.

Any spots should be buffed with a microfiber cloth as doing so will ensure the entire floor will have a uniform gleam at the end of the procedure.

Additional Tips: Removing Wax From Laminate Flooring

1. Use Rubbing Alcohol 

Other than a vinegar and water solution, wax on laminate flooring can also be removed using rubbing alcohol.

Simply apply it to a cloth and use it to clean the wax buildup. (You will need to have scraped the surface first.)

2. Use Mineral Spirits and Paint Thinner for Difficult Spots

What happens when you come across particularly stubborn patches of wax that simply will not budge? Apply mineral spirits or paint thinner to remove them and render your laminate floors wax-free.

3. Use the Hard Floor Attachment

When vacuuming, use the hard floor attachment rather than the beater bar. The latter is meant for carpeting and its bristles rotate thousands of times each minute. Using them on your laminate flooring (or even hardwood surfaces) will result in a dull appearance due to the damage caused to the finish.

4. Use a Store-Bought Solution 

There are store-bought solutions that can also be used to remove accumulated wax from your laminate floors.

Trewax Instant Remover is one such example. Versatile and free of any unpleasant odors, this cleaner manufactured by Beaumont Products is both safe and easy to use and has been proven to be capable of stripping off wax from laminate floors and also getting rid of unsightly footprints. It is also ammonia-free which is an added plus since the chemical is unsuitable for laminate floors.

Additional Tips: Cleaning Laminate Flooring

1. Always Use Manufacturer-Approved Cleaning Products

Using manufacturer-approved products will prevent your floors from taking on a filmy appearance which often occurs as a result of using the wrong sort of cleaning solution. 

It can be especially difficult, or might even be impossible to remove, even when a switch to the right kind of cleaning product is made, hence, it is important to use the right products from the outset.

2. Vacuum Frequently

Doing so will prevent the buildup of debris which can cause scratches on your floor. It will also prevent the likelihood of bits of grit getting stuck beneath footwear or in your mop heads and possibly scratching the finish.

3. Wash Your Microfiber Mops Frequently

Doing so will keep them pristine and ensure they can also keep your floors spotless as a result. 

Fabric softener should never be used when washing your mop heads. Doing so will cause the fibers of your microfiber mops to stick together. 

Once this happens, your floors might take on that hazy appearance even though you use the right kind of cleaner.

4. Read Product Labels Carefully

What happens when you need to choose an alternative cleaner in the event of your go-to, manufacturer-approved floor cleaner being unavailable?

To ensure you select the right kind of cleaner, you will need to read the label carefully to check that it does not contain any wax.